This guide breaks down the key features of the Limiter 2.0, from its sidechain controls to its dual-stage clipping architecture.
And if you want the real unit without buying or racking it, Access Analog lets you control and stream through actual analog outboard gear from inside your DAW using the Analog Matrix.

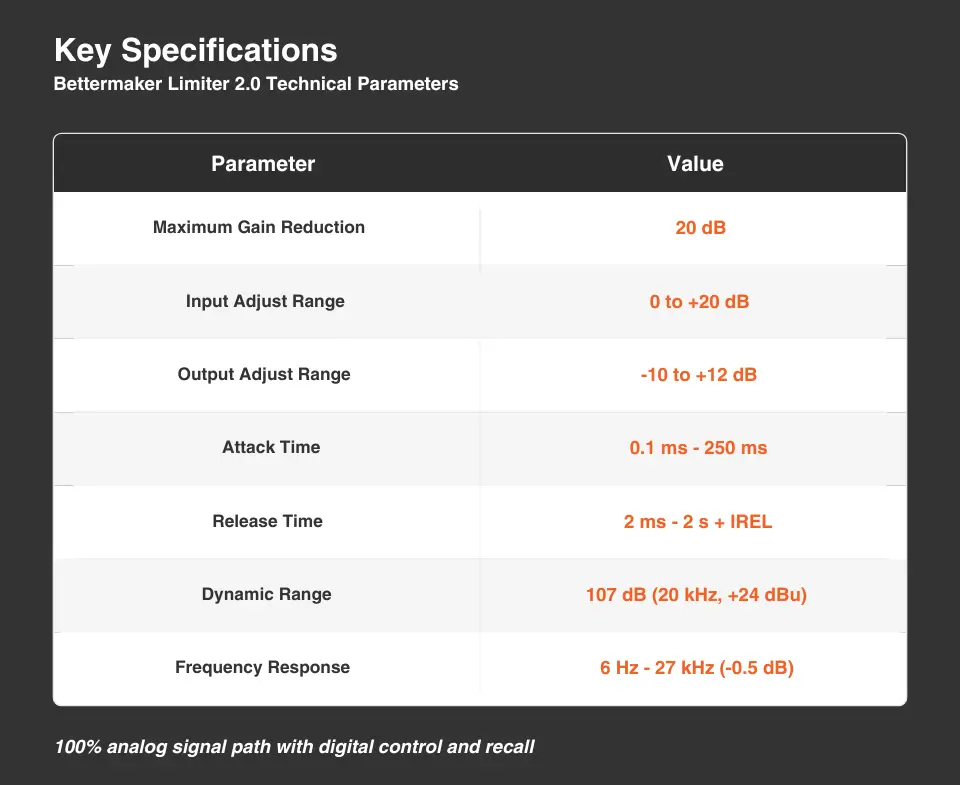
The Bettermaker Limiter 2.0 is built for modern loudness without turning your master into a flat, crunchy pancake.
It delivers up to 20 dB of gain reduction, offers dual-stage clipping (high/low soft clip + trim), and adds a smart sidechain with HPF (20–200 Hz) and mid-boost (8 dB at 2 kHz or 7 kHz) to shape the limiter’s response across the spectrum. On the metering side, it’s designed for real-world mastering decisions with tools like LUFS, K-metering, FFT, and phase analysis.
A limiter is only as good as its ability to get loud without smearing transients or collapsing depth. The Limiter 2.0 preserves what made the original legendary: a 100% analog signal path in which your audio never touches digital conversion until it reaches the metering section. Every tube, capacitor, and resistor in the circuit contributes to the character and transparency of the limiting.
Bettermaker also emphasizes usability features that matter in real sessions, such as flexible release behavior (including intelligent/manual/BPM modes) and linking options designed to keep level moves predictable while you chase loudness.
Why should mastering engineers care? The limiter isn’t just about “volume.” It’s the final decision-maker on punch, vocal density, low-end stability, and whether your mix feels expensive at competitive LUFS. It’s an essential tool for modern mastering.
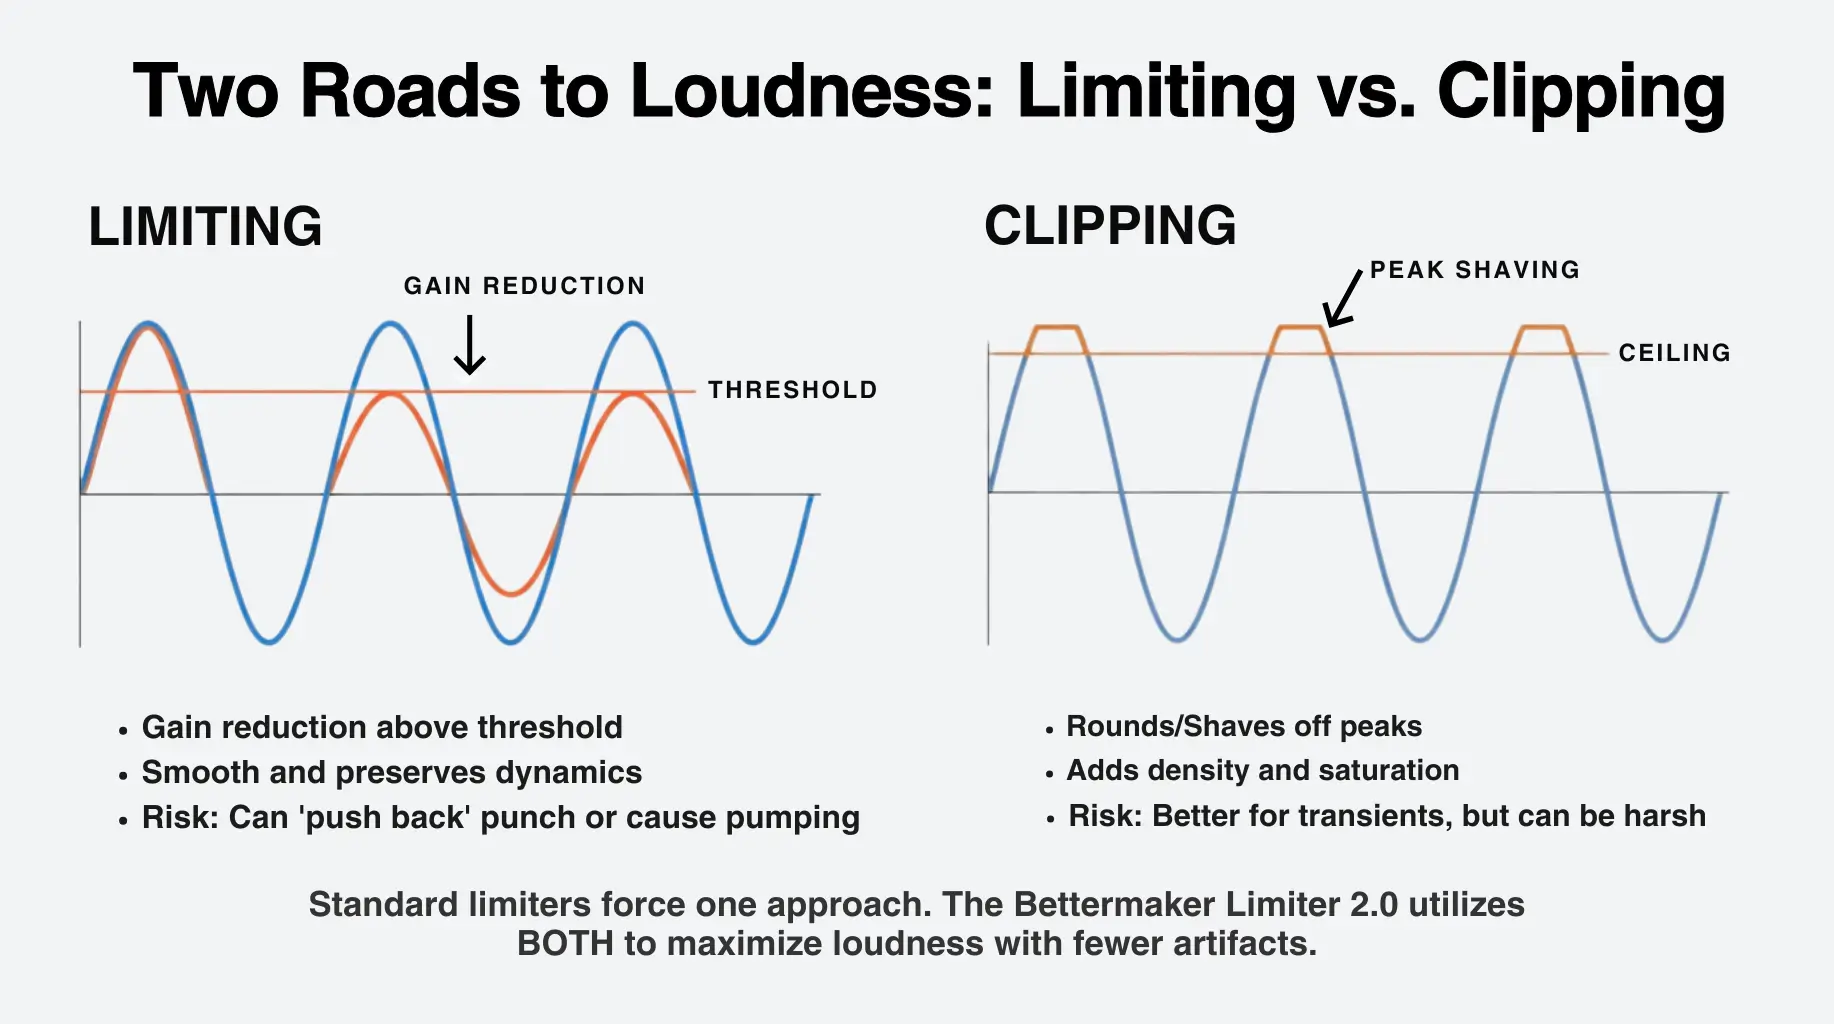
Limiting and clipping are cousins with different personalities.
Limiting: Controls peaks through gain reduction – often smoother, but can “push back” on punch if overdone. A limiter reduces gain above a threshold using compression with very fast attack times and high ratios. It preserves dynamics but can introduce pumping artifacts and alter transient character when pushed hard.
Clipping: Clipping shaves peaks – often punchier, can add edge or density, and can get harsh if unmanaged. A soft clipper takes a different approach: instead of compressing, it gently rounds off peaks that exceed the threshold. This creates subtle harmonic saturation rather than gain-reduction artifacts. The result is increased loudness with less audible processing, particularly on transient-heavy material.
The Limiter 2.0 leans into that reality with a redesigned clipping section built around dual clipping stages – High or Low Soft Clip, plus Soft Clip Trim – so you can decide how peaks are managed, not just how much.
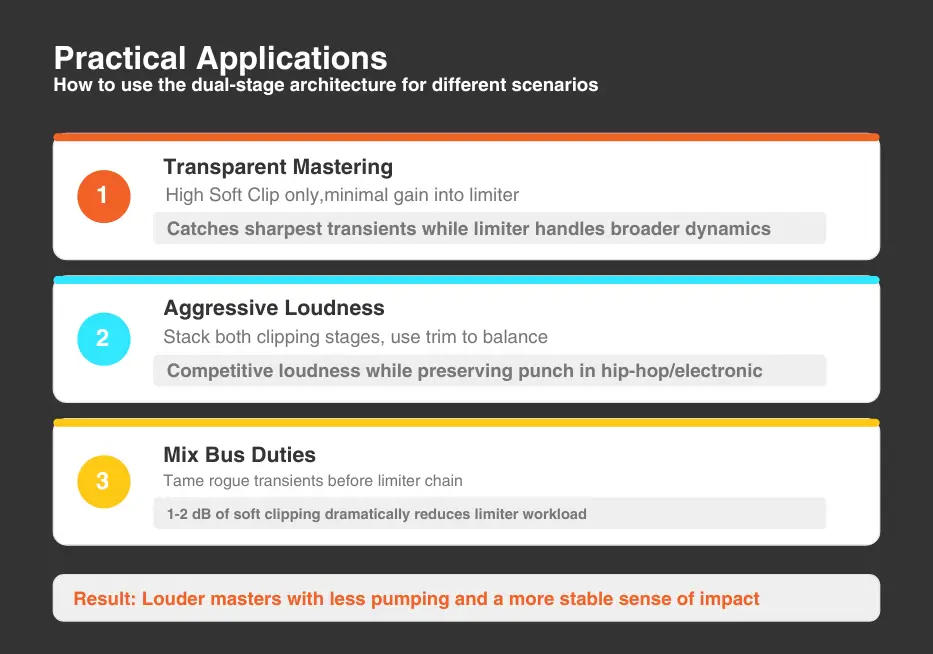
Practical Applications
A standard “one-flavor” limiter can end up doing too much work. With the Bettermaker’s approach, you can:
The dual-stage architecture gives you unprecedented control over how you achieve loudness. This often translates to louder masters with less pumping and a more stable sense of impact, especially in hip-hop, pop, and drum-forward mixes.
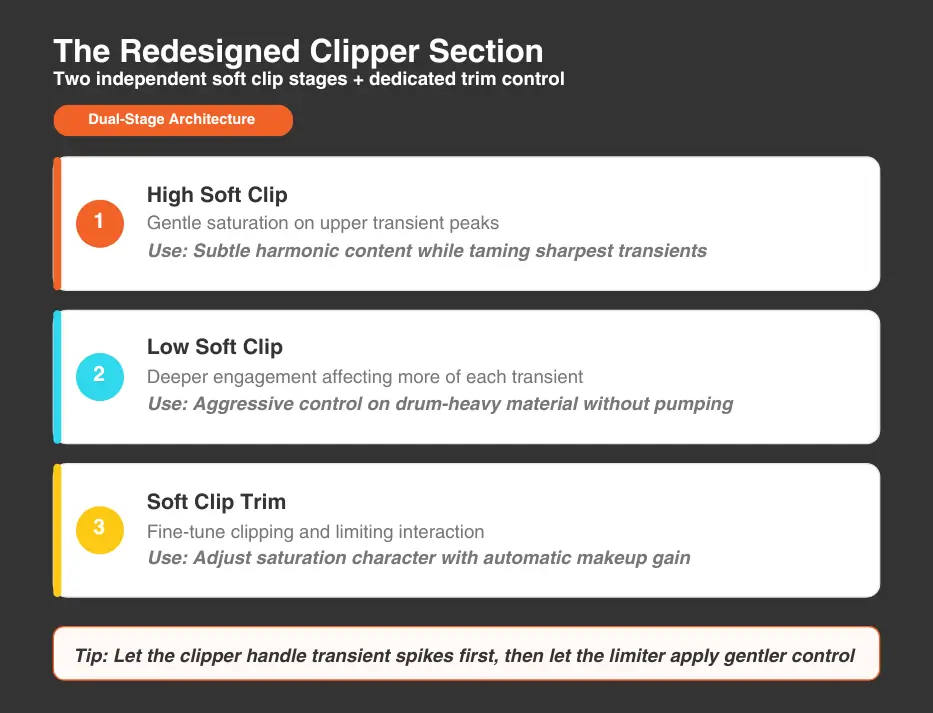
For Transparent Mastering: Engage only the High Soft Clip with minimal gain into the limiter. The clipper catches the sharpest transients while the limiter handles the broader dynamics with minimal load.
For Aggressive Loudness in Electronic or Hip-Hop Productions: Stack both clipping stages and use the trim to balance saturation character with transient preservation. This approach can deliver competitive loudness while preserving punch that pure limiting often sacrifices.
For Mix Bus Duties: The clipper excels at taming rogue transients before they reach your limiter chain. Even a decibel or two of soft clipping can dramatically reduce limiter workload and improve transparency.
If you’ve ever pushed a limiter and thought – “Why is the low end making everything duck?” – you’re already thinking like the Bettermaker’s sidechain.
The sidechain is the detection circuit that tells the limiter when and how much to compress. By filtering what the sidechain “hears,” you can fundamentally change how the limiter responds to your material. The Limiter 2.0 has a sidechain section with two powerful tools.
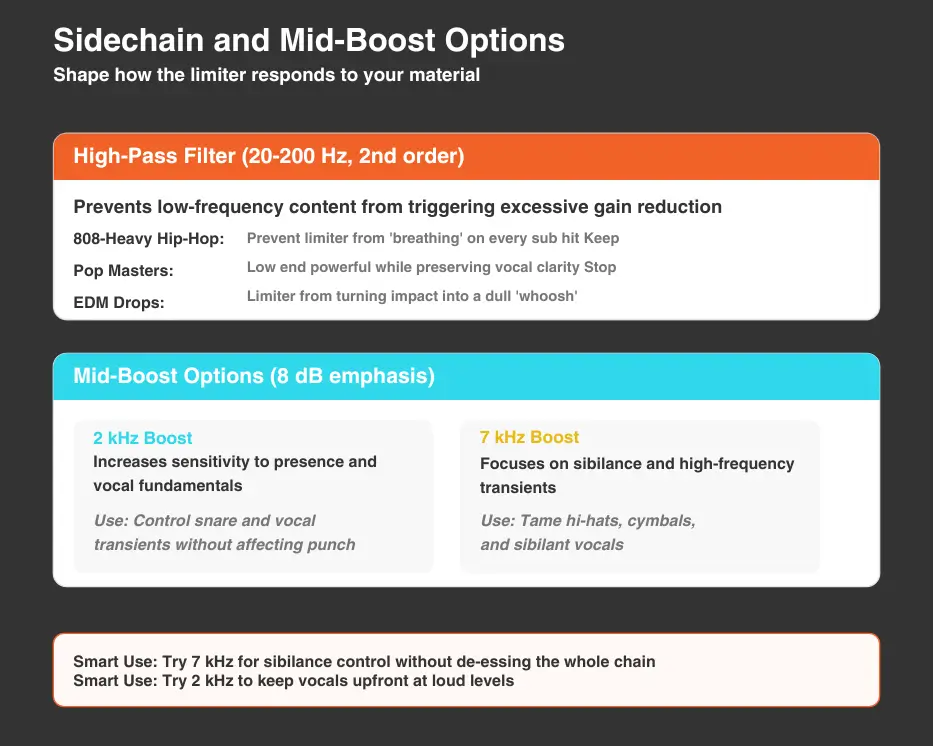
1. The High-Pass Filter (20-200 Hz, 2nd order)
When engaged, the sidechain ignores low-frequency content below your chosen frequency, preventing heavy bass and sub content from triggering excessive gain reduction across the rest of your mix.
This is particularly valuable for bass-heavy genres. Without sidechain filtering, every kick drum and bass note forces the limiter to react, creating audible pumping as the entire mix ducks with each low-frequency hit. The HPF allows those elements to pass through naturally while the limiter focuses on controlling mid- and high-frequency dynamics.
Some Practical Use Cases:
Two Smart Uses:
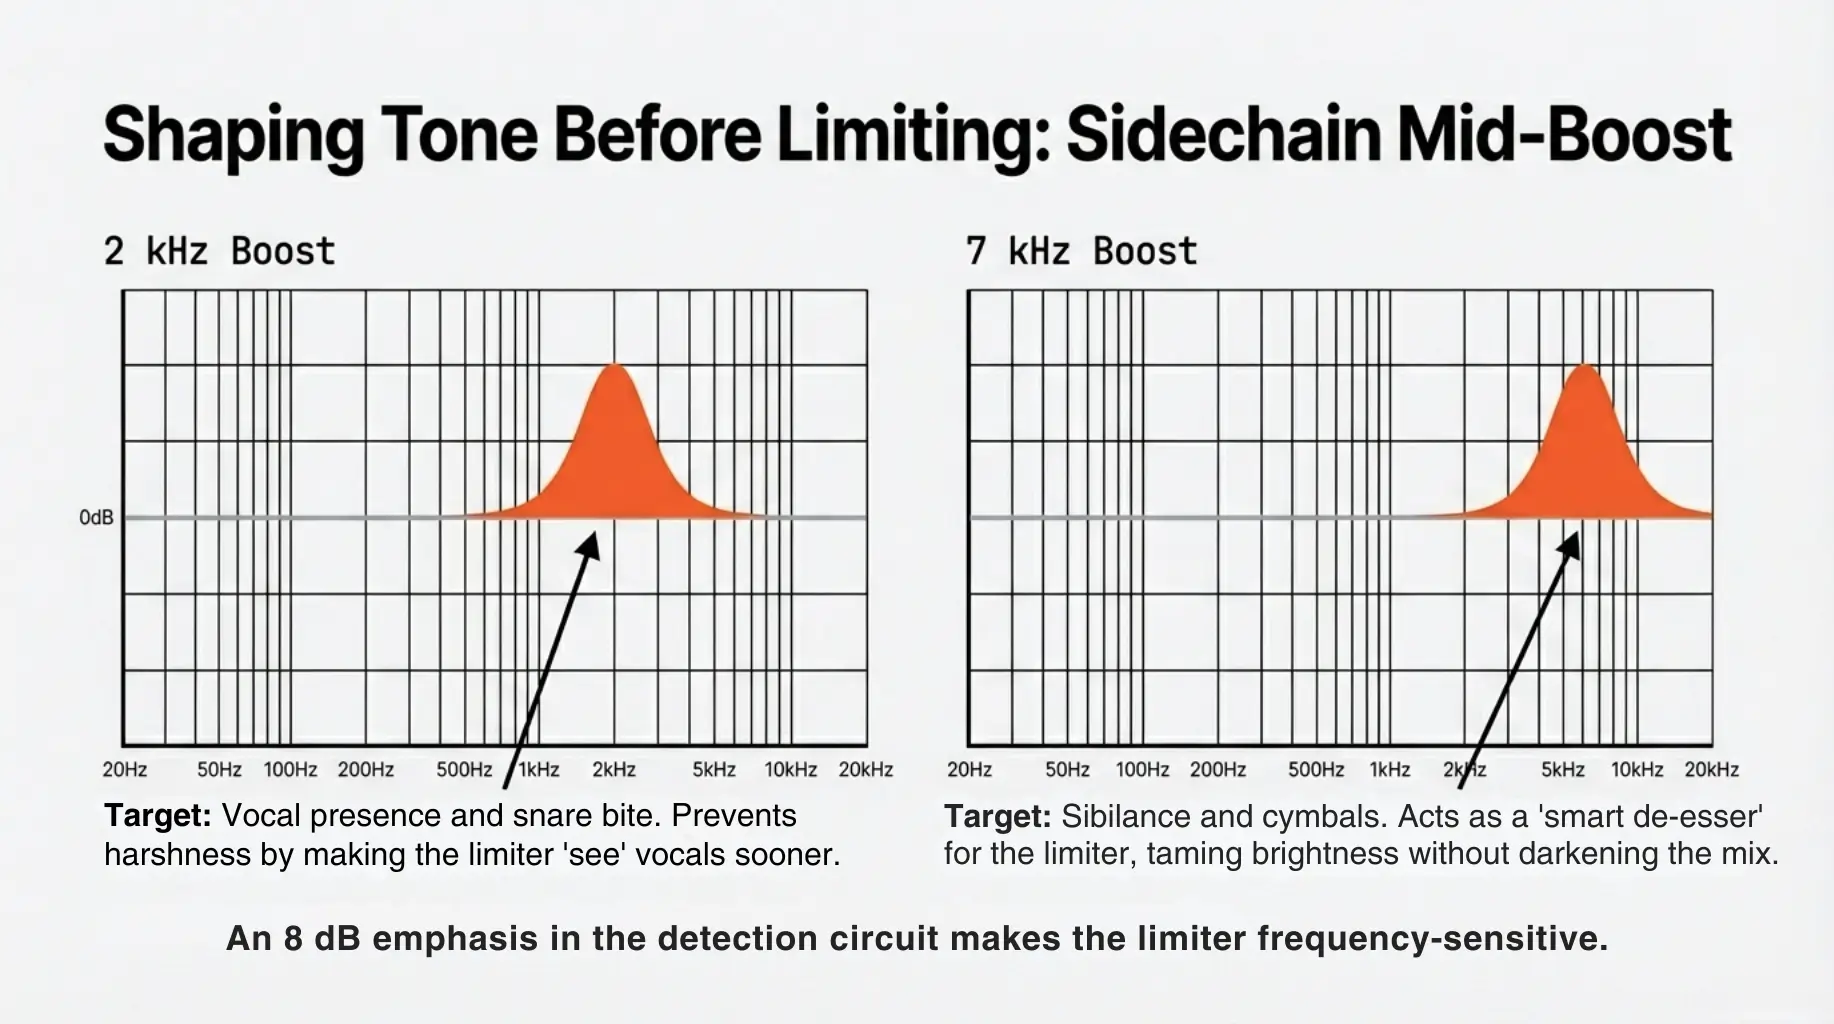
Sibilance control without de-essing the whole chain: Try 7 kHz boost so the limiter “notices” harsh moments sooner, then use less overall gain reduction.
Keep vocals upfront at loud levels: Try 2 kHz boost so presence doesn’t jump out unpredictably when you push loudness.
2. The Mid-Boost Options: 2 kHz and 7 kHz
The sidechain mid-boost applies an 8 dB emphasis at either 2 kHz or 7 kHz, making the limiter more sensitive to energy in those frequency ranges.
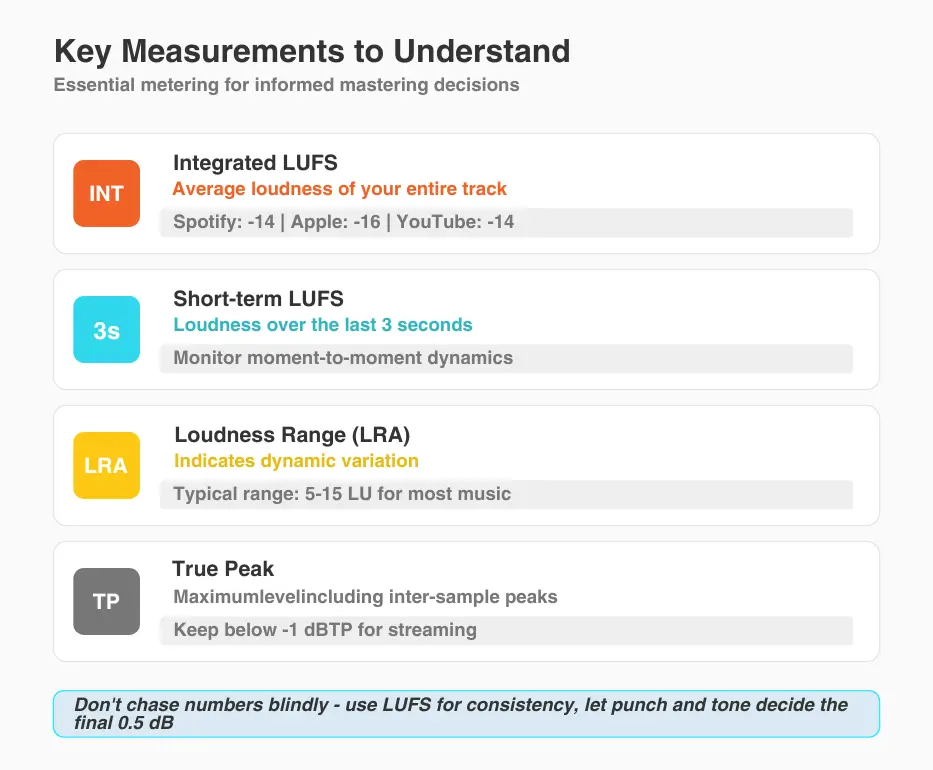
Modern mastering isn’t just ears – it’s ears + measurement. The Limiter 2.0 includes comprehensive metering options, including LUFS, K-metering, FFT analysis, and phase metering.
LUFS (Loudness Units Full Scale): This measures perceived loudness rather than peak levels, making it the standard for streaming platforms and broadcast.
Use LUFS to confirm you’re in the loudness zone you actually want to be in (and not accidentally crushing dynamics to win a meter war you didn’t need to fight).
Tip: Don’t chase a number blindly. Use LUFS to validate consistency across tracks, then let punch and tone decide the final 0.5 dB.
K-metering (Dynamic Perspective): K-metering is a “mix health” view. It’s useful for checking if you’re getting loud because the mix is solid, or loud because you’re flattening it.
FFT (Frequency Balance) FFT helps you spot common loud-master traps like the following.
Using Metering to Guide Decisions
The Limiter 2.0’s metering lets you work toward specific targets while hearing the analog processing in real time.
If you want to use and experiment with the real Bettermaker Limiter 2.0 hardware without the expense of a studio or owing one, Access Analog lets you do it from your DAW. You simply connect through the Analog Matrix and process audio in real time. Below are some practical workflows we recommend.
Clean Loud Master – Fast, Controlled, Repeatable
The Limiter 2.0 excels as the final stage in a mastering chain. The limiter’s clip section can handle transient control that might otherwise require a dedicated clipper plugin, simplifying your chain while keeping everything in the analog domain.
For maximum transparency, start with minimal settings: low input gain, conservative threshold, and clippers off. Increase limiting only until you achieve your target loudness, then decide if the clipping stages would improve transient handling.
Stem Limiting for Drum-Heavy Genres – Hip-Hop, Pop, EDM
Process individual stems (drums, bass, vocals, instruments) through the limiter before final assembly. This distributed approach often achieves higher overall loudness with less audible processing than limiting only the final mix.
Parallel Limiting – Density Without Killing Punch
The variable mix between limiting and clipping creates opportunities for parallel-style processing within a single unit. Heavy clip settings blended with lighter limiting can add energy while maintaining dynamics.
The Bettermaker Limiter 2.0 is about getting competitive loudness without collateral damage. It’s about keeping punch, depth, and tone intact while you manage peaks intelligently.
Lean on the dual-stage soft clipping to catch the nastiest transient spikes first, then let the limiter do the smoother “finishing” work, and don’t forget the sidechain tools (HPF + mid-boost) when the low end or presence is driving gain reduction in a way that changes the vibe.
If you keep your approach conservative – set a clear loudness goal, stabilize the low end with a modest HPF, and verify your decisions with LUFS/FFT/phase metering – you’ll land on masters that sound louder because the mix is better, not because it’s flatter.
And if you want to hear what this unit does on your own material before you commit to buying or racking one, you can run your audio through the real hardware from your DAW via Access Analog and the Analog Matrix.
Try it today. Connect to a real Bettermaker Limiter in the cloud with the Analog Matrix.
Want to learn more? Visit the Bettermaker site to explore its full capabilities and learn why it’s a favorite among audio professionals worldwide.
How does the Bettermaker Limiter’s sidechain affect limiting behavior? The sidechain filters what frequencies the limiter “sees” when deciding how much gain reduction to apply. The high-pass filter (20-200 Hz) prevents low bass from triggering compression on your entire mix, reducing pumping artifacts. The mid-boost options (8 dB at 2 kHz or 7 kHz) make the limiter more sensitive to those frequencies, helping target specific problem areas like harsh presence or excessive sibilance.
What’s the advantage of dual-stage soft clipping compared to a standard limiter? Soft clipping rounds off transient peaks with subtle saturation rather than gain reduction, allowing higher loudness with fewer artifacts. The Limiter 2.0’s dual stages let you choose how aggressively to clip: High Soft Clip for gentle transient taming, Low Soft Clip for more pronounced saturation, or both for maximum loudness with controlled character.
How do the mid-boost options at 2 kHz and 7 kHz help control the sound? The 2 kHz boost makes the limiter more reactive to vocal presence and snare attack, useful when those elements are driving the limiter harder than you want. The 7 kHz boost focuses attention on sibilance and high-frequency transients, helpful for taming harsh cymbals or bright vocals without affecting low-end punch.
What metering options does the Limiter 2.0 provide? The touchscreen displays LUFS (Short-term, Integrated, and Loudness Range), K-metering, 30-band FFT analysis, VU/PPM/RMS/Peak meters, goniometer, and correlation meter. These can measure either the limiter output or the plugin position in your chain, providing comprehensive feedback for informed mastering decisions.
How do I integrate the Limiter 2.0 into a hybrid chain via Access Analog? Insert the Analog Matrix plugin on your master bus, select the Bettermaker Limiter 2.0, and begin processing. Your audio streams to the physical hardware, gets processed through the analog circuit, and returns to your DAW in real-time. Save settings as presets for full recall, and automate any parameter directly from your DAW.