System Overview
User Manual
Equipment Guides
System Reqs
Format
Buffering/Latency
Analog Switching
FAQs
Additional Help
System Overview
System Overview
User Manual
User Manual
Connection: Configure your connection to the equipment server
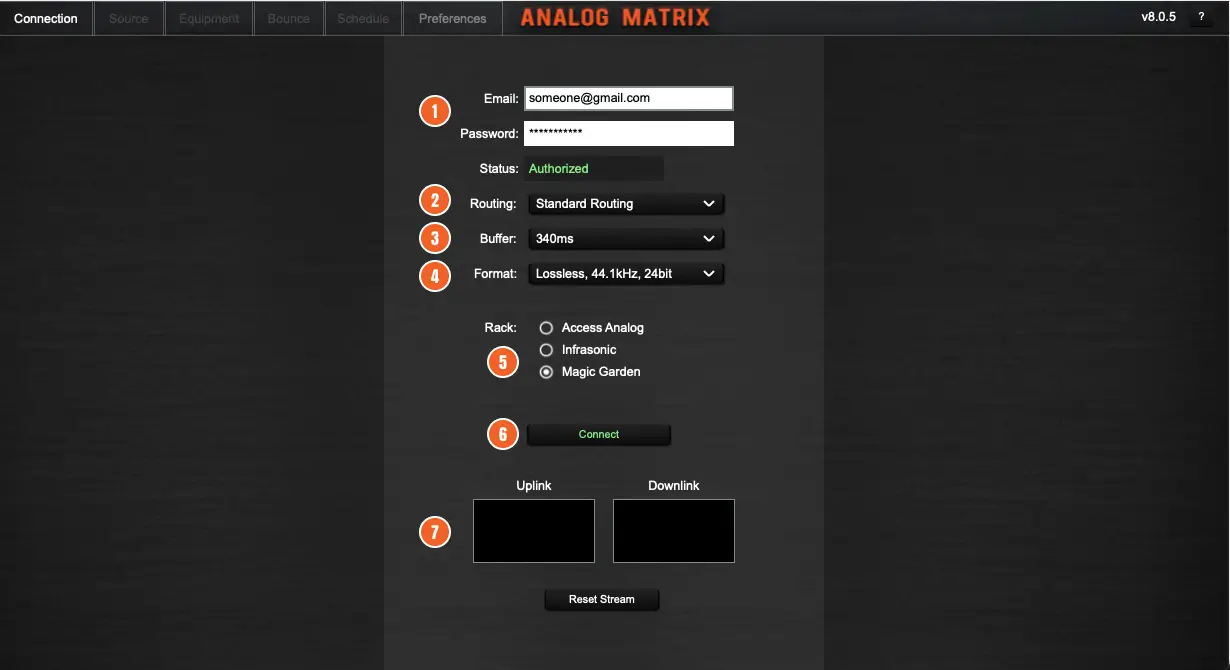
- Enter the email and password from your website account. Status should update to “Authorized”. If it does not, then there could be problem with the credentials, or the website or audio servers are not accessible. You can check with our support chat for further information.
- There are two ways to route the stream of audio between your computer and the server with the analog equipment. You may have better streaming with one particular option. “Standard” uses a direct connection over the public internet. “AWS” uses the global Amazon network. Users in North America should start with “Standard”. Users elsewhere might try “AWS” first. Feel free to experiment to see what works best for you.
- The buffer size sets the amount of buffering throughout the system. This is how much delay the plugin adds to your DAW. “Latency” is time between changing a control and hearing the effect. Your latency is directly affected by this setting. Smaller values result in lower latency, but require a more stable connection. Feel free to experiment and find what works for you.
- Format changes the type of audio samples that are encoded to stream across the internet. When possible, use the lossless format that matches your DAW sample rate. If you need to save bandwidth, you can use the 16 bit sample type, or the compressed formats.
- Our equipment is physically installed into specific racks. We have three different racks that you can use, each mutually exclusive. Choose the “Access Analog” rack for access to most of our devices. If you want to use the mastering chains, you can alternately connect to those respective racks.
- Use the connect button to begin streaming your audio to our servers.
- These buffer graphs indicate how many samples are buffered at each end of the streaming audio connection, plotted over time. “Uplink” reflects the buffered samples at the server, while “Downlink” reflects the buffered samples at the plugin. If either buffer goes to zero, the audio will experience a glitch and you will see an underflow warning.
Source: Setup the audio source going into the equipment
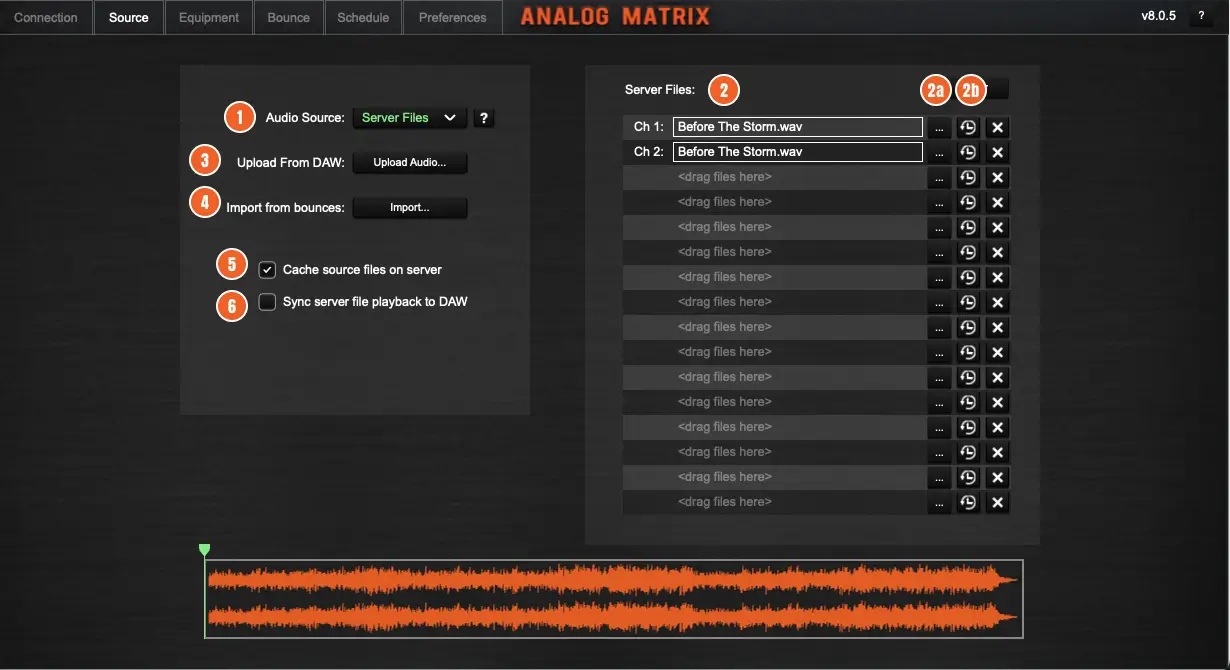
- The audio source is selected here. When used as a plugin, the Analog Matrix will default to use the DAW track as the audio source and works like a normal audio plugin with bi-directional real time streaming. The audio source can also be switched to “Server Files”. These are files that you can upload to our own account area on the audio server. See (3) below.
- This list shows the files on the server that are currently loaded and ready to be the audio source going into the equipment. Depending on the DAW track, and the first device in the rack, there will be one or more channels of audio going through the equipment. Each active channel will be denoted by “Ch X”. Files that are loaded in these locations will be the audio source for those channels going into the rack. Files can be loaded into the other spots, but only the files on the “Ch X” rows are actually used. If the first device is a summing unit, then all 16 spots will be “Ch X” locations and act as an audio source into the devices.
(2a) This button will allow you to select any recently used source files that are already cached on the server. No upload is necessary when using these files.
(2b) This opens a file dialog to choose the source file. You can also drag files from your computer into this area to load one or more files. - Use the upload from DAW to transfer all or part of the DAW track to a server file so that you can subsequently bounce the audio (see below). Start by placing the DAW playhead at the start of the audio. Then use this button to arm the process. Start playback to begin and stop playback to complete the upload. Your DAW track audio should appear as a new file on the server.
- You can import previously bounced files and use them as an audio source. Using this mechanism, you can process audio multiple times through the devices.
- You can cache your source files on the server so that you can use them in the future without needing to upload them again. See (2a) above.
- All server files are stored with information that locates them within a DAW session. If the file is loaded from your file system, it is assumed that the start of the file is at the start of the DAW session. If you use “Upload From DAW” (3), the resulting server file will be stored with the DAW location information. For example, if you upload audio from the DAW starting at measure 5 and ending at measure 20, then the file will be stored with that information. When using the plugin (not the application), and “Server Files” is the audio source, DAW playback triggers the start and stop of audio playback. When “Sync To DAW” is unchecked, then DAW start playback will always start at the beginning of the file. When “Sync To DAW” is checked, the file will play in sync with the DAW session. In the example, if you started at DAW measure 7, the file audio would start at the appropriate location in the middle of the file. When sync’d to DAW, it is like having your DAW track in the cloud but still in perfect sync with your other DAW tracks. Running in this mode requires only download bandwidth from the server to your DAW.
Equipment: Add/remove and control the analog equipment

- This is a master bypass at the server of all devices in your chain. The bypassed audio is in sync with the processed audio, so this bypass is sometimes more useful than the DAW bypass, because engaging it is seamless without any jump in time.
- You can add a device to your chain here. You can also right click in the active chain background for the same options. This menu also includes the factory chain presets. Selecting one of these presets will add one or more devices to your active chain, and configure all control settings on those devices.
- This is your active chain area. A chain can include up to eight devices. When you insert a device, your audio is automatically routed through that device at the server. In addition, a digital bypass connection is also maintained at the server, in sync with the processed audio coming from the device. The “Bypass” button can be used to switch between the processed and bypassed audio. The meters reflect the signal level as captured at the converter between each device. The server maintains a parallel “dry” audio path for each device, so the “Bypass” button on each device switches to this dry audio.
- You actually have two active chains – A and B, and you can build them up and switch between them here. You can also copy one chain to the other. This is ideal for comparing completely different chains of equipment, or comparing the same devices with different control settings.
- Create and recall your own full chain presets here. These presets include everything – the devices and their ordering, all device controls, bypass, digital gains before and after the devices, mix level, robotic linking, and mid/side. Use this to snapshot your entire chain for easy recall later. The most recently used preset is displayed to the right. If you make equipment or control changes, you can update that current preset using the “Save” button.
- These panels display and control the audio level before and after the device. Use the faders to increse or decrease the audio level at the converter between each device. The “Link L/R” button will link the faders and maintain any delta that exists between them. The balance button is a special intelligent L/R balancing feature. This measure the L/R balance going into the device along with the balance at the output of the device. The delta represents the imbalance caused by the device. This “Balance” button will use the output faders to apply the inverse of this imbalance, resulting in the properly balanced audio field that is true to the source audio.
- Link L/R: This provides robotic linking for devices that have left and right controls or mono devices that are setup in a dual mono configuration (detailed above). When this is set to “None”, the linking is disabled and all controls move independently. When this is set to “Absolute”, you can turn the left control and the robotics will physically turn both left and right controls to the same physical rotary location. This allows you to use only the left controls and affect the stereo audio field equally. When this is set to “Relative”, the left and right controls will track each other, but any delta between them is preserved. Example: the left control is at 3 and the right control is at 4. If you move the left control to 6, the right control will move to 7.
You can use this to help balance your left/right audio field. We recommend this procedure:
– Set this to “Absolute” and use the left controls to get close to your desired settings
– Set this to “None” and adjust the right controls for left/right audio balance
– Set this to “Relative” and continue adjusting controls as needed. - Mid/Side: When you enable this, the device “left” channel will process the center (mid) of your audio. The device right channel will process the sides of your audio.
- Equipment Presets: In addition to the chain presets above, you can use these presets to store and recall the control settings for a single device. The drop down selector usually has factory presets by default. You can add/remove presets below the factory presets. To add a preset, set the device controls to your desired settings, then click the “+” (plus) button, then type in the name of the preset. That preset will now show up at the bottom of the preset drop down selector. To remove a (user) preset, select it with the preset selector, then press the “-” (minus) button.
- Converter: In the bottom left corner of the equipment panel, the converter being used at the server to send audio to/from the analog device is displayed. This is for informational purposes only.
- Left/Right Selector: This is only present for dual mono configurations. This allows you to switch the equipment panel between the left and right device.
- Mix: The server maintains a parallel “dry” audio path for each device, so the mix slider adjusts the relative contribution between the dry path and the processed audio going through the device.
- Preview Timer: This progress bar shows the amount of time left in your free preview of the device. You get approximately 45 seconds each day to preview each device.
- Time Bank: If you have a subscription that gives a recurring amount of time on the device that is currently displayed in the equipment panel, then the time bank box will show the remaining time that you have for the current month.
- This area allows you to monitor specific devices. This allows you to easily track the state of devices and know when they become available. Feel free to add your favorite devices as needed (no cost). Once a device is added, you can conveniently double click it to add it to your rack for processing.
- Your credit balance is displayed in this area, along with the current cost of the active devices in your rack.
Bounce: Capture your processed audio in a .wav file

- Set the parameters of your bounced file in this area. Set the sample rate, bit depth, and format of the bounce file here. The extended file tail is an optional duration that can be added to the bounce to continue capturing a reverb tail after the original source audio is complete.
- The bounce process can be started with this button. Note: In the standalone application, there is an additional button “Multi File…” that will allow you to load and process multiple files with the same rack and settings.
- Each fininshed bounce is stored on the server, whether you download the bounce or not. Enable this option if you want to keep them stored on the server even after you disconnect.
- Enable this option to download the bounce as it is being processed. For most connections, the bounce will then already be stored locally by the end of the bounce. Note that the local storage director is chosen at (6).
- This area gives a list of your bounced files that are stored on the server. Use the ‘x’ to delete the file. Use the down arrow button to download the bounce to your local machine. The location of the download is chosen in
- The location where you want bounces to be downloaded to.
Schedule: View, create, and cancel reservations (subscribers only)

- Choose the devices you want to schedule. You can either choose one or more devices, or you can choose one of your presets and all devices included in that preset will be chosen. Chosen devices show up as columns in the schedule to the right. This allows you to view, create, and cancel reservations together on all devices.
- With one or more devices selected, the schedule is displayed. You will see blocks indicating “Unavailable” for schedule slots are that are already booked. To create a reservation for all displayed devices, click and drag from your desired start time down to your desired stop time. Currently, reservations are limited to 30 minutes. This will create reservations for all of your currently displayed devices. Reservations that cost no credits must be used in their entirety, or they will be cancelled. Note that the schedule is blocked out until the next 15 minute boundary that is at least 15 minutes in the future, to allow current equipment users a chance to finish up their work before a new reservation takes over.
Preferences

- You can enable alert sounds for various events. Note: this is the configured system alert sound.
- You can show and hide tool tips. Tooltip windows will show up if you hover over various controls in the plugin.
- You can show and hide the help buttons (“?”).
- You can enable this option to have the plugin automatically remove equipment in your rack if it has been idle longer than the duration you pick. This is helpful if you want to avoid using up your credits when you forget that you have a device in use.
- This checkbox can override the address of the server. This is for testing and not checked under normal operation.
- This checkbox can turn on some debug logging for the plugin. Use this to create a log file that can be emailed to technical support when issues arise.
Standalone Application: Processing a file outside of the DAW
 The Standalone Application is a very lightweight DAW wrapper around the Analog Matrix plugin.
- Use the “Options” button at the top left to set your audio output to a local stereo device. The input device can be set to “None”.
- You can upload a file from your local file system by dragging the file into the source panel “Server files” box, or using the “…” button to bring up a file browser.
- You will see a playhead in the waveform display. You can click in the waveform display to move the playhead around and then use spacebar to start and stop real time playback of the audio.
- You can also use the play and stop buttons at the top of the application interface for playback. The resulting processed audio will be played in real time and the processed audio will be heard on the output device you chose above. You can listen to the audio in real time and naturally you can change the equipment devices and controls. When you are ready to bounce, go to the bounce panel, set your sample rate, and click the “Bounce” button, just as described above in the “Bounce” section.
Processing a file inside of the DAW
It is also possible to process files inside the plugin within the DAW. Assuming the file is independent from the DAW session that the plugin is currently inserted into, you might want to let the uploaded file “take over” the audio input to the plugin (equipment) so that you can independently process the audio file. In this case, the DAW simply provides a way to start and stop playback with the spacebar. After uploading the file, make sure that “Sync playback to DAW” is NOT enabled.
Use Case: Processing your DAW track in the cloud
You can upload your entire DAW track audio, or any portion of it, using the “Upload from DAW” button. When the audio is uploaded, the DAW timeline position and duration are saved with the file at the server. So, effectively, your DAW track is now in the cloud and still synchronized to your DAW playback. Set the Audio Source to “Server Files” and enable the “Sync playback to DAW” setting. Now when you play the DAW session, the uploaded track audio will be the source, and the local DAW track will be ignored. Thus, you will not be using your uplink internet connection, but you are still playing the DAW track audio in sync, just like in standard bi-directional DAW mode. This is a powerful configuration as it does not need any uplink bandwidth, allowing you to have better streaming performance, and the ability to try lower buffer settings for lower latency. If you set the DAW playhead outside the timeline of the uploaded track audio, you
Equipment Guides
Equipment Guides
System Reqs
System Requirements
You will need recording software that uses the AAX, VST, VST3, or AU plugin formats on either the Mac (10.10+, 64 bit) or Windows (7+, 64 bit) platform.
You will need a robust internet connection. In general, wifi is not ideal for streaming low latency audio completely error free, but if you have a strong signal then it is usually fine. Since this is a professional audio application, we cannot lose even one sample of audio. So, the requirements for this streaming application are a bit more stringent than something like Netflix, which can drop a frame here or there without any noticeable effect to the application.
We transmit audio across the internet in one of the following formats, selectable by the user:
- Lossless, 44.1 kHz, 24 bit
- Lossless, 48 kHz, 24 bit
- Lossless, 88.2 kHz, 24 bit
- Lossless, 96 kHz, 24 bit
- Lossless, 44.1 kHz, 16 bit
- Lossless, 48 kHz, 16 bit
- Lossless, 88.2 kHz, 16 bit
- Lossless, 96 kHz, 16 bit
- Compressed, 48 kHz, 512 kBit/sec
- Compressed, 48 kHz, 256 kBit/sec
- Compressed, 48 kHz, 128 kBit/sec
The compressed formats reduce the requirements on the internet connection but may not be desirable for professional results. If this is the only choice for a given user internet connection, the offline processing tool is provided to allow real time system usage with the compressed audio, but the final bounce or save can be done offline at lossless, 96 kHz, 24 bit resolution. See the user manual offline processing topic for more details.
You can measure your connection bandwidth at speedtest.net.
Format
Transmit Format
The system allows the user to select the audio format that will be used to transmit the data across the internet and back. This format can be chosen to match the sample rate of the user session, or it can be adjusted to match the quality and bandwidth of the internet connection.

When the sample rate on both sides of the SRC are the same, then no conversion takes place. Thus, when the session sample rate and transmit sample rate are the same, there is no sample rate conversion at the plugin. Similarly, when the transmit sample rate is 96 kHz, there is no conversion at the server.
The transmit sample rate should not be set higher than the DAW session sample rate, as that would use more bandwidth and result in no benefit.
The hardware A/D converter is set to 96 kHz.
When offline bounce is used, the audio is transmitted from the plugin to the server in lossless format at the session sample rate. The samples are converted to 96k at the server when sent to the hardware. You can pick the sample rate of the final wav file in the offline processor. The server converts the processed samples to this sample rate and transmits them losslessly back to the plugin. Thus, offline bounce looks like this:

Buffering/Latency
Buffering
The system employs two buffers to manage the inconsistencies of the internet. There is one buffer located at the server which receives samples from the client plugin. There is another buffer located in the plugin that receives samples back from the server. The user can select the entire system buffer size at the top of the plugin, between 300ms and 2500ms, and this is split between the two buffers.

Buffer Graph

The buffer graph is located at the top of the plugin. This shows the size of both the plugin and server buffer relative to the total system buffer setting. The two graphs are overlayed on top of each other and show the fill percentage of both buffers over time. For best streaming, each buffer should be approximately half full, resulting in a bright orange graph that is half of the height of the graph, as shown. If one graph is much larger than the other, you can use the reset button below the graph to clear up the issue.
Latency/Delay

Inserting the Analog Matrix plugin on the master track of a session is always possible at any buffer size setting because there are no parallel tracks to the master track and compensation is not necessary.
For individual tracks, each DAW provides plugin delay compensation. This can be used to compensate for the Analog Matrix buffer size setting and keep the track in sync with the session. Analog Matrix provides a selectable buffer size setting that represents the total buffer size, or delay, through the system. Each DAW has it’s own maximum delay compensation detailed below. The Analog Matrix plugin can be used on any individual track as long as the buffer size is less than the maximum delay compensation for that DAW, and delay compensation is enabled. If the Analog Matrix plugin requires larger buffer sizes for stable audio streaming, and the buffer size is larger than the maximum delay compensation, the track with the plugin will be out of sync with parallel tracks in the session. If you are processing the master track, then there are no parallel tracks, and so this doesn’t affect you.
If you are processing an individual track, you can compensate for this by manually moving the audio of the track earlier in the timeline. If delay compensation is not enabled, you would move the audio earlier by the buffer amount. If delay compensation is enabled, you would move the audio earlier by the buffer size minus the maximum delay compensation value.
Analog Switching
The audio routing between devices in a chain can be done in the digital or analog domains.
By default, the audio is routed from the first device through A/D conversion, and then routed digitally to the next device through D/A conversion. We call this standard routing. Using this routing, the level of the audio is accessible and displayed in the plugin. Also, a digital gain can be applied which is controlled with the device input and output sliders in the plugin. Standard routing allows a bypass audio stream to run in parallel with the device which can be used to mix dry and processed signals, as well as bypassing the device altogether.
For devices that are connected to an analog switch, there is an option to use “analog” routing between the devices. Analog routing provides high audio quality and gain staging by providing a direct connection between devices. Additionally, the audio is still routed into the digital domain to measure the level for metering in the plugin. Gain and bypass functions are not possible with analog routing.
Our analog switches are provided to enable analog routing. These switches use mechanical relays for highest audio quality. Each switch supports up to eight stereo devices. An example audio routing is shown in the diagram.
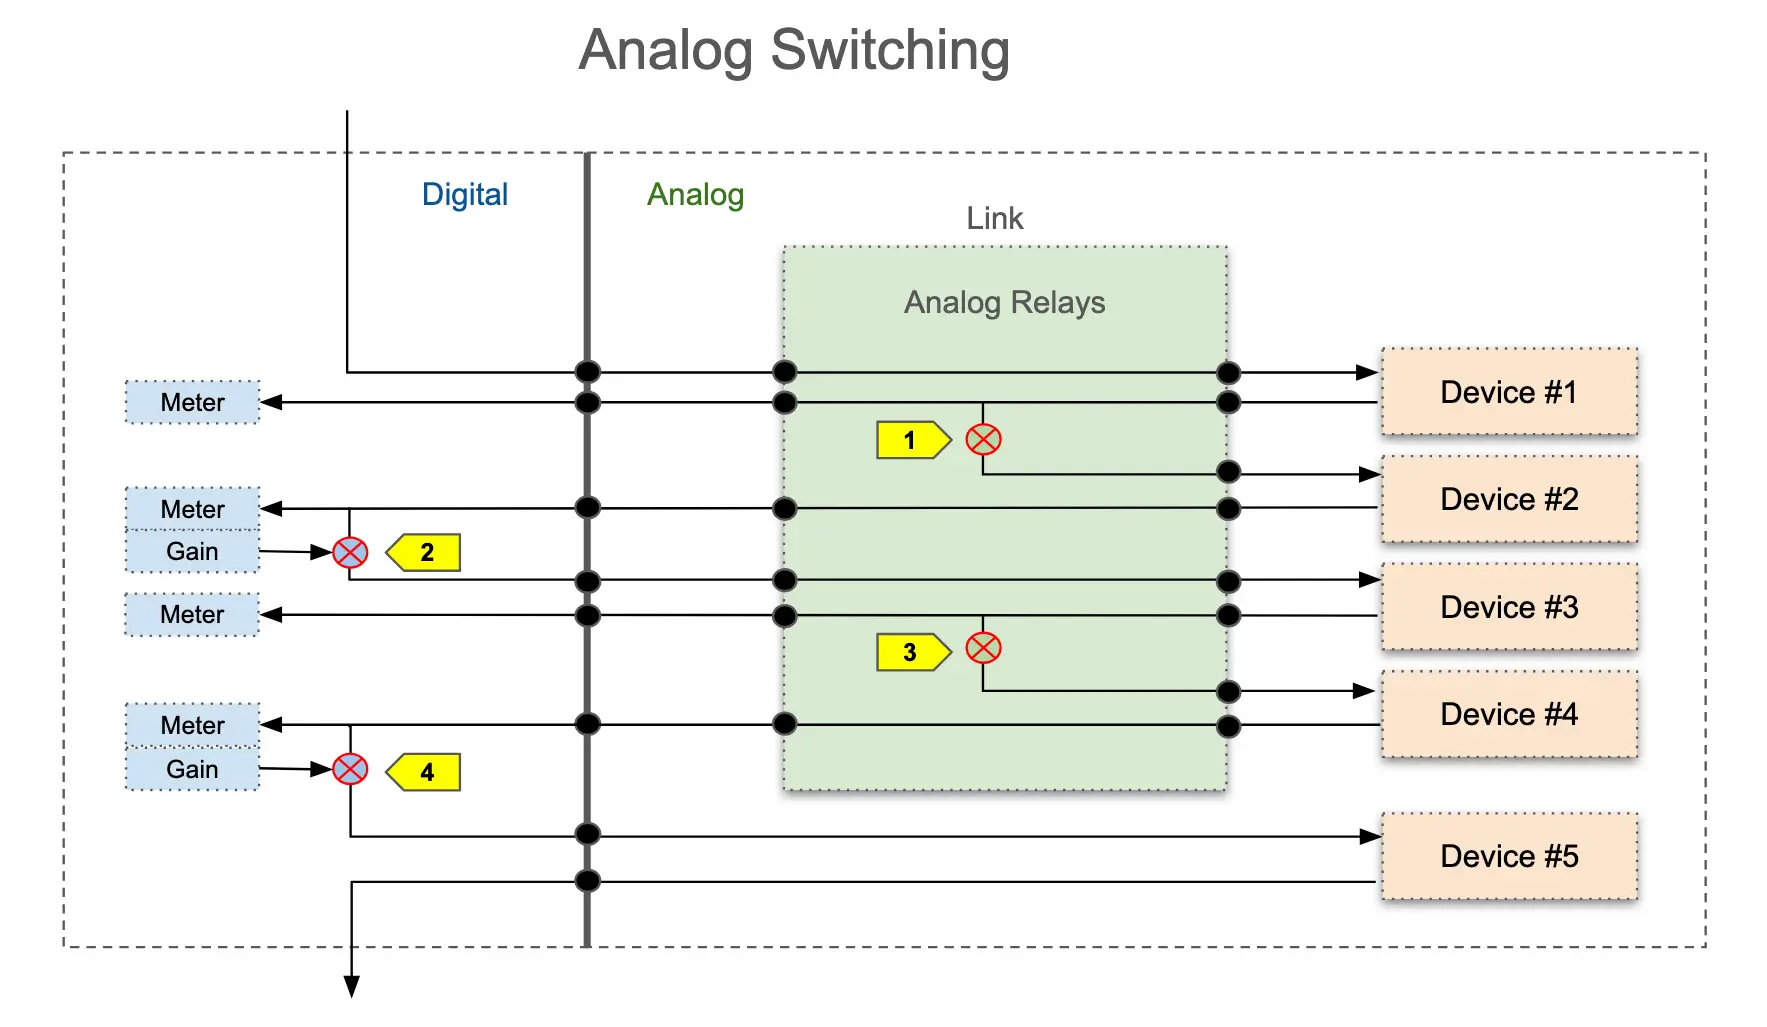
- Analog routing is chosen and the relay is used to directly connect the output of device #1 to the input of device #2. Note that the output of device #1 is also routed to the digital domain so that it can be measured and displayed in the plugin meter.
- In this connection, digital routing is chosen by the user even though analog routing could be used since both device #2 and device #3 are attached to the analog switch. Since digital routing is chosen, the user has gain, mix, and bypass controls.
- Again analog routing is used to directly connect the output of device #3 to the input of device #4.
- Since device #5 is not on the analog switch, digital routing is the only option available between device #4 and device #5.
When standard routing is the only option, it will be used automatically in the plugin and the user does not need to choose anything. When both standard and analog routing are available for a given connection (as is the case between device #2 and device #3 in the diagram), then the user will be able to select the desired routing. Locate this control above the faders in the plugin and set the control to the desired routing.
The plan is to add multiple eight-device analog switches into our service. These will form “analog islands” of equipment that are all connected to the same switch. As described above, analog routing will be available between devices on the same analog island.
We have named our first analog island “Fiji” and it includes the devices in the diagram below.
FAQs
FAQs
Please visit our FAQs page for a comprehensive list of the most common questions we get about our service.
Additional Help
Additional Help
Can’t find what your looking for? Need additional information or help?
You can usually chat with us using the icon at the bottom right of this page. If that doesn’t work, please click a link below related to your specific question or visit our contact page for additional inquiries.