
Every mix hits this point. The balance is right, every part sounds good, and the whole thing still plays like a stack of separate tracks instead of a record.
Then you put an SSL G bus compressor across the stereo bus, dial in a couple of dB of gain reduction, and something locks. The drums sit into the bass, the vocal settles into the band, and the mix starts moving as one piece. Nothing sounds squashed. It just sounds finished. This guide covers what the SSL G actually does, what every control is for, four starting settings that work, the mistakes that undo the magic, and how to run the real unit from your DAW with Access Analog.
A light touch on the right box turns a good mix into a record.
The SSL G bus compressor is the stereo compressor that lived in the centre section of Solid State Logic's 4000-series mixing consoles. SSL's 4000 E Series, introduced in 1979, already carried a master bus compressor, and the 4000 G Series, launched at AES New York in 1987, gave the circuit the name everyone uses. The unit on our rack is the SSL XLogic G Compressor, SSL's own 1U rack version of that console compressor.
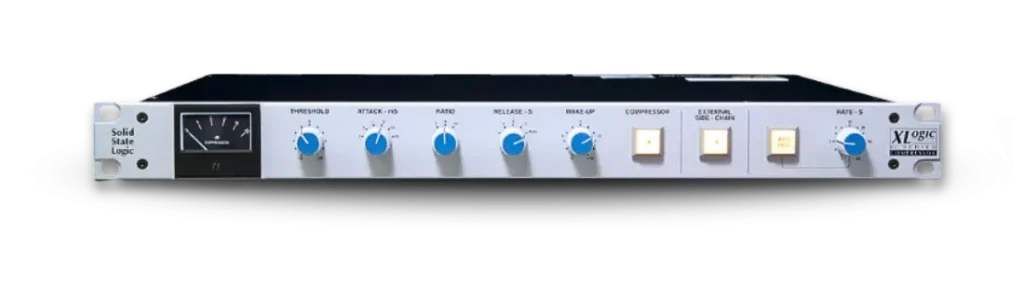
A quick note on names. "SSL G comp" gets used for every version of this circuit: the original console centre section, the XLogic rack unit, SSL's X-Rack and 500-series modules, and newer rack units such as THE BUS+. They share the same core idea but not the same controls. The 500-series G Comp module, for example, adds extra ratio settings and a sidechain high-pass filter that the XLogic doesn't have. Everything in this guide (the switch positions, the ranges, the recipes) describes the XLogic G Compressor on our rack.
Its reputation comes from where it lived as much as how it sounds. Through the 1980s and 1990s an SSL was the go-to desk in a huge number of commercial mix rooms (Billboard's Studio Action Chart reported in 1996 that 83% of that year's number-one singles were made on an SSL board), so a huge share of hit records passed through this compressor on the way to the mixdown deck. A generation of engineers and listeners calibrated their ears on that sound. By the time it came out as a rack unit, it was already the reference every other bus compressor got measured against.
The XLogic keeps the classic compressor behavior and wraps it in SSL's SuperAnalogue input, output, and power circuitry, which is designed for low noise, wide bandwidth, and very little added color. Hugh Robjohns, in Sound On Sound's review, found it made mixes sound louder and more complete without the compression ever sounding aggressive. That's the key to understanding this box. Its character lives in movement (how it grabs and lets go), not in harmonic color.
The SSL G doesn't change the tone of your mix. It changes how your mix moves.
If you're choosing between bus compressors, our SSL G vs API 2500 comparison puts the two classics side by side. This guide stays on the SSL and goes deep on using it.
Glue is gentle gain reduction applied to the whole mix at once, so the loud and quiet elements move together instead of independently.
Think about a mix before it hits the bus. Dozens of tracks, each with peaks landing at slightly different moments: the snare cracks here, a bass note blooms there, a vocal consonant spikes somewhere else. Every element is fighting for the front of the speaker on its own schedule, and that's a big part of why a rough mix feels busy and disconnected.
A bus compressor listens to the sum of everything. When the chorus hits and the drums, bass, and vocal all push at once, it turns the whole mix down by a small, shared amount. When the energy drops, it lets the level come back. Because every element gets the same gain change at the same moment, they start rising and falling as a group. Picture a crowd of people walking at their own pace, then linking arms. Nobody walks any slower. They just move together.
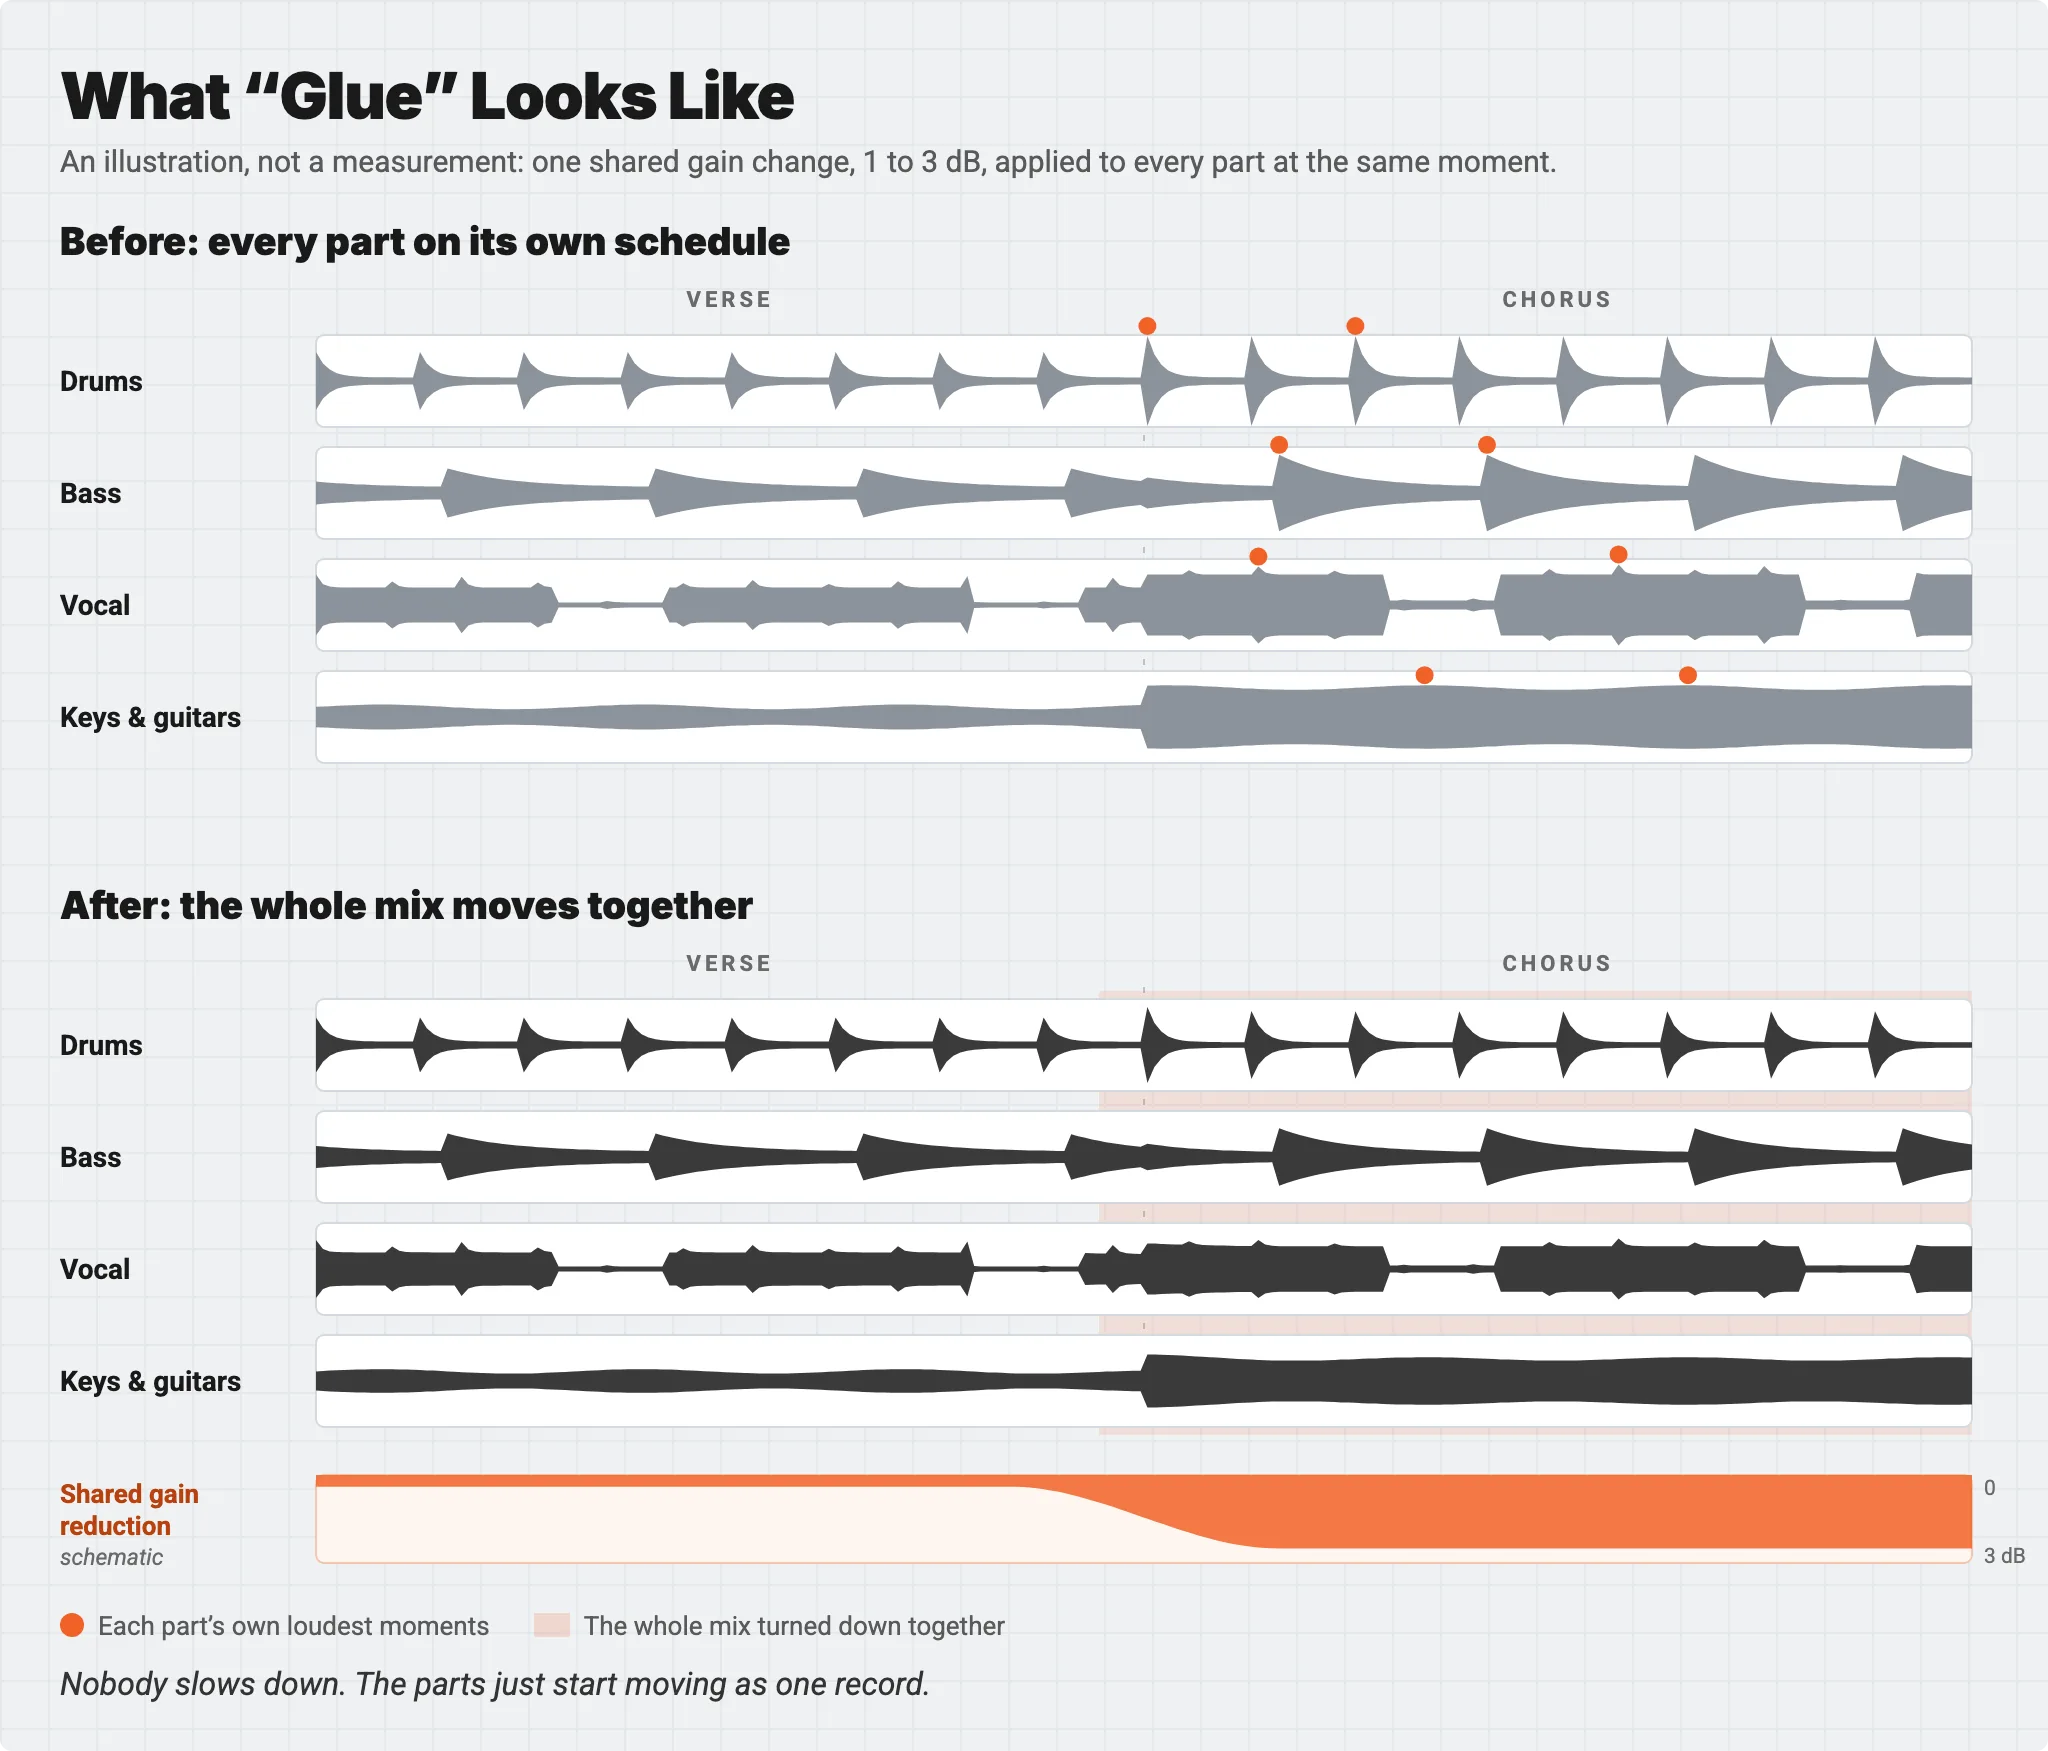
The important word is gentle. Glue happens at 1 to 3 dB of gain reduction. Push the same compressor to 8 or 10 dB and you get an obviously pumping, smaller, more processed sound. That can be a great effect, but it isn't glue, and it isn't what made the G comp famous.
A note here: glue is a finishing move, not a repair. If the low end is fighting itself or the arrangement is crowded, a bus compressor will just compress the problem. Get the balance right first, then reach for the SSL to make the parts behave like one record. For a broader walk through the technique, see our complete guide to bus compressors.
Glue is what happens when a balanced mix starts breathing as one.
The SSL G gives you six controls, and only the threshold and make-up gain move smoothly. Ratio, attack, and release are switches. People coming from plugins are often surprised by how few choices there are. That's the point: there are only a handful of meaningful combinations, the good ones are well known, and each one does the same thing every time you call it up.
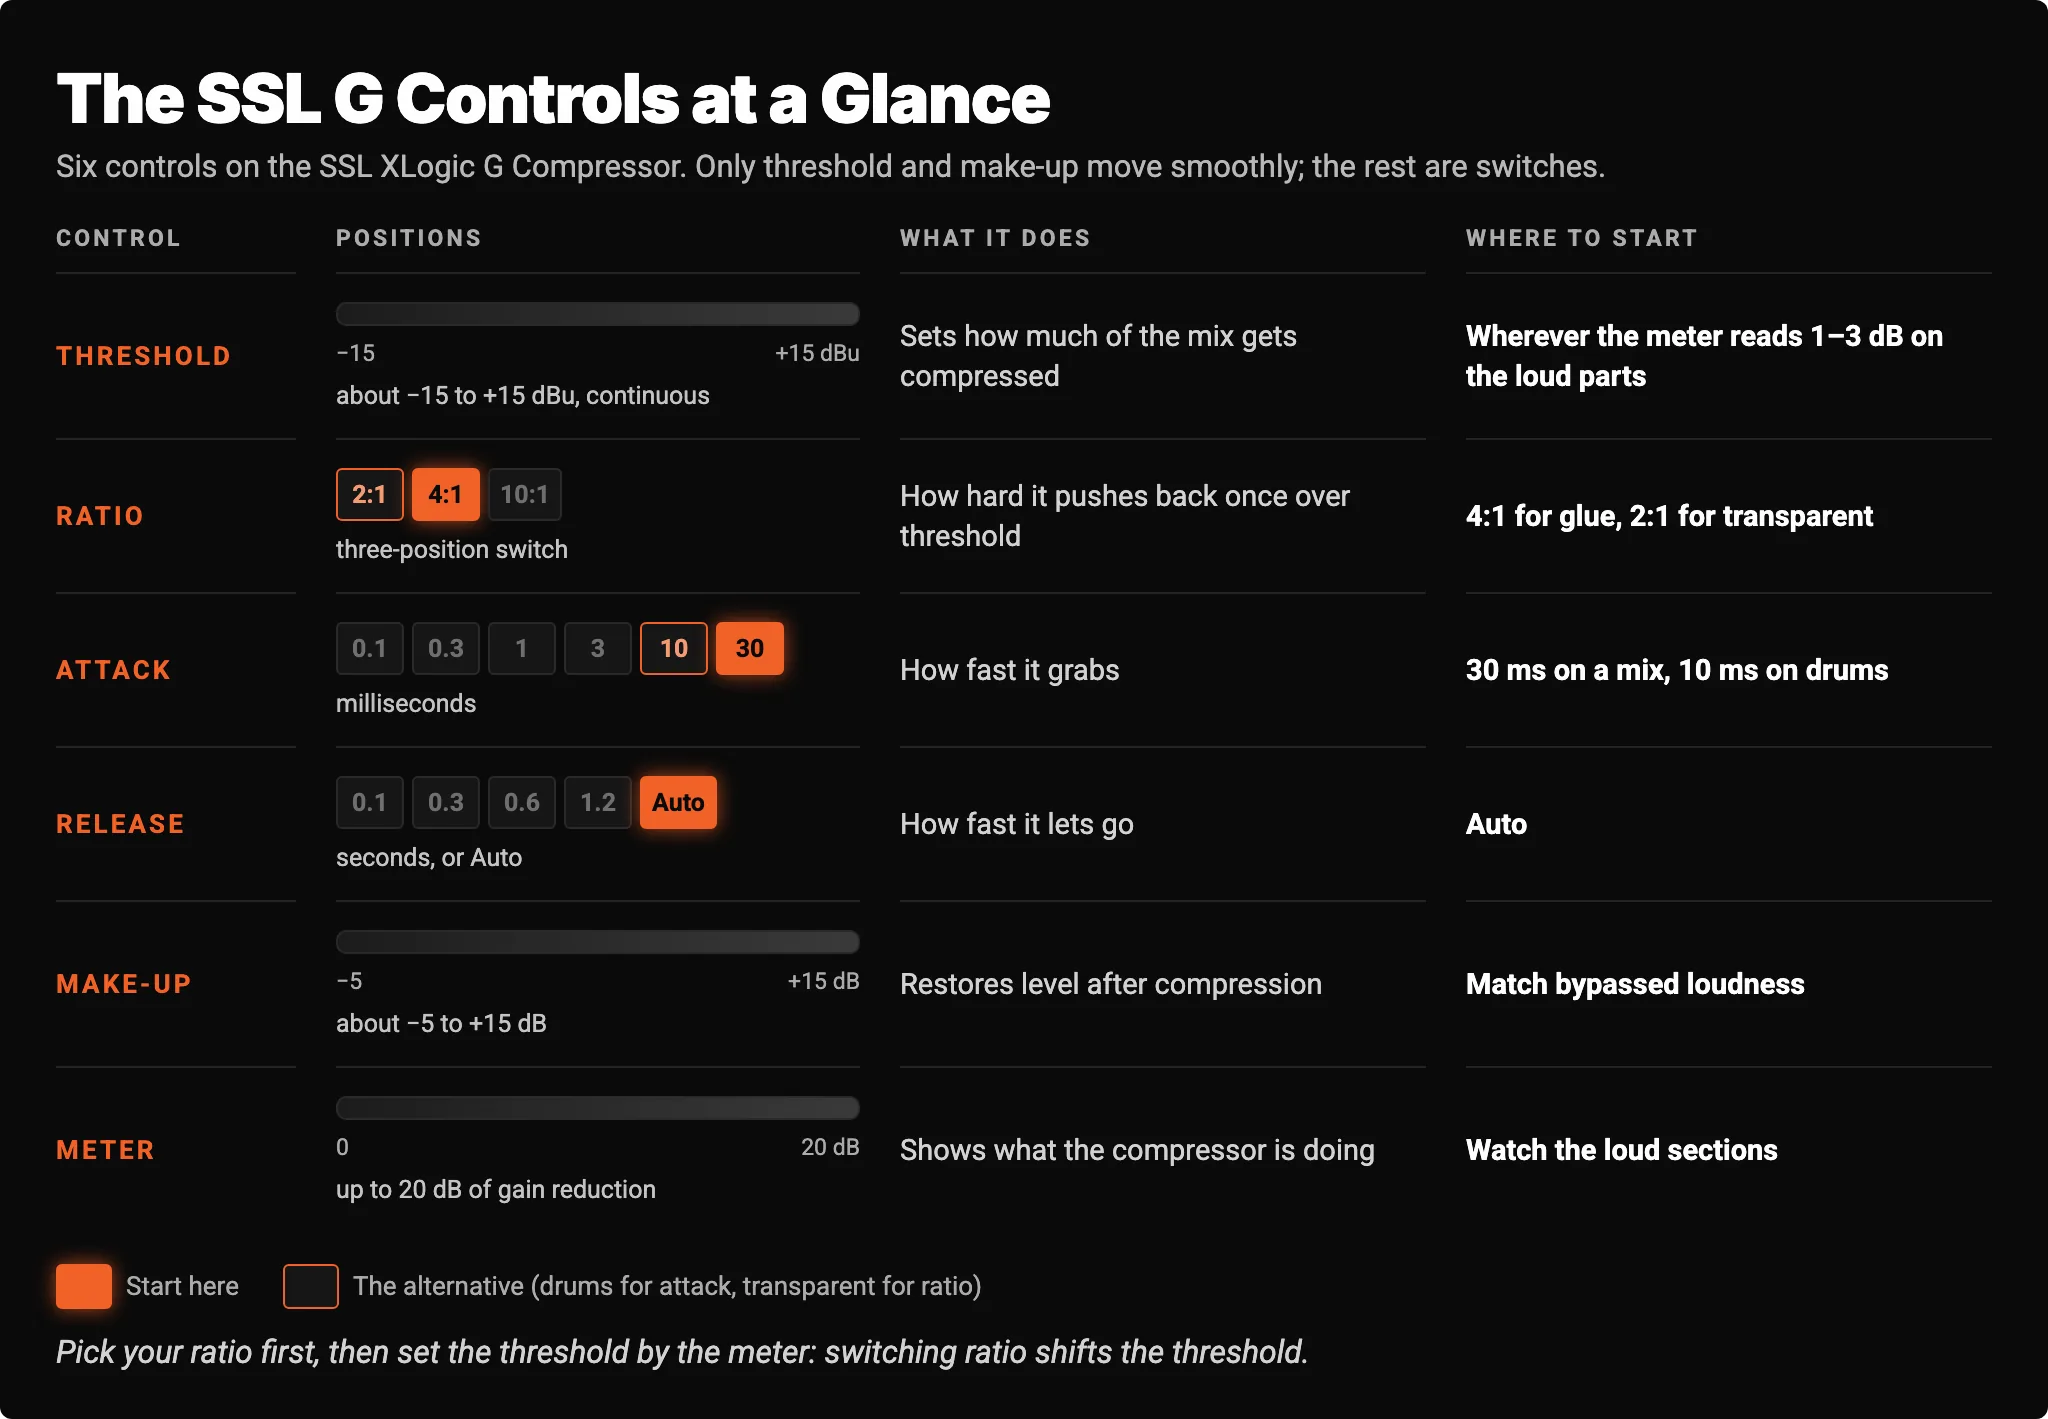
Threshold. Turn it down and more of the mix crosses into compression. One detail most people miss: according to SSL's owner's manual, the threshold is designed to shift with the ratio, so switching ratio can change the gain-reduction reading even if you never touch the threshold. Pick your ratio first, then set the threshold by the meter.
Ratio. 2:1 is the gentle, transparent setting, the one for invisible leveling and mastering. 4:1 is firmer and more audible, and it's the setting most people mean when they say "the SSL sound." 10:1 behaves broadly like a limiter: useful for catching wild peaks or deliberately crushing a drum bus, rarely what a mix bus wants.
Attack. Six steps from 0.1 ms to 30 ms. The fast end grabs transients and adds density. The slow end lets the front edge of every hit through before the compressor reacts, which is where the punch comes from. This is the control people most often get wrong on a mix bus (more on that below).
Release. Four fixed times from 0.1 to 1.2 seconds, plus Auto. Fast fixed releases add bounce and movement; slow ones are smoother but can hang on through the quiet parts. Auto gets its own section, because it's the heart of the box.
Make-up gain. Brings the level back up after compression, and it can also cut by about 5 dB. Use it to match the compressed and bypassed loudness before you judge anything.
The stereo link. The SSL G is a true stereo compressor, not two mono channels. Its detector follows whichever side is louder and turns both sides down by the same amount, so a loud hit on the left never drags the image to the right. That's why it's safe on a full mix and on any stereo stem.
Fewer choices, better results. Every SSL G setting is one you can find again.
Auto release lets the compressor's recovery follow the music instead of holding one fixed time, and that's most of what makes the SSL G feel like glue rather than compression.
Here's the problem it solves. A fast fixed release recovers quickly after every loud moment, so on a busy mix the compressor is constantly grabbing and letting go, and you hear it pump in time with the beat. A slow fixed release is smoother, but it can hold the level down long after a big hit and leave the next quiet passage sounding dull. The right release time for a sparse verse isn't the right release time for a dense chorus.
Auto is program dependent. After a short, sharp peak it lets go quickly, and when loud material is sustained it recovers more slowly. In practice the gain reduction tracks the overall energy of the song instead of chattering against individual drum hits. It rises gently into the big sections and eases back out of them, and because it isn't pumping against the rhythm, your ear stops hearing a compressor and starts hearing a mix that moves together. Robjohns found Auto so dependable that it became his normal starting point, and plenty of engineers never leave it.
The fixed times still earn their place. A 0.1 or 0.3 second release adds bounce to a drum bus, and on aggressive material a fast release can be an effect in itself. But for the classic sit-back glue, start on Auto.
Set it to Auto and let the song decide how fast the SSL breathes.
These are starting points for your ears, not presets. Every one uses the real switch positions on the hardware.
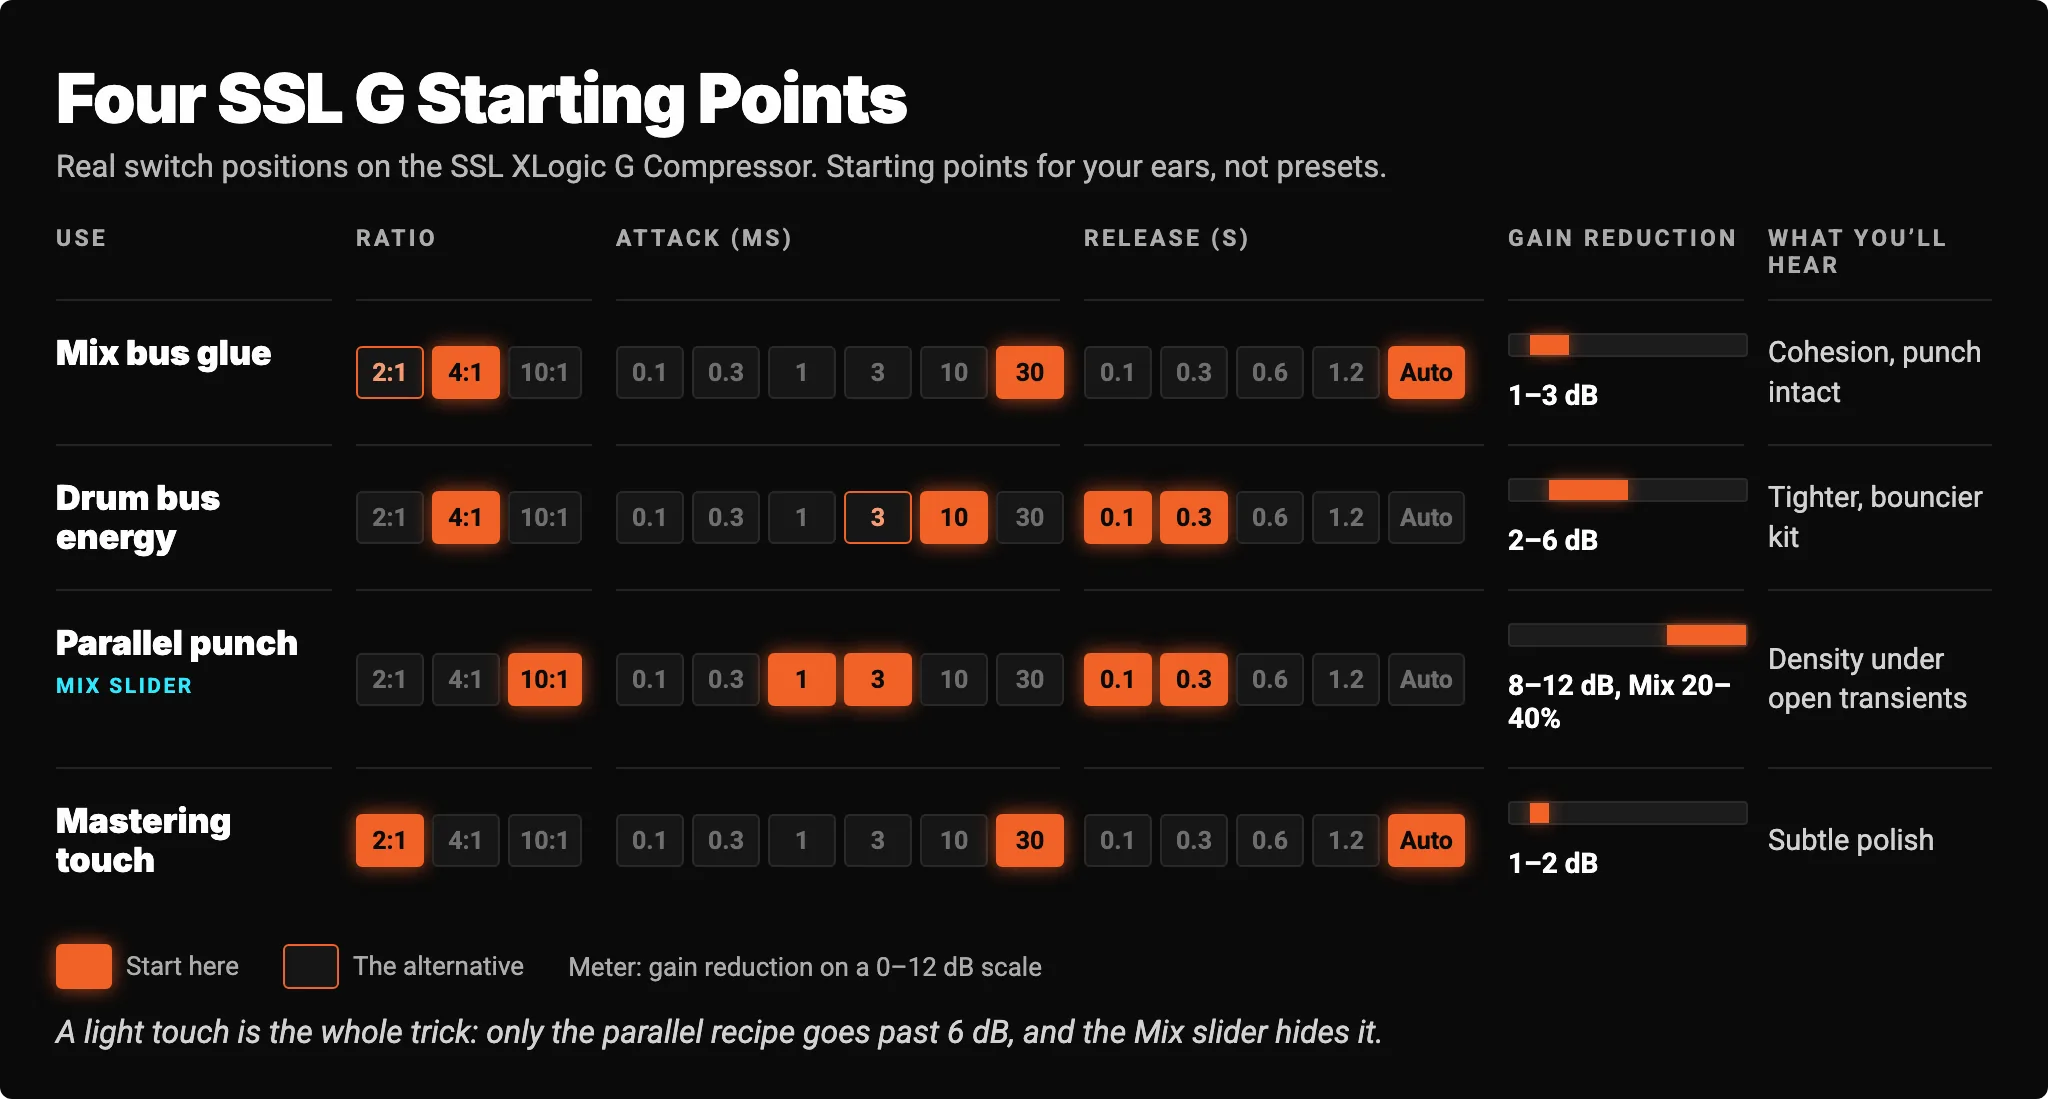
1. Mix bus glue. The setting everyone searches for, and for good reason. Start at 4:1 with a 30 ms attack and Auto release, then bring the threshold down until the meter just kisses 1 to 3 dB on the choruses. If 4:1 feels like it's grabbing too obviously, drop to 2:1 and reset the threshold. Move the attack to 10 ms only if you want a tighter, more controlled front edge. If you need 6 dB or more to feel anything, stop: the mix balance wants attention, not more compression.
2. Drum bus energy. Keep 4:1, speed the attack up to 10 ms (or 3 ms if the kit needs reining in), and use a 0.1 or 0.3 second release so the gain reduction recovers between hits. Aim for 2 to 6 dB. The fast release makes the room and the sustain swell back up after each hit, which is where the "breathing" drum sound comes from. Time it so the meter returns before the next downbeat.
3. Parallel punch with the Mix slider. The XLogic hardware has no wet/dry control, but the Analog Matrix plugin adds one. Set 10:1, a fast 1 to 3 ms attack, and a 0.1 to 0.3 second release, then crush the drums or the whole mix with 8 to 12 dB of gain reduction. Now pull the Mix slider back to 20 to 40% wet. The dry signal keeps every transient; the crushed signal fills in the space between them. That's parallel ("New York") compression on a real SSL, with no aux sends or extra routing.
4. Mastering touch. 2:1, 30 ms, Auto, and no more than 1 to 2 dB on the loudest passages. At this depth the SSL is closer to leveling than compressing. It adds a sense of completion without changing the balance the mix engineer chose.
Beyond the stereo bus. Sound On Sound's review lists stereo stems, instrument groups, backing vocals, and drum buses alongside full mixes, and the product page adds piano. Anything stereo that needs to move as one group is fair game: a backing-vocal stack at 4:1 with 2 to 3 dB, a stereo piano at 2:1 to calm the left hand, a room-mic pair at 10:1 for an aggressive, pumping ambience.
For mix bus glue, set the threshold for about 1 to 3 dB of gain reduction in the loud sections and let Auto release do the rest.
Most bad SSL G results come from five habits.
If you can point at the compressor and say "there it is," you've gone too far.
The SSL G does one job, so it plays well with gear that does others. Three chains worth trying on the rack:
The full SSL console chain. We also rack a matched pair of genuine vintage SSL 4000 G channel strips with the G-Series 292 EQ, linked in stereo. Shape the mix with the console's EQ, then glue it with the console's bus compressor: the same desk family and the same order a mix took through an SL 4000 G, EQ first and compression second.
Glue, then tone. The SSL G adds movement, not color, which makes it a natural first stage before a tone box. Follow it with the Rupert Neve Designs Master Bus Transformer for transformer weight and its Width control, or the SSL Fusion for Vintage Drive harmonics, the Violet EQ, and its Stereo Image section. Compress first so the color stage sees a steadier level.
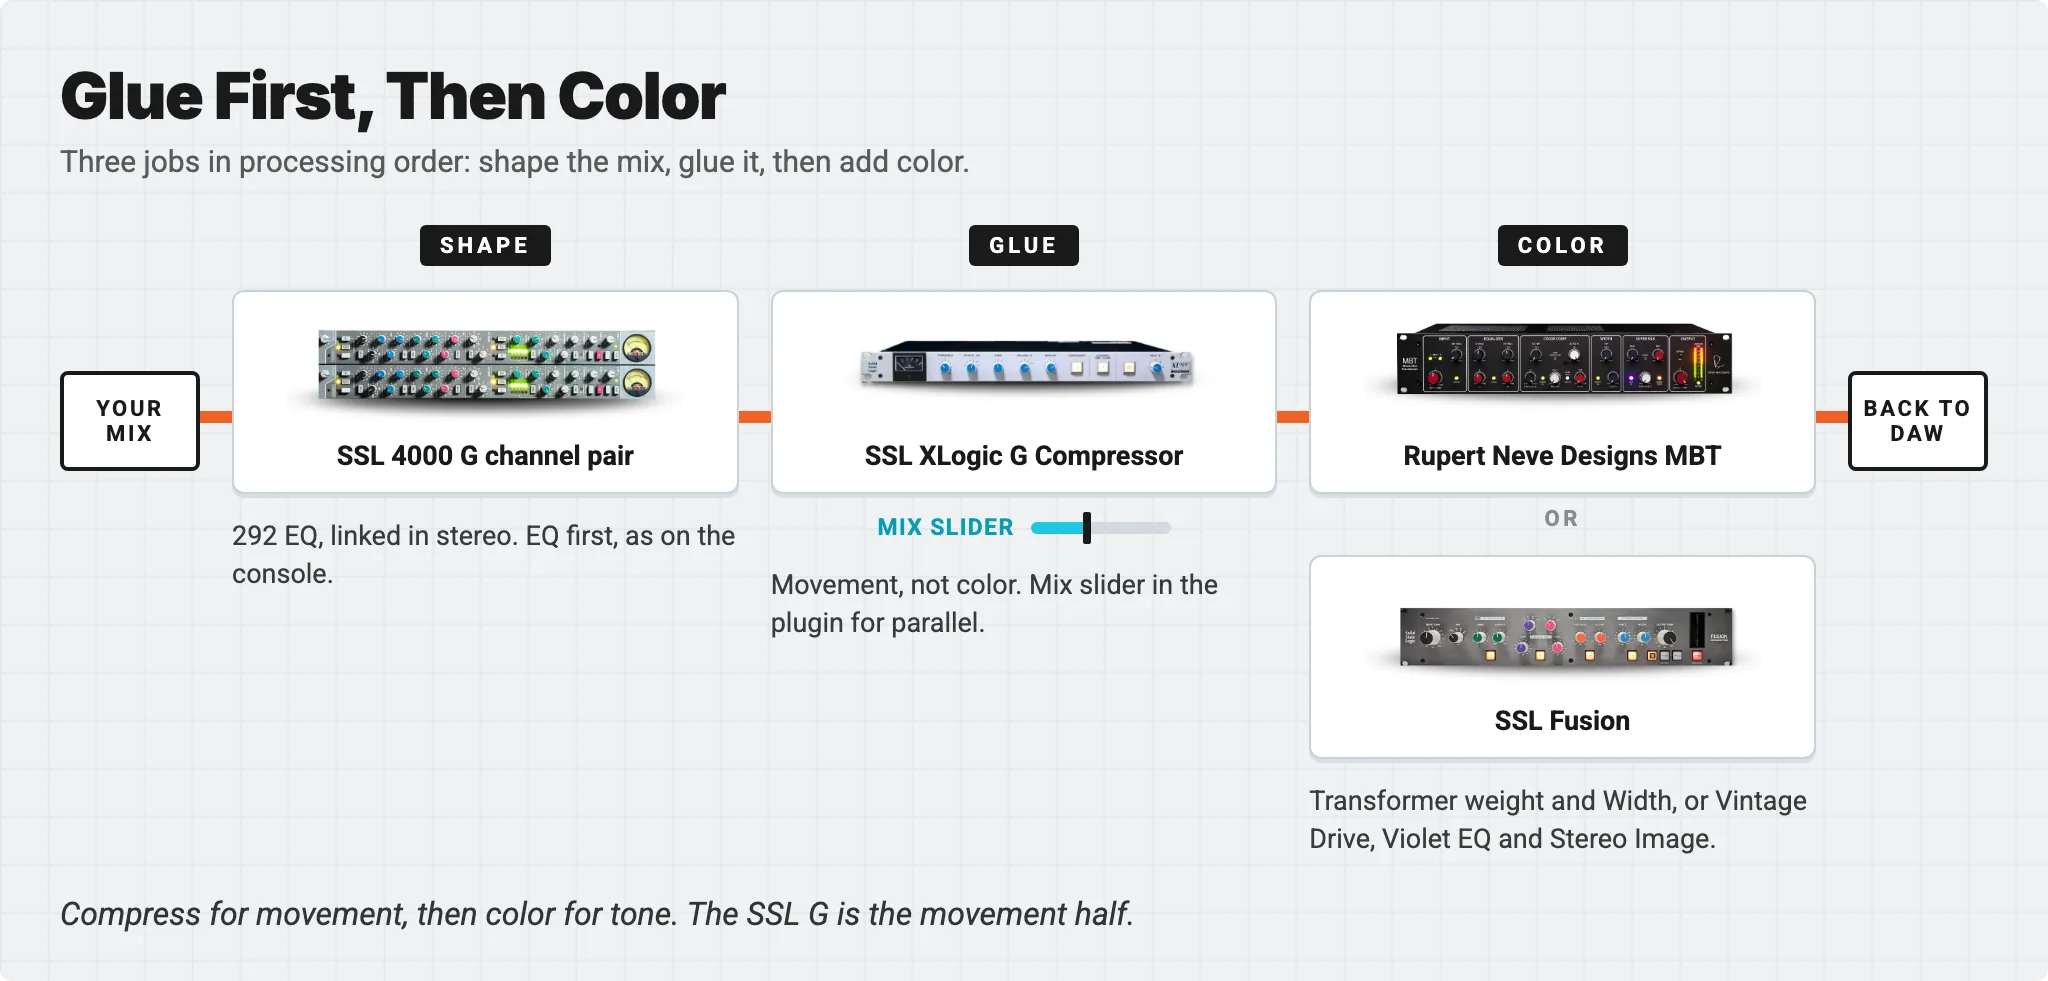
A different kind of glue. Some mixes want rounder, slower cohesion than a VCA gives. The AMS Neve 33609/N brings diode-bridge compression with transformer color, and the Manley Variable Mu reaches the same goal through tubes with a program-dependent ratio. Run the same mix through each in one session and pick by ear.
Compress for movement, then color for tone. The SSL G is the movement half.
The technique carries over completely. Everything in this guide works on any decent SSL-style plugin, and if you learned bus compression on one, you already know the moves.
What a plugin can't be is the circuit itself. An emulation models the topology: the VCA, the detector, the Auto release behavior. The hardware is the topology, with its real components reacting to your real signal, including the ways that reaction shifts with level and program that a model has to approximate. Whether that difference matters on your mix is something only your ears can answer, which is why hearing the real unit on your own material is worth more than any spec sheet. We go deeper on the trade-offs in Analog Hardware vs. Plugins: The Honest Pros and Cons.
Learn it on a plugin. Hear it on the hardware.
Access Analog racks a real SSL XLogic G Compressor in Colorado that you control from inside your DAW. Here's the workflow:
One thing that isn't available: the hardware's rear-panel external sidechain (Key) input isn't exposed in the Analog Matrix, so plan on the internal detector.
The SSL G is included in the Elite tier of the Access Analog Subscription. Not subscribed? You can reserve a session on the unit or use credits, and every new account gets 12 free credits to try it.
Glue isn't magic. It's a real circuit, and now it's in your DAW.
The SSL G has outlasted forty years of new compressors because it does one thing with almost no fuss. It turns the whole mix down a little, at the right moments, by the same amount, and lets the song set the pace of its recovery. Your parts stop competing and start playing together. A slow attack keeps the punch, Auto release keeps it musical, and a light touch keeps it invisible.
Put your next mix through the real SSL G and hear the moment it becomes a record.
What are the best SSL G bus compressor settings for a mix bus?
Start at 4:1 (or 2:1 for a more transparent result), 30 ms attack, Auto release, and set the threshold for 1 to 3 dB of gain reduction on the loudest sections. Match the make-up gain so the compressed and bypassed mix are the same loudness before judging.
Should I use 2:1 or 4:1 on the SSL G?
2:1 is gentler and more transparent, good for subtle leveling and mastering. 4:1 is firmer and more audible, and it's the setting most associated with the classic SSL bus sound. Because the SSL G's threshold shifts with the ratio, reset the threshold after switching.
What attack time should I use on the SSL G?
30 ms on a full mix, so transients pass through before the compressor reacts. 10 ms (or 3 ms) on drums when you want tighter control. The fastest settings (0.1 and 0.3 ms) catch transients and reduce punch, so use them deliberately.
How much gain reduction should the SSL G do on a mix bus?
Usually 1 to 3 dB on the loudest sections, and rarely more than about 4 dB. Beyond that the compression becomes audible as pumping. If you want more density, use parallel compression with the Mix slider instead.
Does the SSL G compressor have a sidechain filter or a mix knob?
The SSL XLogic G Compressor has no built-in sidechain filter and no wet/dry control. It has an external sidechain (Key) input, but that input isn't exposed on Access Analog. The Analog Matrix plugin adds a wet/dry Mix slider, so you can run parallel compression on the real unit without extra routing.
Can you use the SSL G for mastering?
Yes. At 2:1, 30 ms attack, Auto release, and 1 to 2 dB of gain reduction, it adds cohesion and polish without changing the mix balance. Its SuperAnalogue signal path is clean, so it controls movement without adding obvious color.
Is the SSL XLogic G the same as the console bus compressor or the 500-series G Comp?
The XLogic G is SSL's own rack version of the console's centre-section bus compressor. It keeps the classic three ratios, six attack steps, and Auto release, and adds SSL's SuperAnalogue input, output, and power circuitry for lower noise and wider bandwidth. The 500-series G Comp module is a different product built on the same circuit, with extra ratios and a sidechain high-pass filter. Access Analog racks the XLogic G.