How to Use Upload From DAW in Analog Matrix: Send Tracks Straight From Your Session
Arm, press play, stop: your track goes straight from your DAW session to our server, ready for real analog gear.
To run a track through the gear at Access Analog with an offline bounce, the audio first has to be on our server. You could export it from your DAW, find the file and drag it into the plugin. Or you can skip all of that with Upload From DAW, which sends the track from your session as it plays.
In this guide, Dr. Dan walks through it in the Analog Matrix plugin: the three steps, how the new file is named and loaded, why the Sync server file playback to DAW setting matters, and how to upload several tracks at once.
Key Takeaways
- Three steps, no export: arm, press play, stop. The track goes from your session to our server as it plays.
- It's lossless 24-bit audio, whatever transmit format you stream with.
- The upload keeps its place on your DAW timeline, and lands in your Files list named DAW plus the date and time.
- With Sync server file playback to DAW on, the file plays from our server in step with your session, using download bandwidth only.
- Several tracks at once: put Analog Source on each track, arm the ones you want, and each one uploads to its own file.
Why Upload From Your DAW?
An offline bounce is the safest way to print through real analog gear, because it runs on our end from a file on our server. Our Offline Bounce guide walks through it. Getting that file there the long way takes four steps: export the track from your DAW, find the file on your drive, drag it onto the plugin's Source tab, and wait for it to upload.
Upload From DAW does it in one. The track goes straight from your session to our server while it plays, in lossless 24-bit audio, whatever transmit format you stream with.
It also remembers where the audio sat on your DAW timeline. If you upload from bar 5 to bar 20, the file is stored with that position, so it can play back in step with the rest of your session later (more on that below).
Step-by-Step: Upload a Track From Your DAW
Upload From DAW lives on the Source tab, under the Files list. You'll see the Upload... button, with two settings just above it: Sync server file playback to DAW and Auto-load when upload completes.
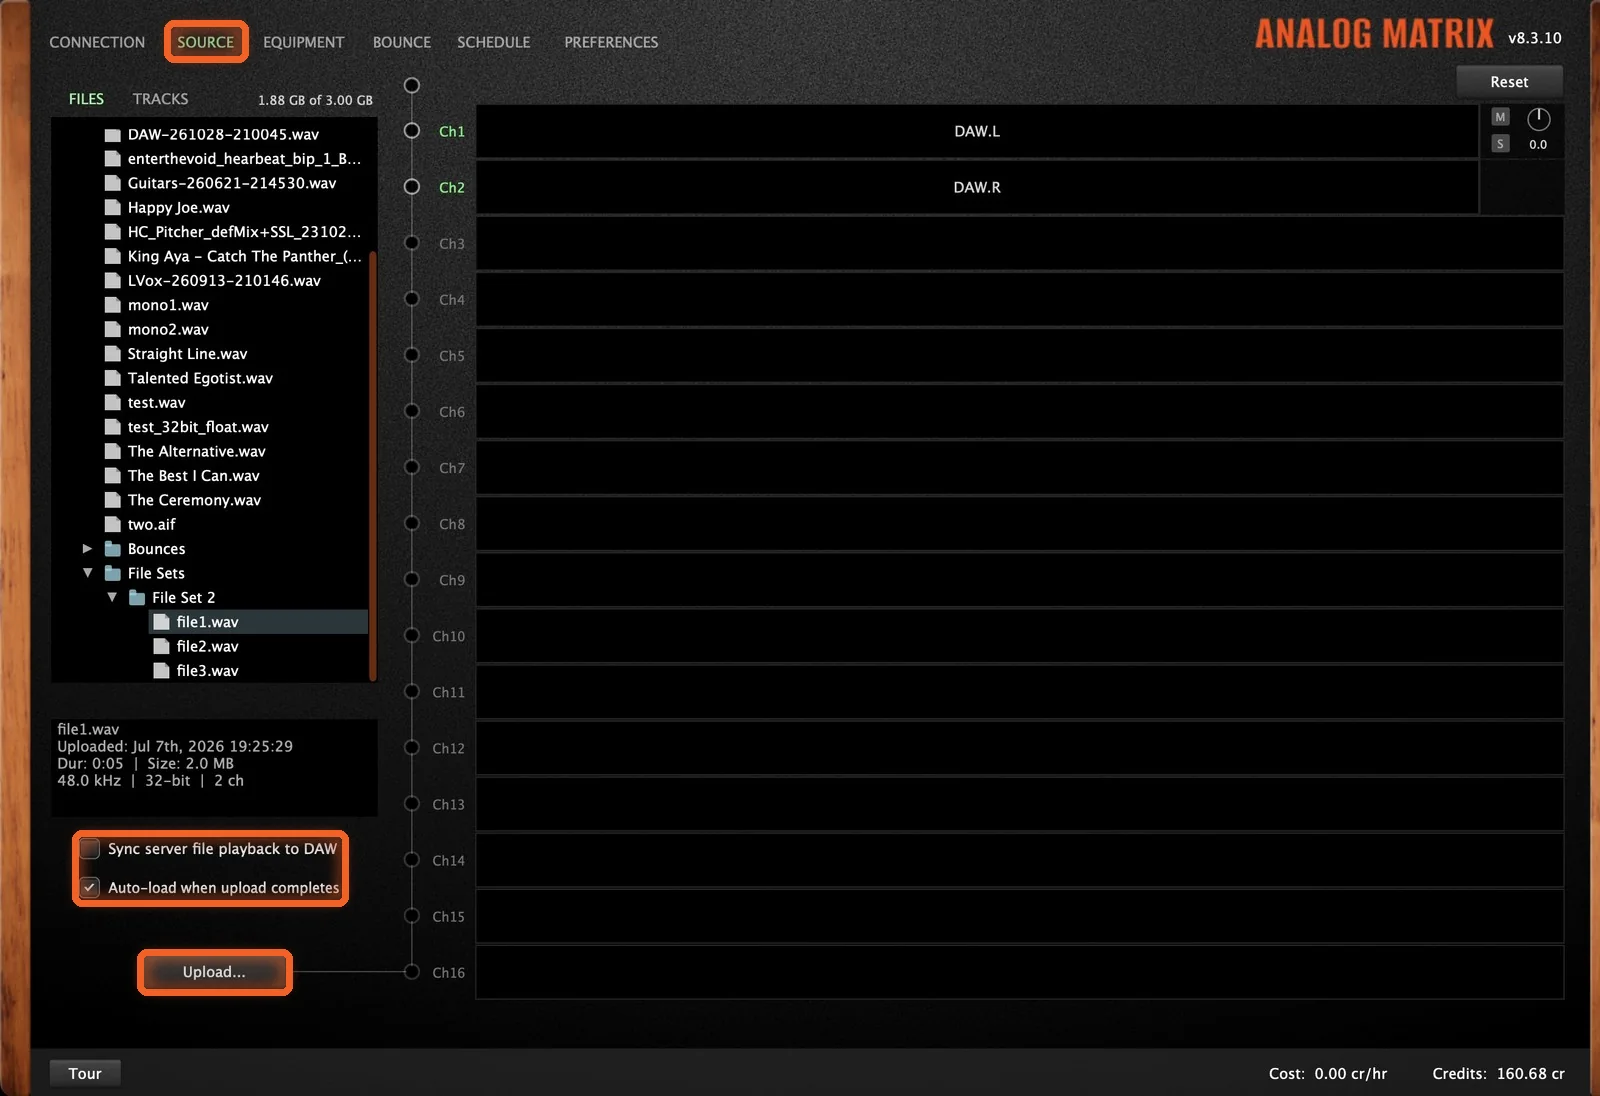
Step 1: Arm
Put your DAW's playhead where you want the upload to start. Then click Upload... in the plugin. Channels 1 and 2 arm (their record dots turn red), the button turns to Cancel, and the plugin shows "Start playback to begin..." while it waits for you. Your live stream pauses from this moment, so the upload gets the bandwidth.
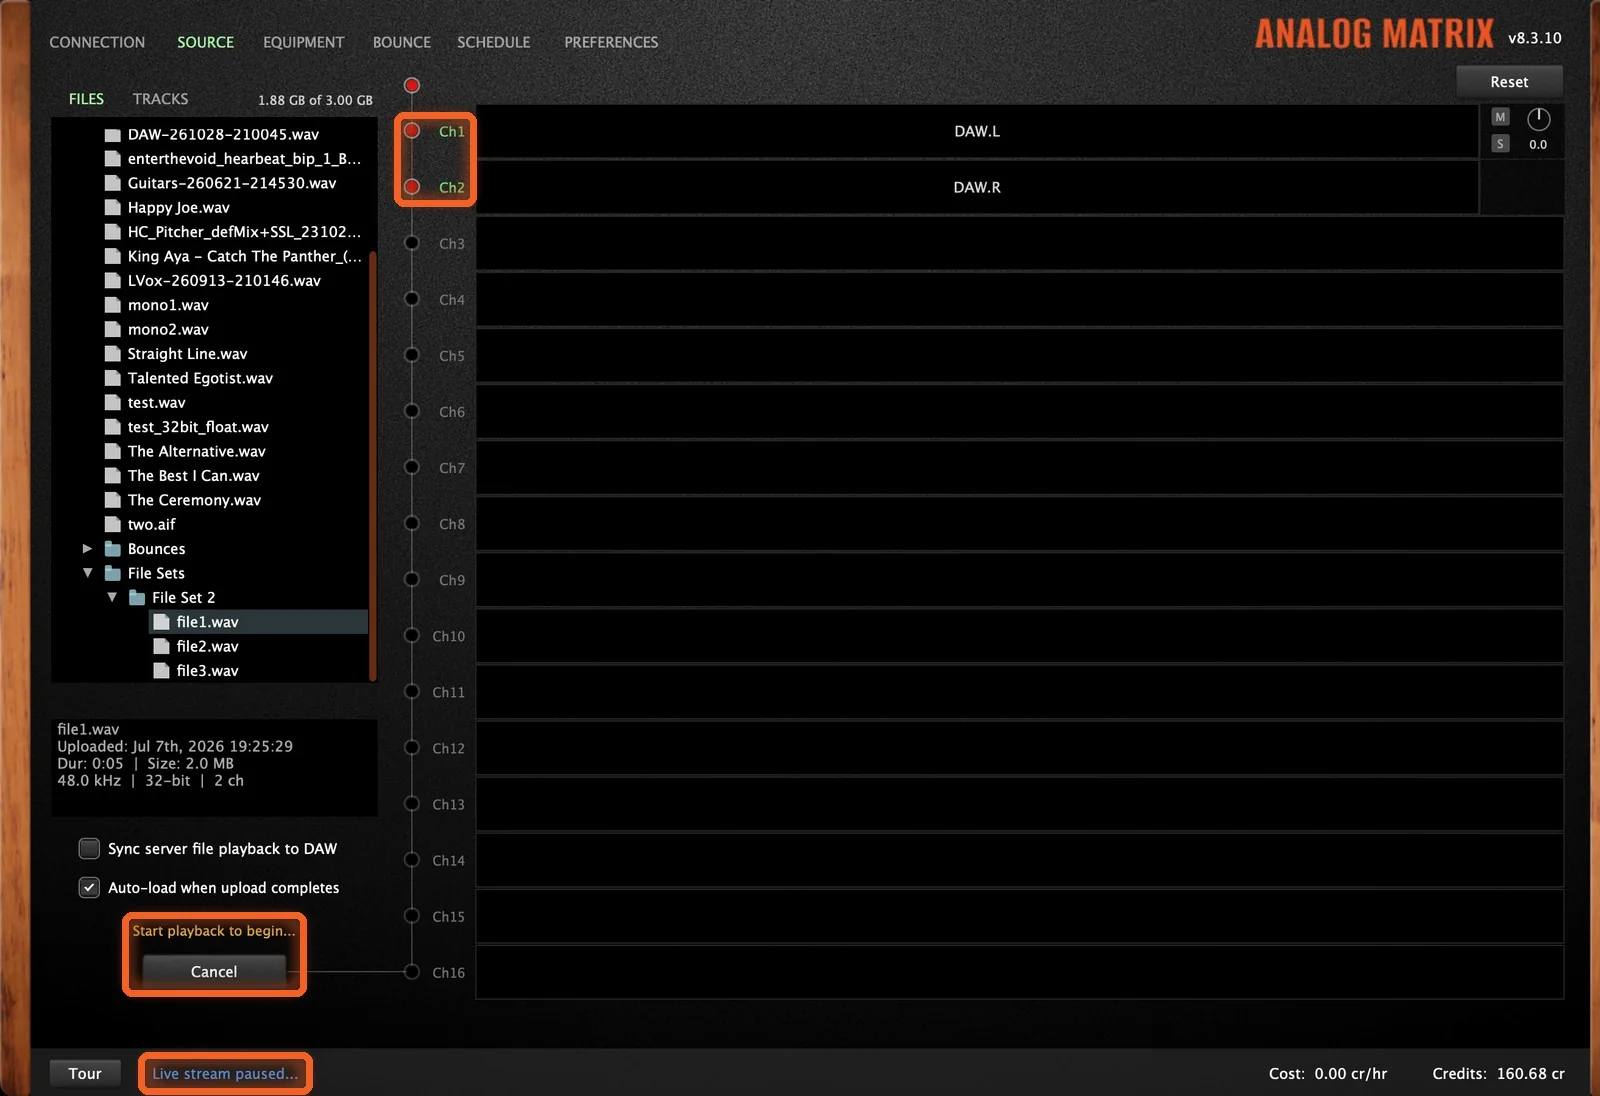
Step 2: Play
Press play in your DAW. The track uploads as it plays, and the plugin reads "Stop playback to finish...". Let it run to the end of the section you want.
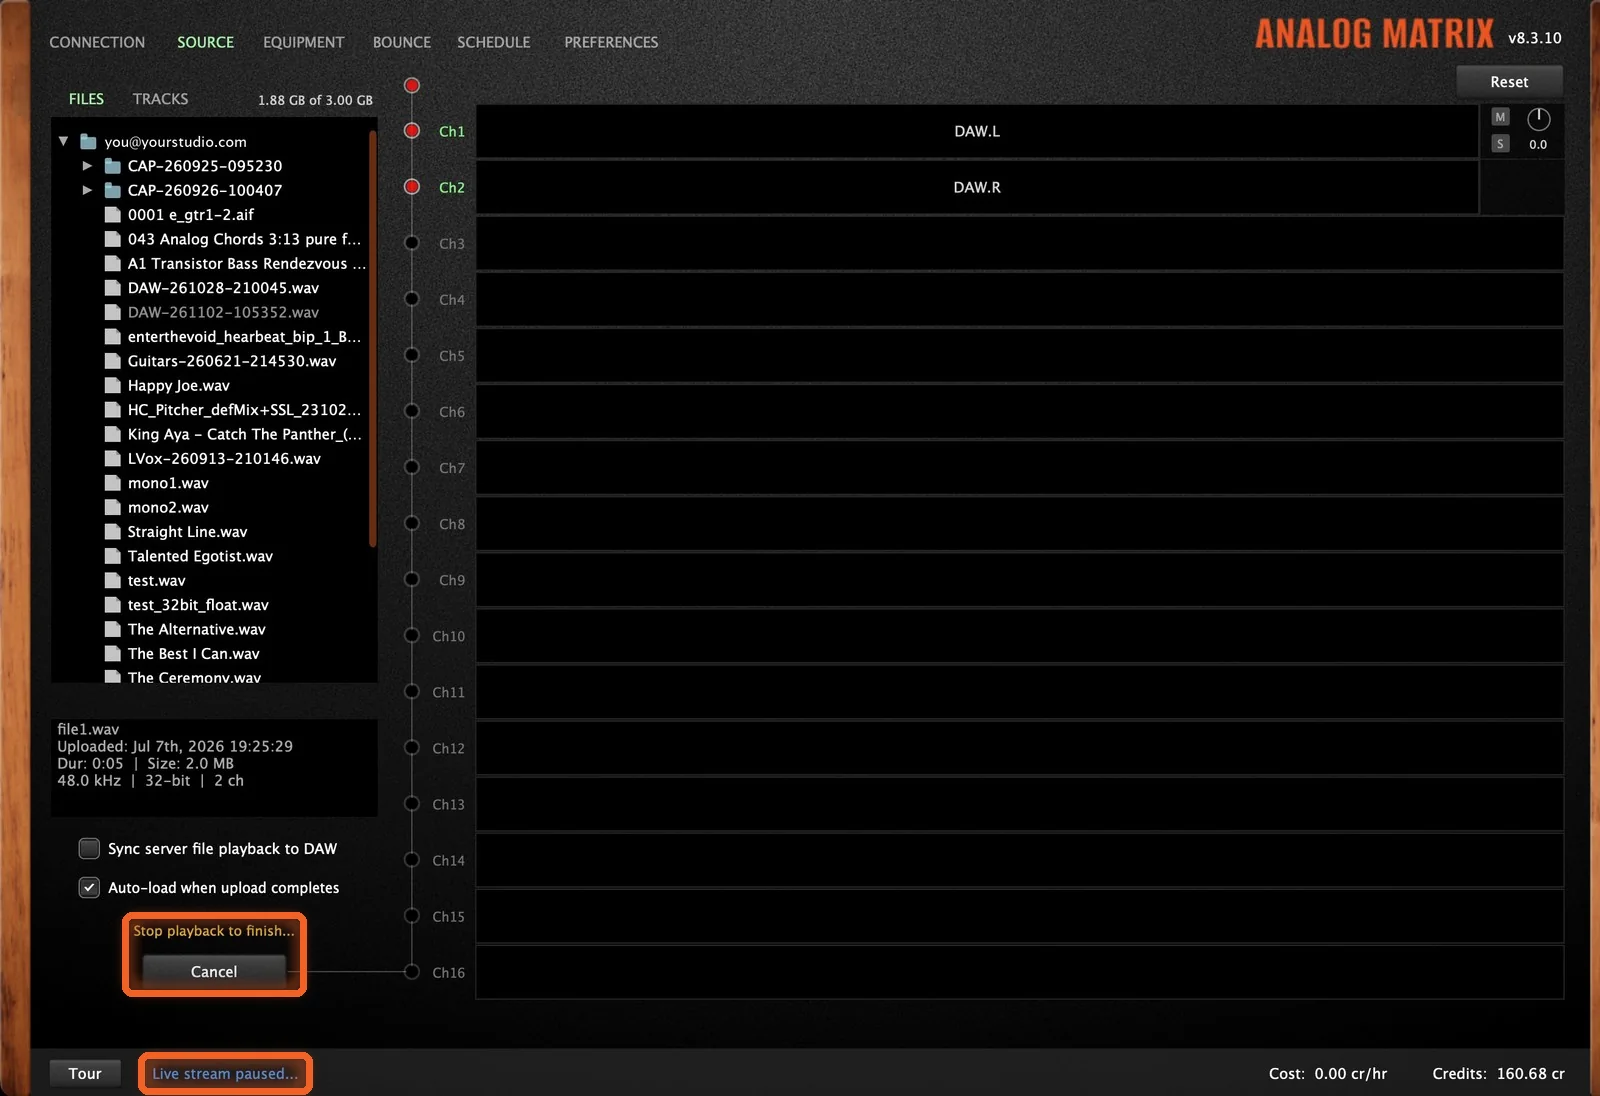
Step 3: Stop
Stop playback, and the upload is done. The new file shows up in your Files list. Its name starts with DAW, followed by the date and time (for example, DAW-261102-105352.wav), so you always know where it came from.
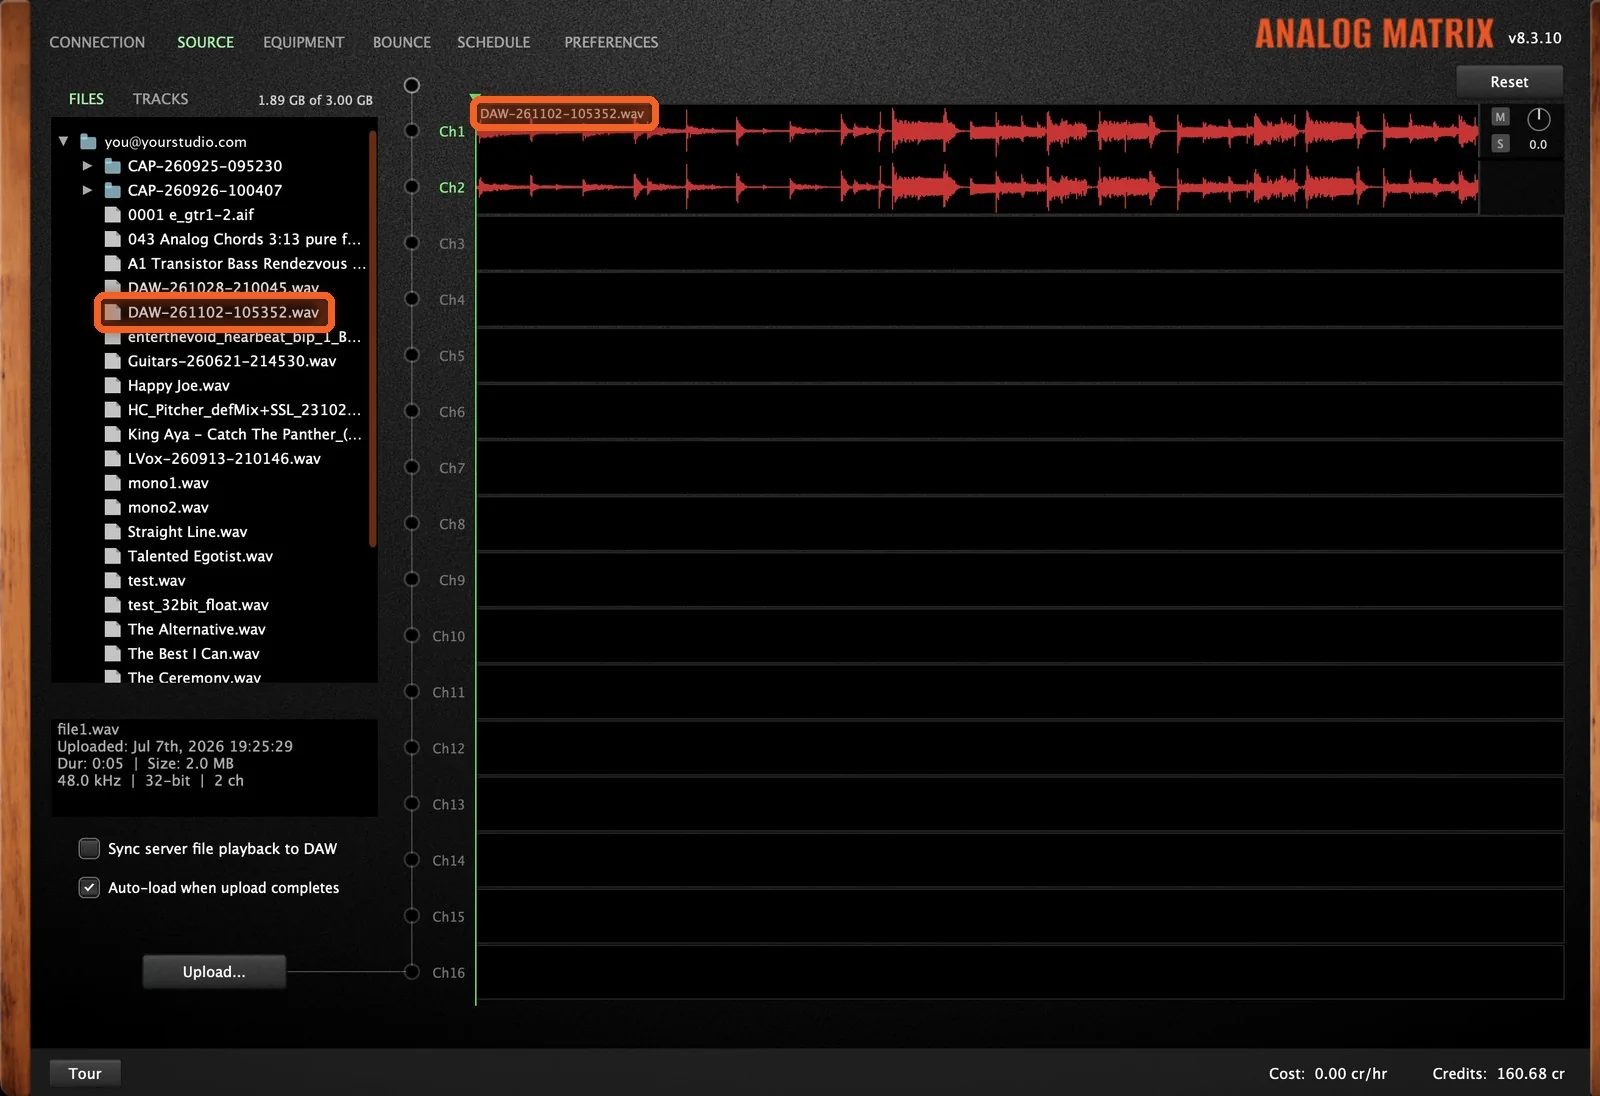
Auto-Load and Play From the Server
With Auto-load when upload completes checked, the file loads straight onto channels 1 and 2, in place of your DAW input, and its waveform appears there.
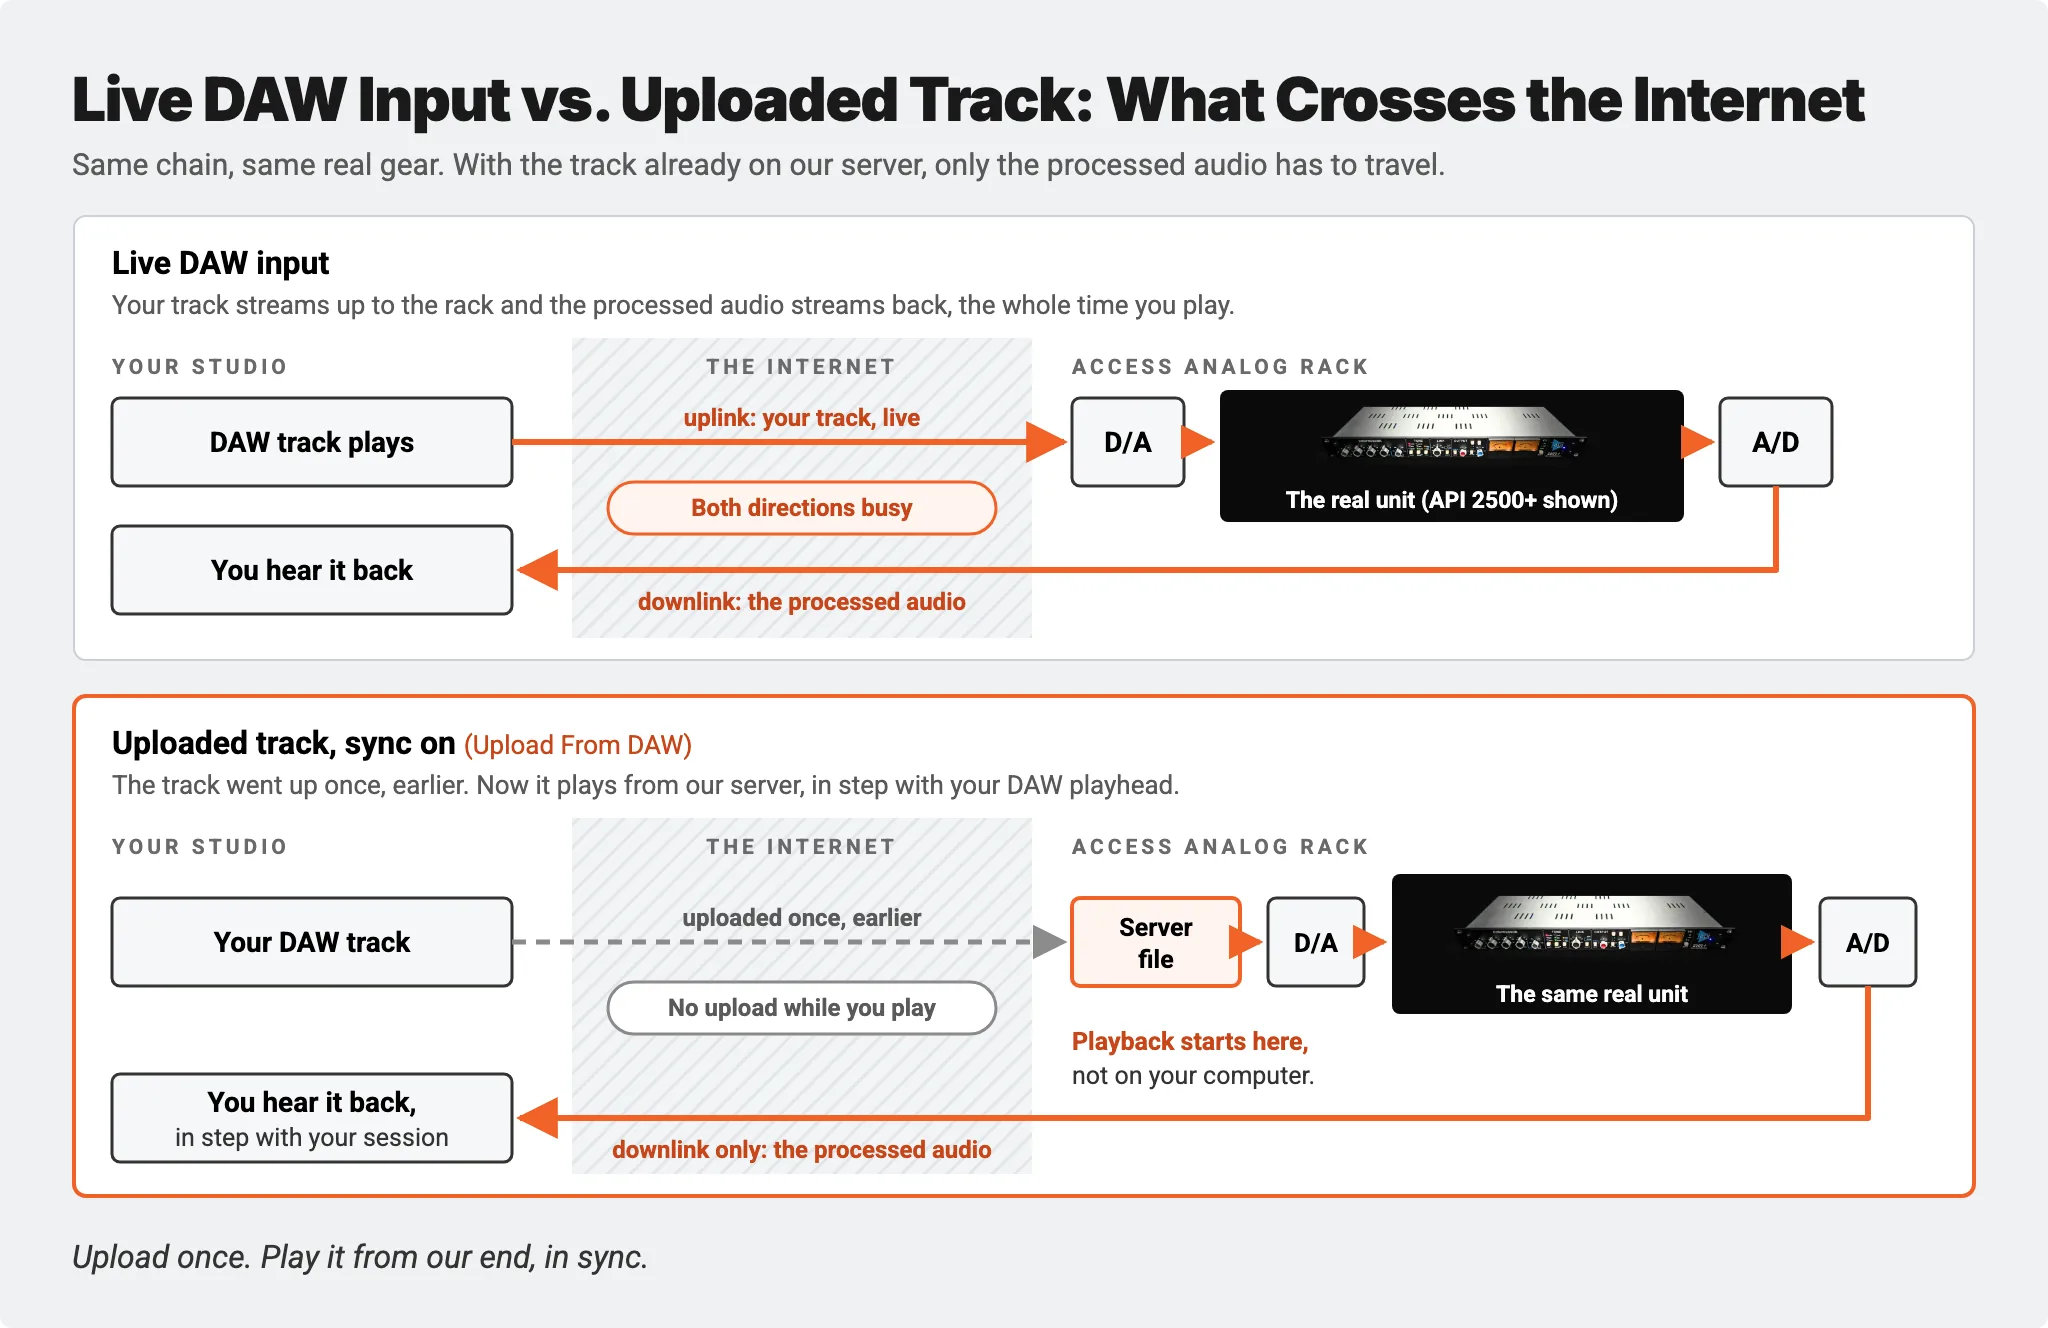
Now when you press play, the audio comes from our server, not from your computer. Nothing has to stream up from your end, so the session uses no upload bandwidth, which makes for a steadier session. Our Playback From Server guide covers this in full.
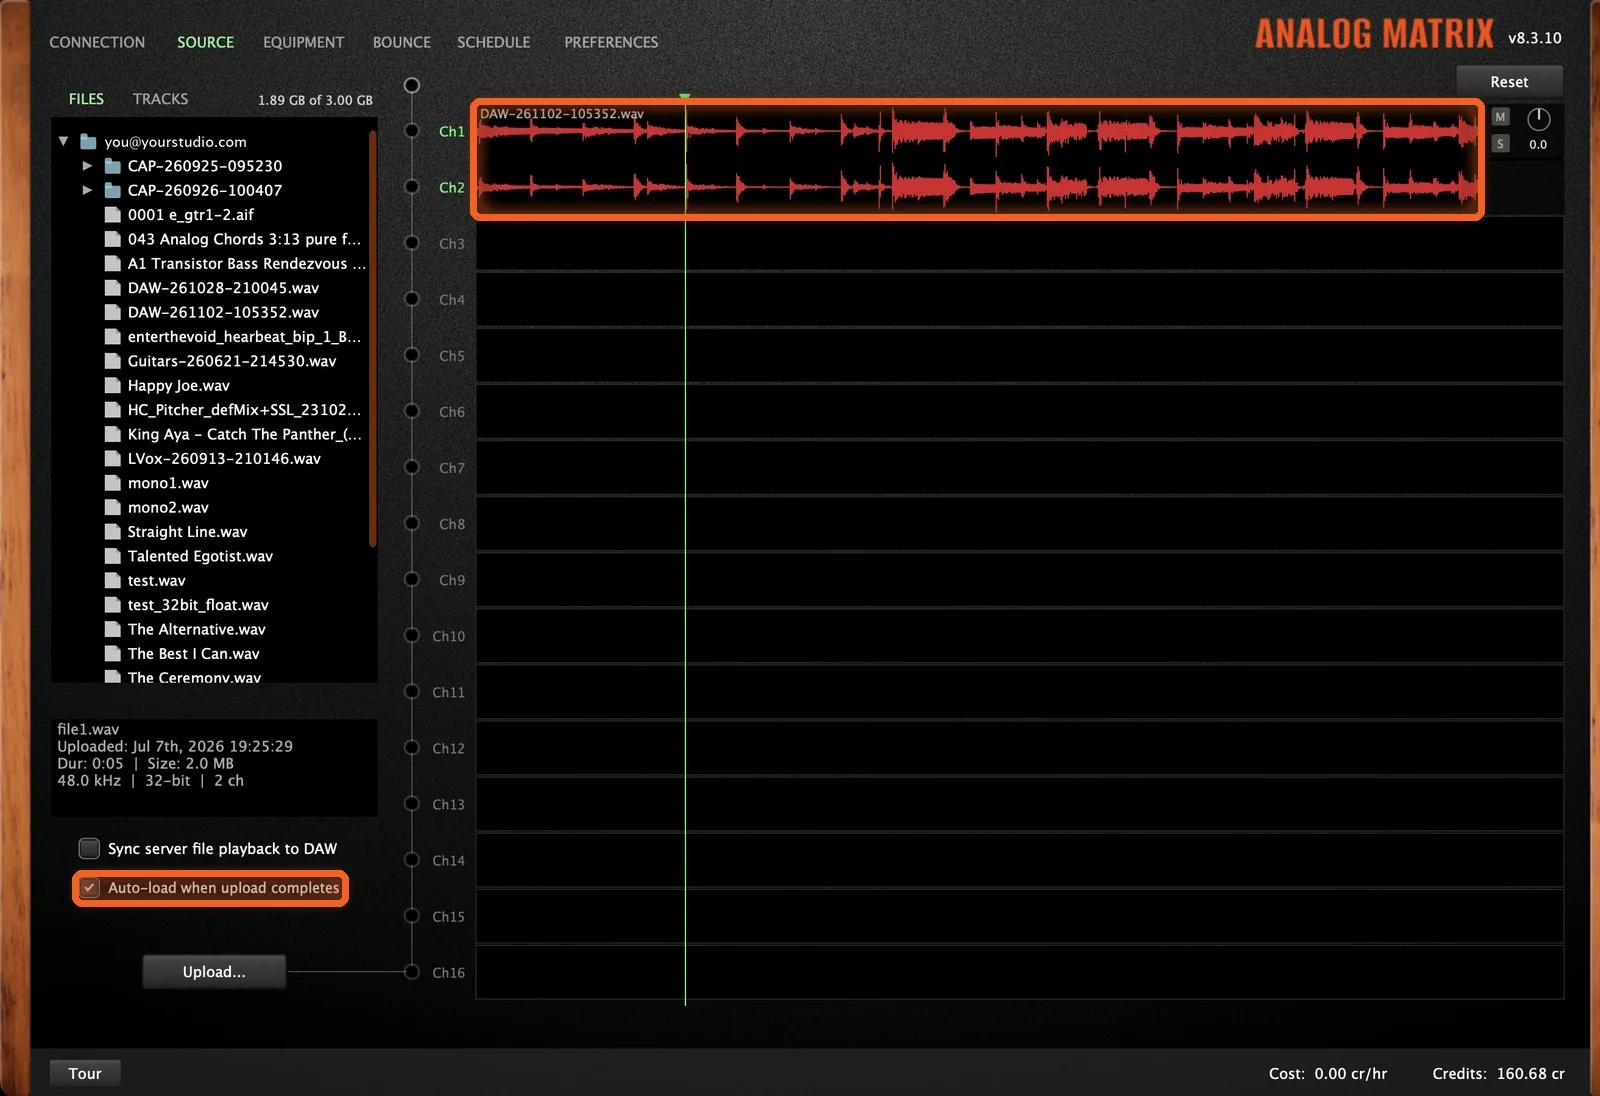
Arm, play, stop. Three steps, and your track is on our server.
Keep It in Sync With Your Session
The upload remembers where it sat on your DAW timeline. Say it ran from bar 5 to bar 20. What happens when you press play depends on one checkbox, Sync server file playback to DAW:
- Sync off: the file always plays from its top, wherever your playhead is. That's fine when it's the only thing playing, but it won't line up with your other tracks.
- Sync on: the file plays in step with your DAW, right where it belongs. Start at bar 7, and it starts two bars into the file. It's like having your track in the cloud while it stays in sync with everything else.
If your playhead is outside the file, the plugin tells you: "DAW playhead is before file start" or "DAW playhead is after file end".
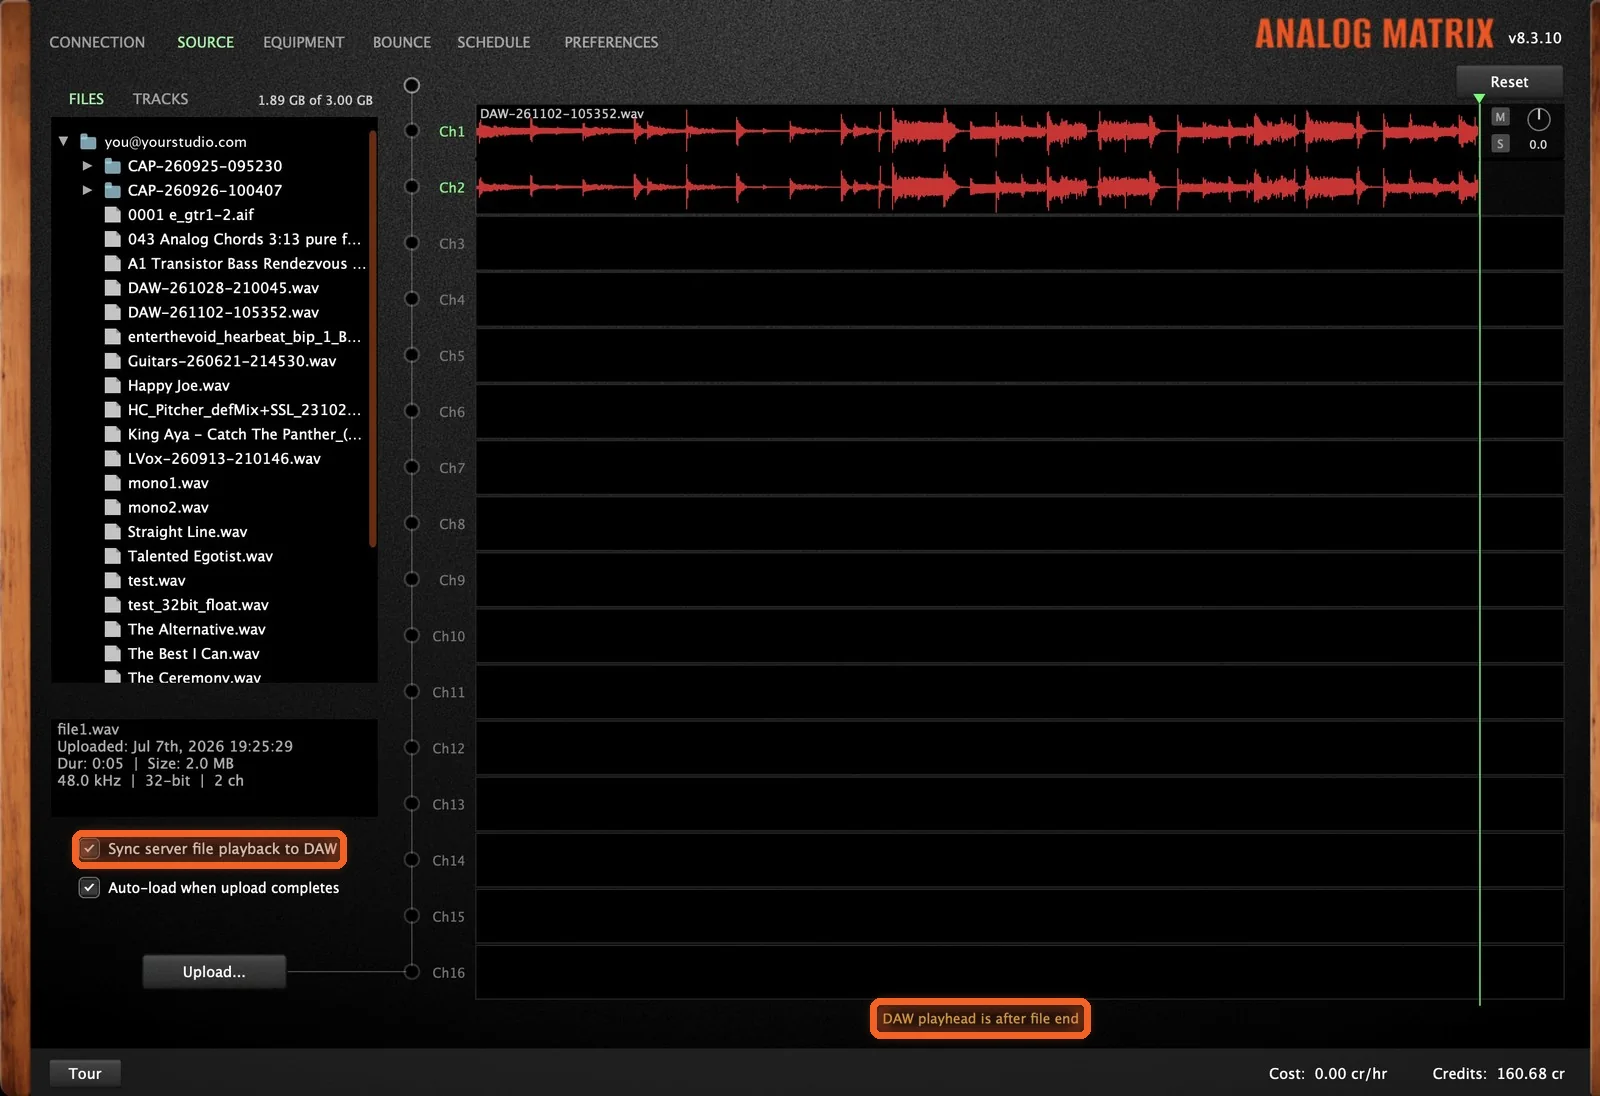
With sync on, your track plays from the server in time with your session, using only download bandwidth. That gives you steadier streaming and room to try a lower buffer for less latency.
Back to Your Live DAW Input
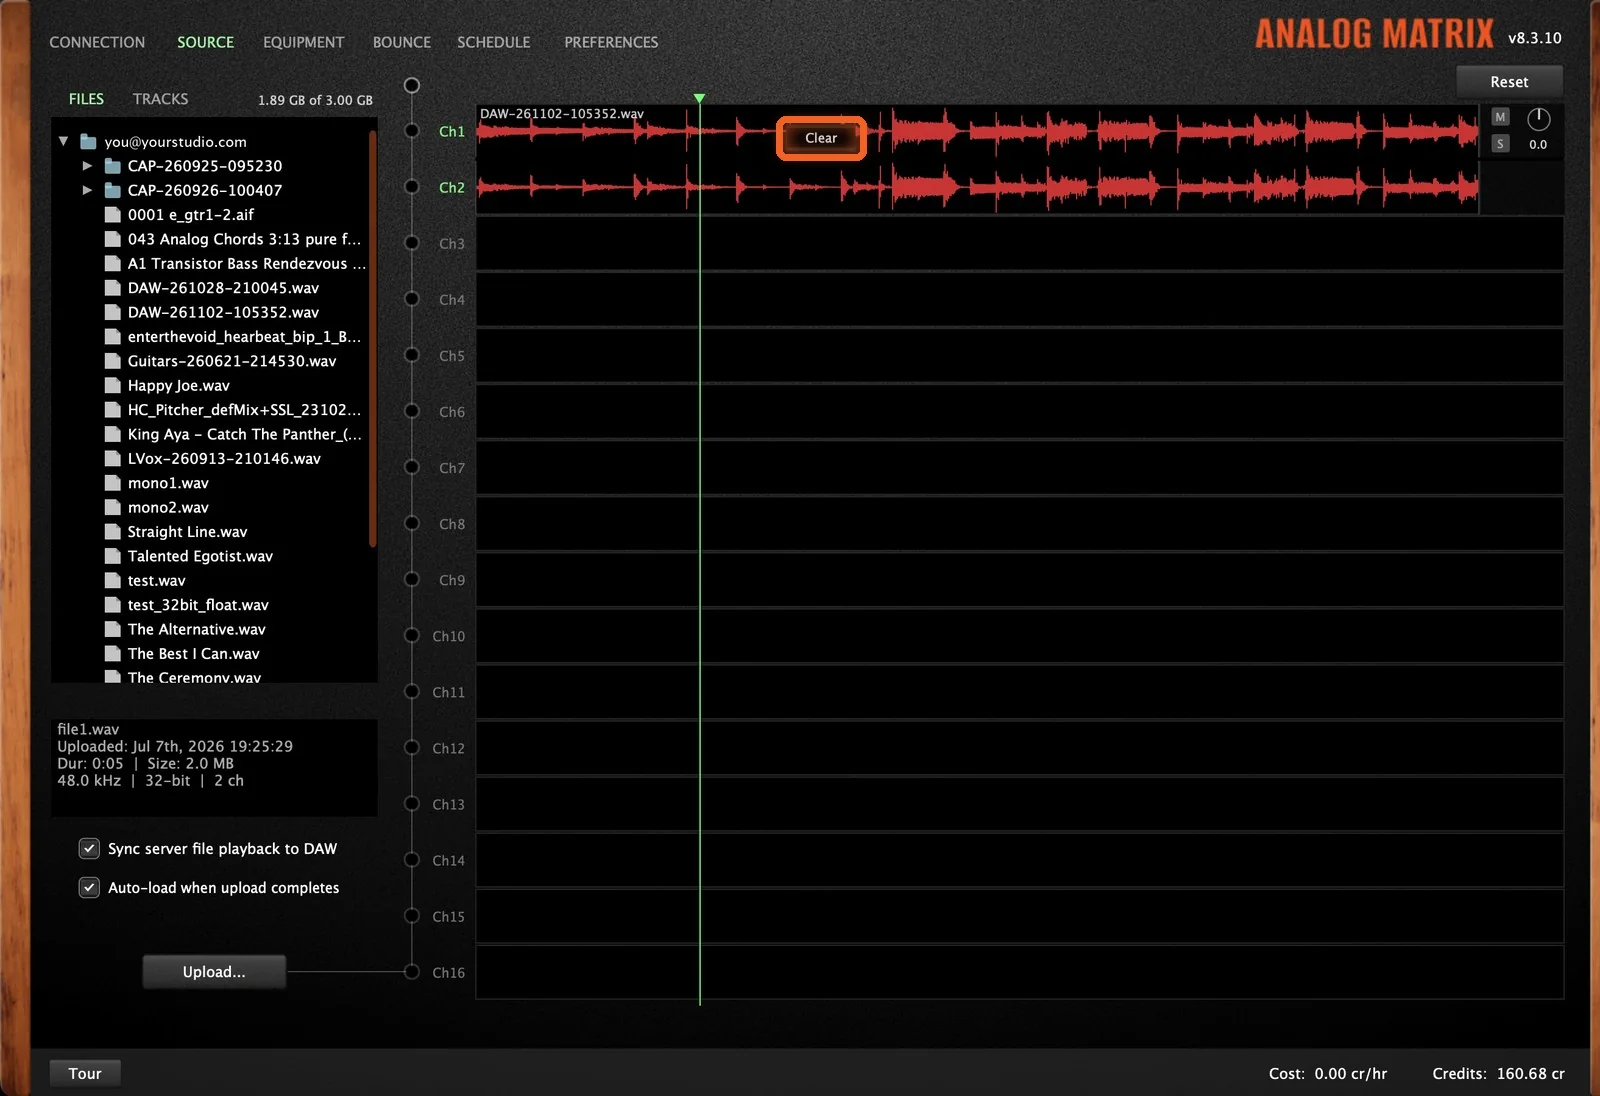
To go back to your live DAW input, right-click the channel and choose Clear.
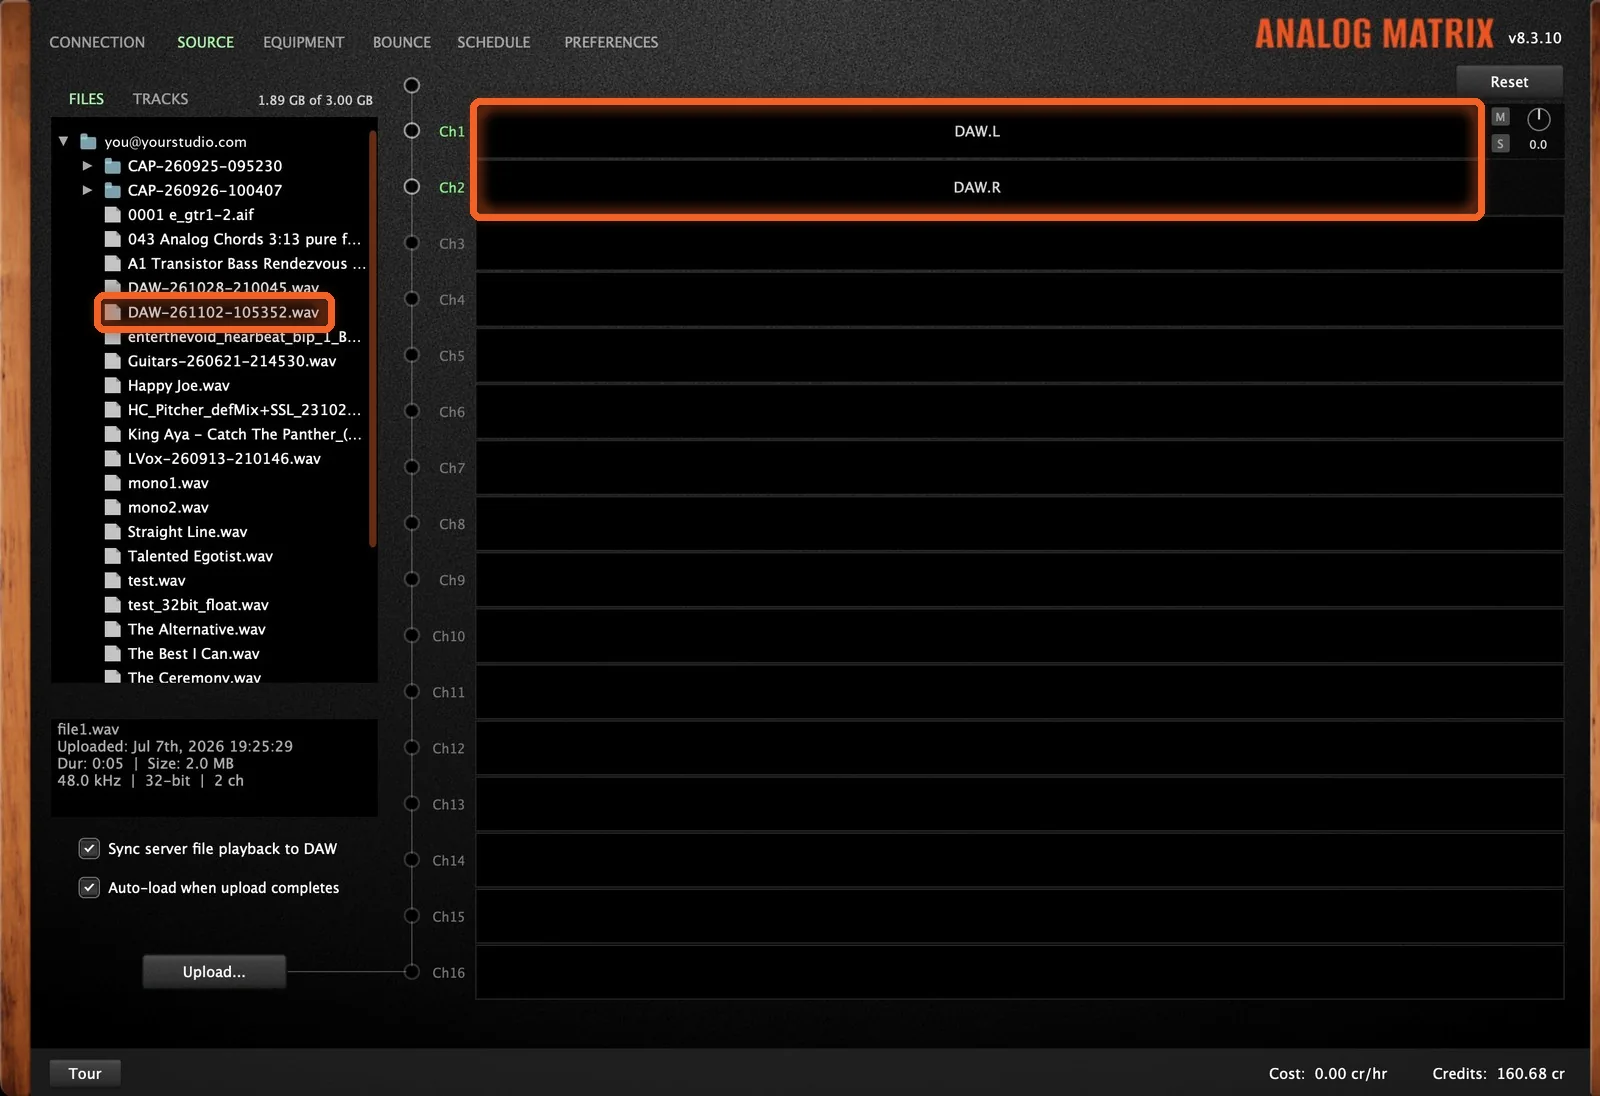
Channels 1 and 2 return to DAW.L and DAW.R, and your upload stays in Files for next time. Double-click it to load it again.
Uploading Several Tracks at Once
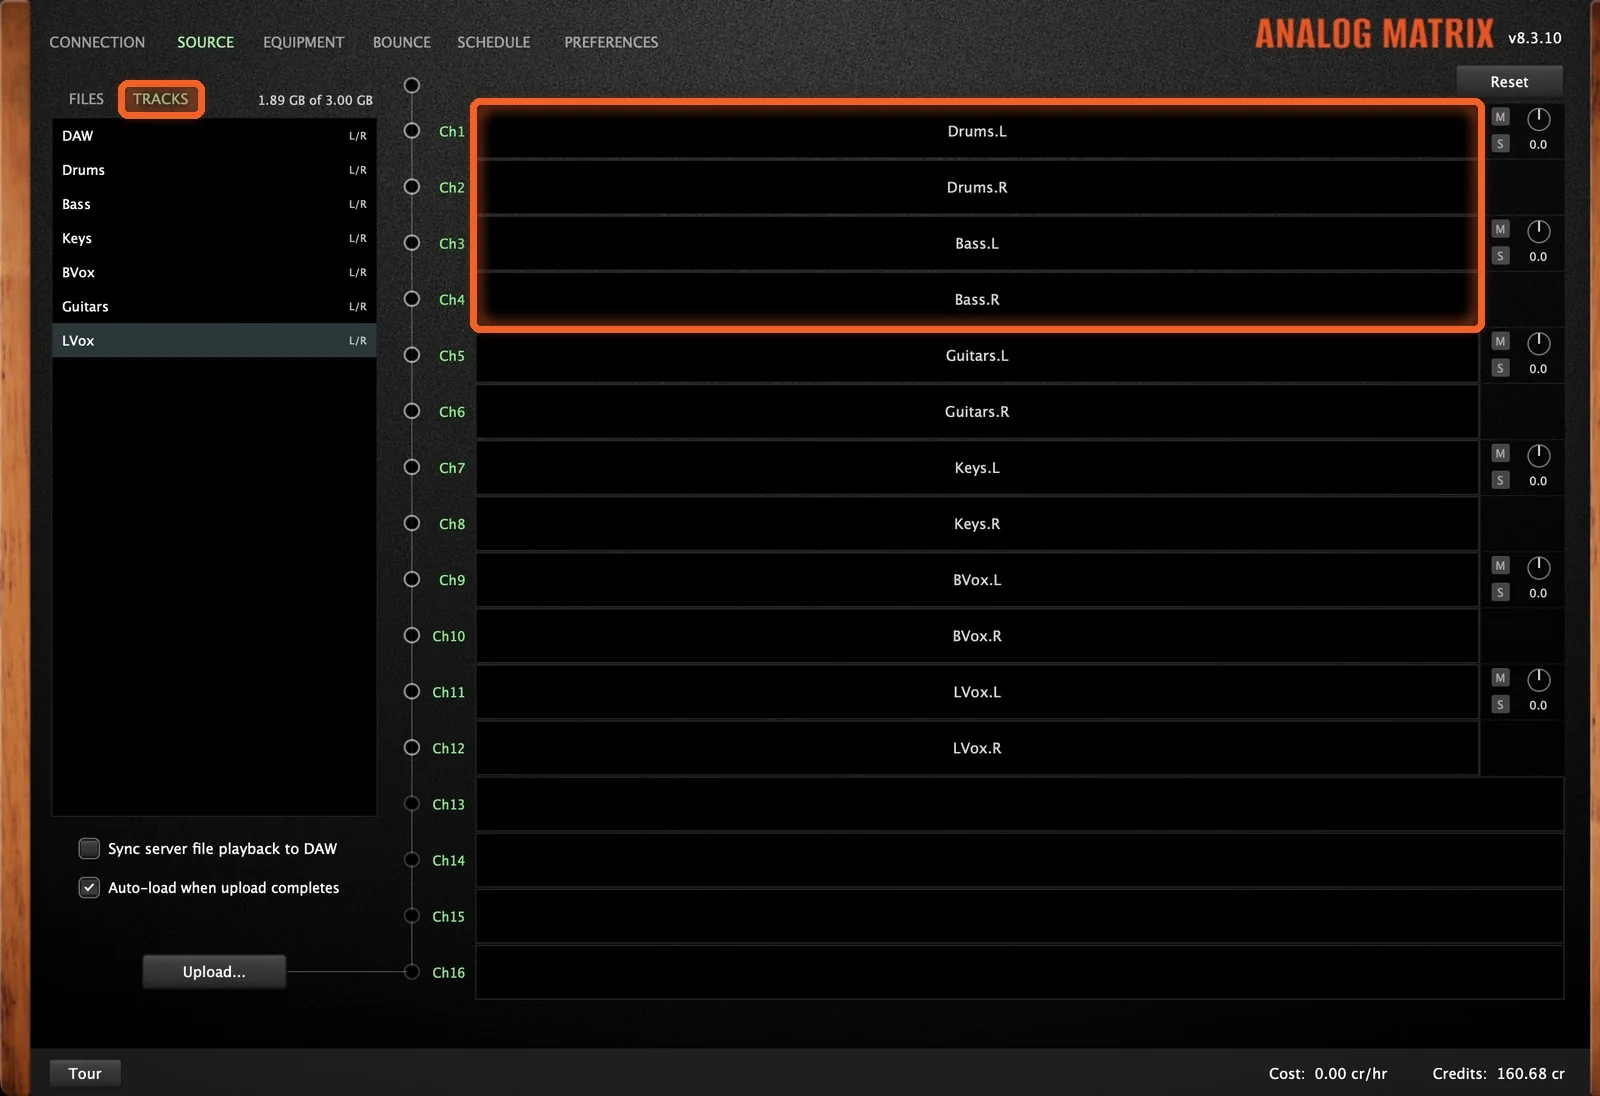
You can upload several tracks in one pass, each to its own file. This uses Analog Source, the free companion plugin that installs with Analog Matrix. Put an Analog Source on each track you want to upload, and they show up on the Analog Matrix Source tab, under Tracks. Our Real-Time Analog Summing guide covers the setup.
1. Route Your Tracks
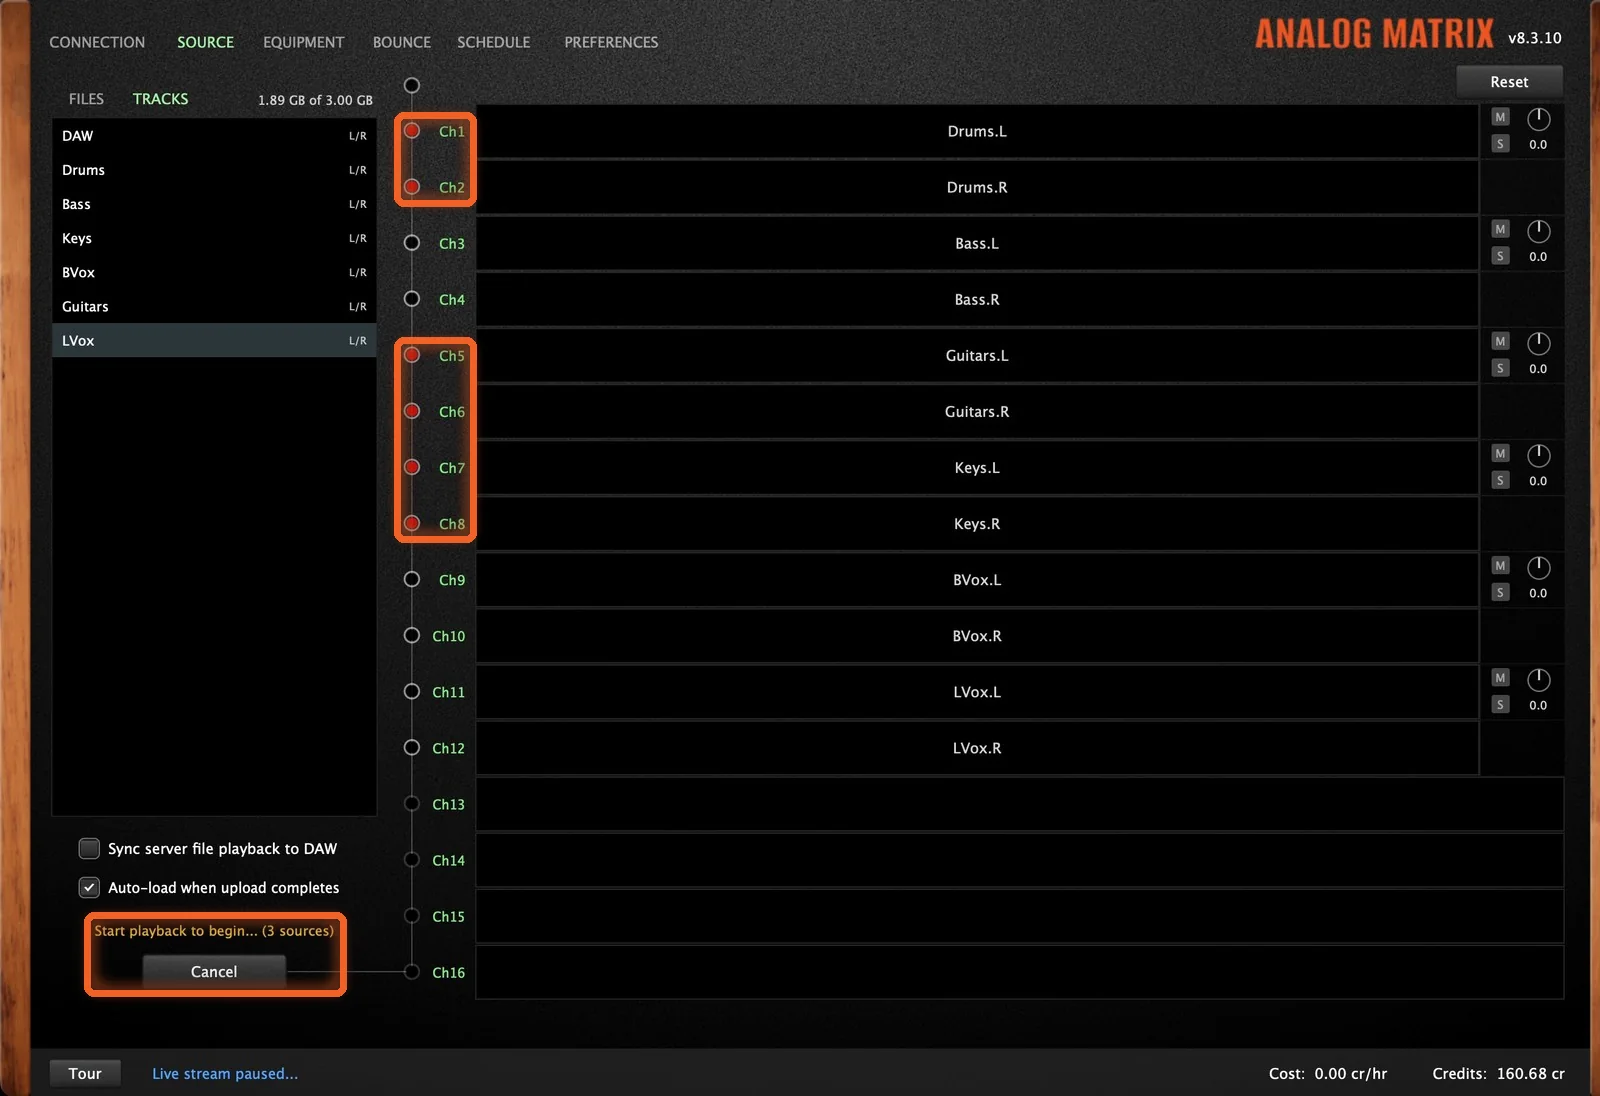
Open the Tracks tab and drag each track onto a pair of channels: Drums to 1 and 2, Bass to 3 and 4, and so on, up to 16 channels.
2. Arm the Ones You Want
Click the record dots for the tracks you want to upload, then click Upload.... The plugin counts them for you: "Start playback to begin... (3 sources)".
3. Play, Then Stop
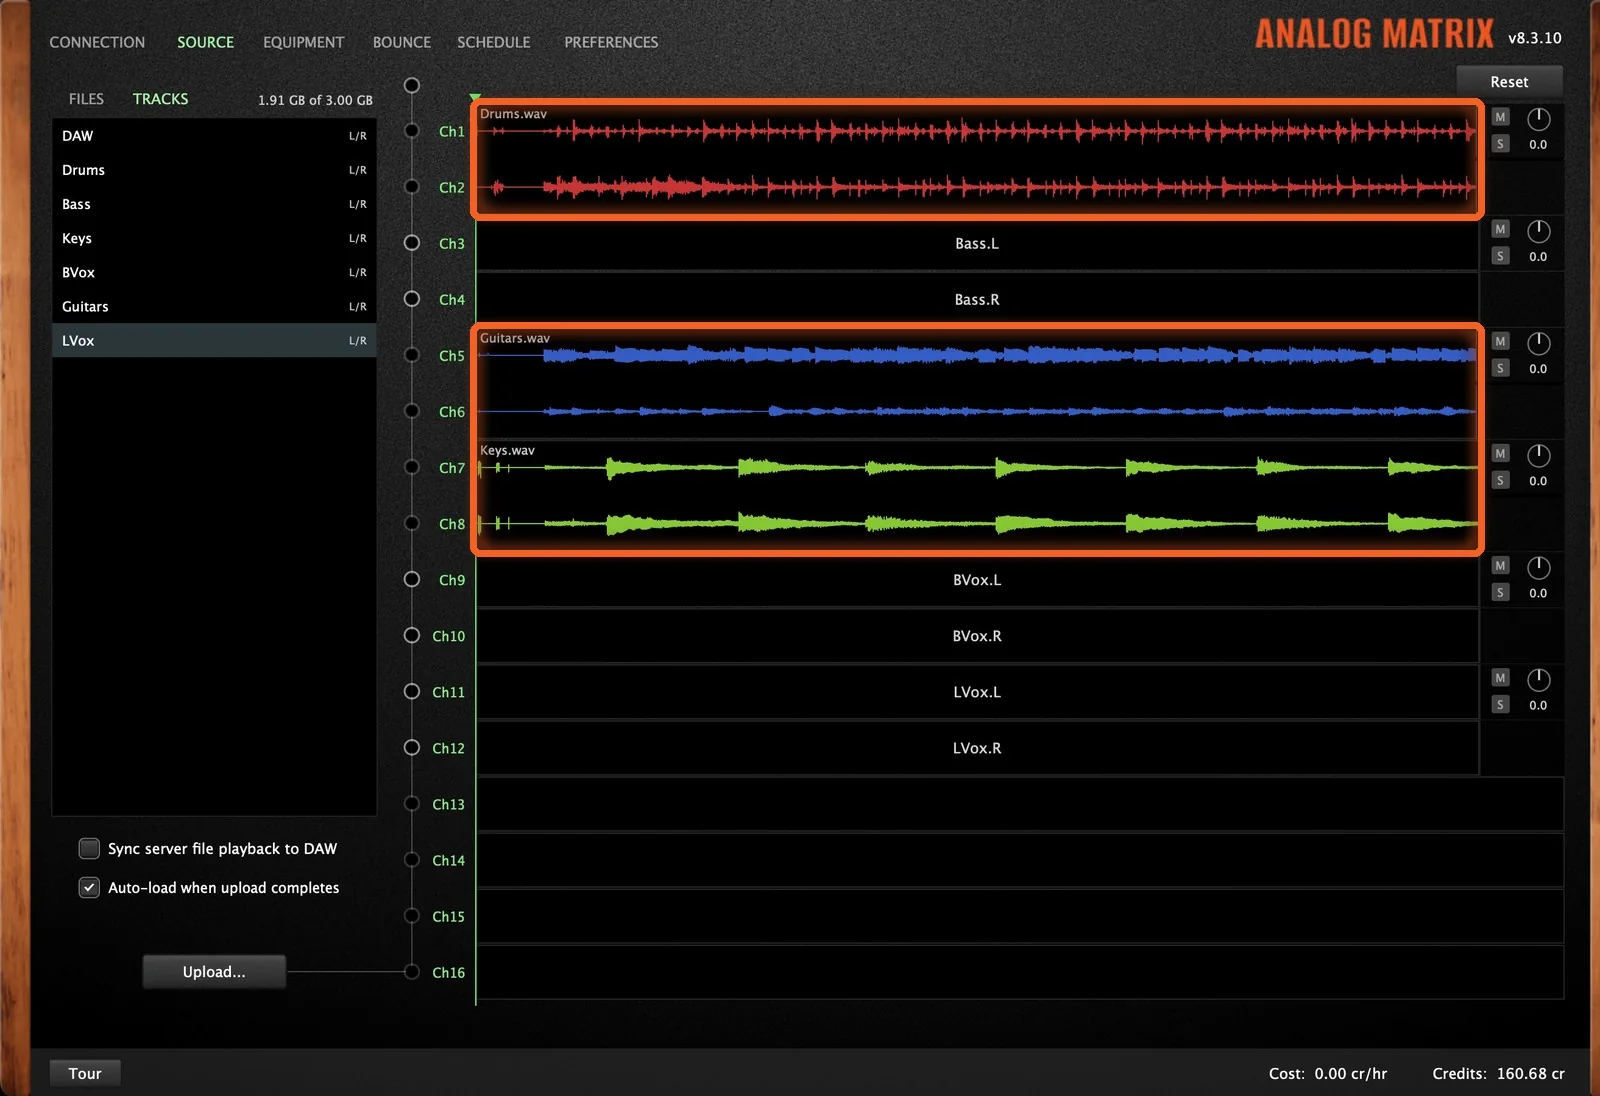
Press play, and they all upload together. When you stop, each track becomes its own file, named after the track (Drums.wav, Guitars.wav, Keys.wav), in one folder named CAP plus the date and time. With Auto-load on, they're already loaded on their channels.
Turn sync on, and they play back in step with your session, ready to bounce. Our Offline Bounce guide shows you how.
How Do I Get Started?
Download the Analog Matrix. The plugin is free from our downloads page for Mac and Windows in VST, VST3, AU and AAX, and Analog Source installs with it. It is not an emulation: every knob you move turns a real control on real hardware in our racks.
Practice the workflow for free. A new account starts with 12 free credits, roughly an hour on an average device. The Iron Age LH95 EQ and the AudioScape Buss Compressor never use credits, so they're a good place to try your first upload and bounce.
Pick how you pay for gear time. Buy credits on demand, reserve a unit for a set time, or move to the Access Analog Subscription (Essential, Pro or Elite) for the best rate.
Arm, Play, Stop
No exports, no file hunting. Arm, play and stop, and your track is on our server, in step with your session and ready for an offline bounce through real analog gear.
Send your tracks straight from your DAW to the real API 2500+, SSL, Neve and more.
FAQs
What is Upload From DAW in Analog Matrix?
It sends a track from your DAW session straight to the Access Analog server while it plays, so you don't have to export it and upload the file yourself. Click Upload... on the Source tab, press play, and stop when you're done.
Where does my upload go?
Into the Files list on the Source tab, named DAW plus the date and time. Uploads of several tracks go into a folder named CAP plus the date and time, with one file per track. Our Cloud Storage guide covers the Files list in full.
What does Sync server file playback to DAW do?
It plays the upload in step with your DAW, from the same place on the timeline where you recorded it. With it off, the file always plays from its top, which won't line up with your other tracks.
Does my live stream keep running while I upload?
No. The live stream pauses from the moment you arm until the upload finishes, so the upload gets the bandwidth.
How do I go back to my live DAW input?
Right-click the channel and choose Clear. Channels 1 and 2 go back to your DAW input, and the upload stays in Files.
Can I upload several tracks at once?
Yes. Put the Analog Source plugin on each track, route the tracks to channels on the Tracks tab, arm the ones you want, then click Upload... and press play. For analog summing, you can upload up to 16 stems and bounce them through a summing mixer.
What do I do with the upload next?
Bounce it. An offline bounce runs on our end from the file on our server, so a dropout in your connection can't touch the print. Our Offline Bounce guide walks through every step.
Hear what real analog gear does to your own mix, before you buy a single piece of it.
Run real outboard hardware from your DAW. New accounts get 12 free credits.
Connect todayMore in Getting Started
All posts →