How to Use Offline Bounce in Analog Matrix: Print Through Real Analog Gear Without Dropouts
With offline bounce, your print runs on our end, right next to the rack, so your internet connection can't touch it.
When you mix through real analog gear with Access Analog, there are two ways to print the result. You can stream your track through the rack in real time and record it back into your DAW. Or you can use offline bounce, which uploads your file first and runs the whole print on our server.
Offline bounce is the safest way to print. In this guide, Dr. Dan walks through every step in the Analog Matrix plugin: uploading your audio, loading it, building your chain, setting up the bounce and running it. Then we cover what happens when it finishes, and how to bounce several files at once with File Sets.
Key Takeaways
- Offline bounce runs the print on our server, next to the rack. Your file goes up first, so a dropout in your connection can't reach the print.
- It's always lossless 24-bit audio, whatever transmit format you use for real-time streaming.
- Five steps: upload, load, build your chain, set up the bounce, press Bounce. One bounce can run up to 75 minutes.
- Bounce time uses credits (about 1 credit per 5 to 6 minutes on one device). The Bounce tab shows the cost before you start.
- File Sets batch the work (Elite): several files, one chain, the same settings, bounced one after another.
Real-Time vs. Offline Bounce: Why It Matters
Real-time bounce plays your DAW session through the plugin, out over the internet to the rack and back, while you record the result on another track. It works well on a solid connection. But your audio is streaming live, so if your connection drops out, so does your print. You also have to export at real-time speed, because analog gear can't run faster than real time.
Offline bounce takes the internet out of the print. Your file goes up to our server first. The bounce runs on our end, right next to the rack, and the finished file comes back to you. A hiccup in your connection can't touch it, and offline bounces always use lossless 24-bit audio, whatever transmit format you stream with.
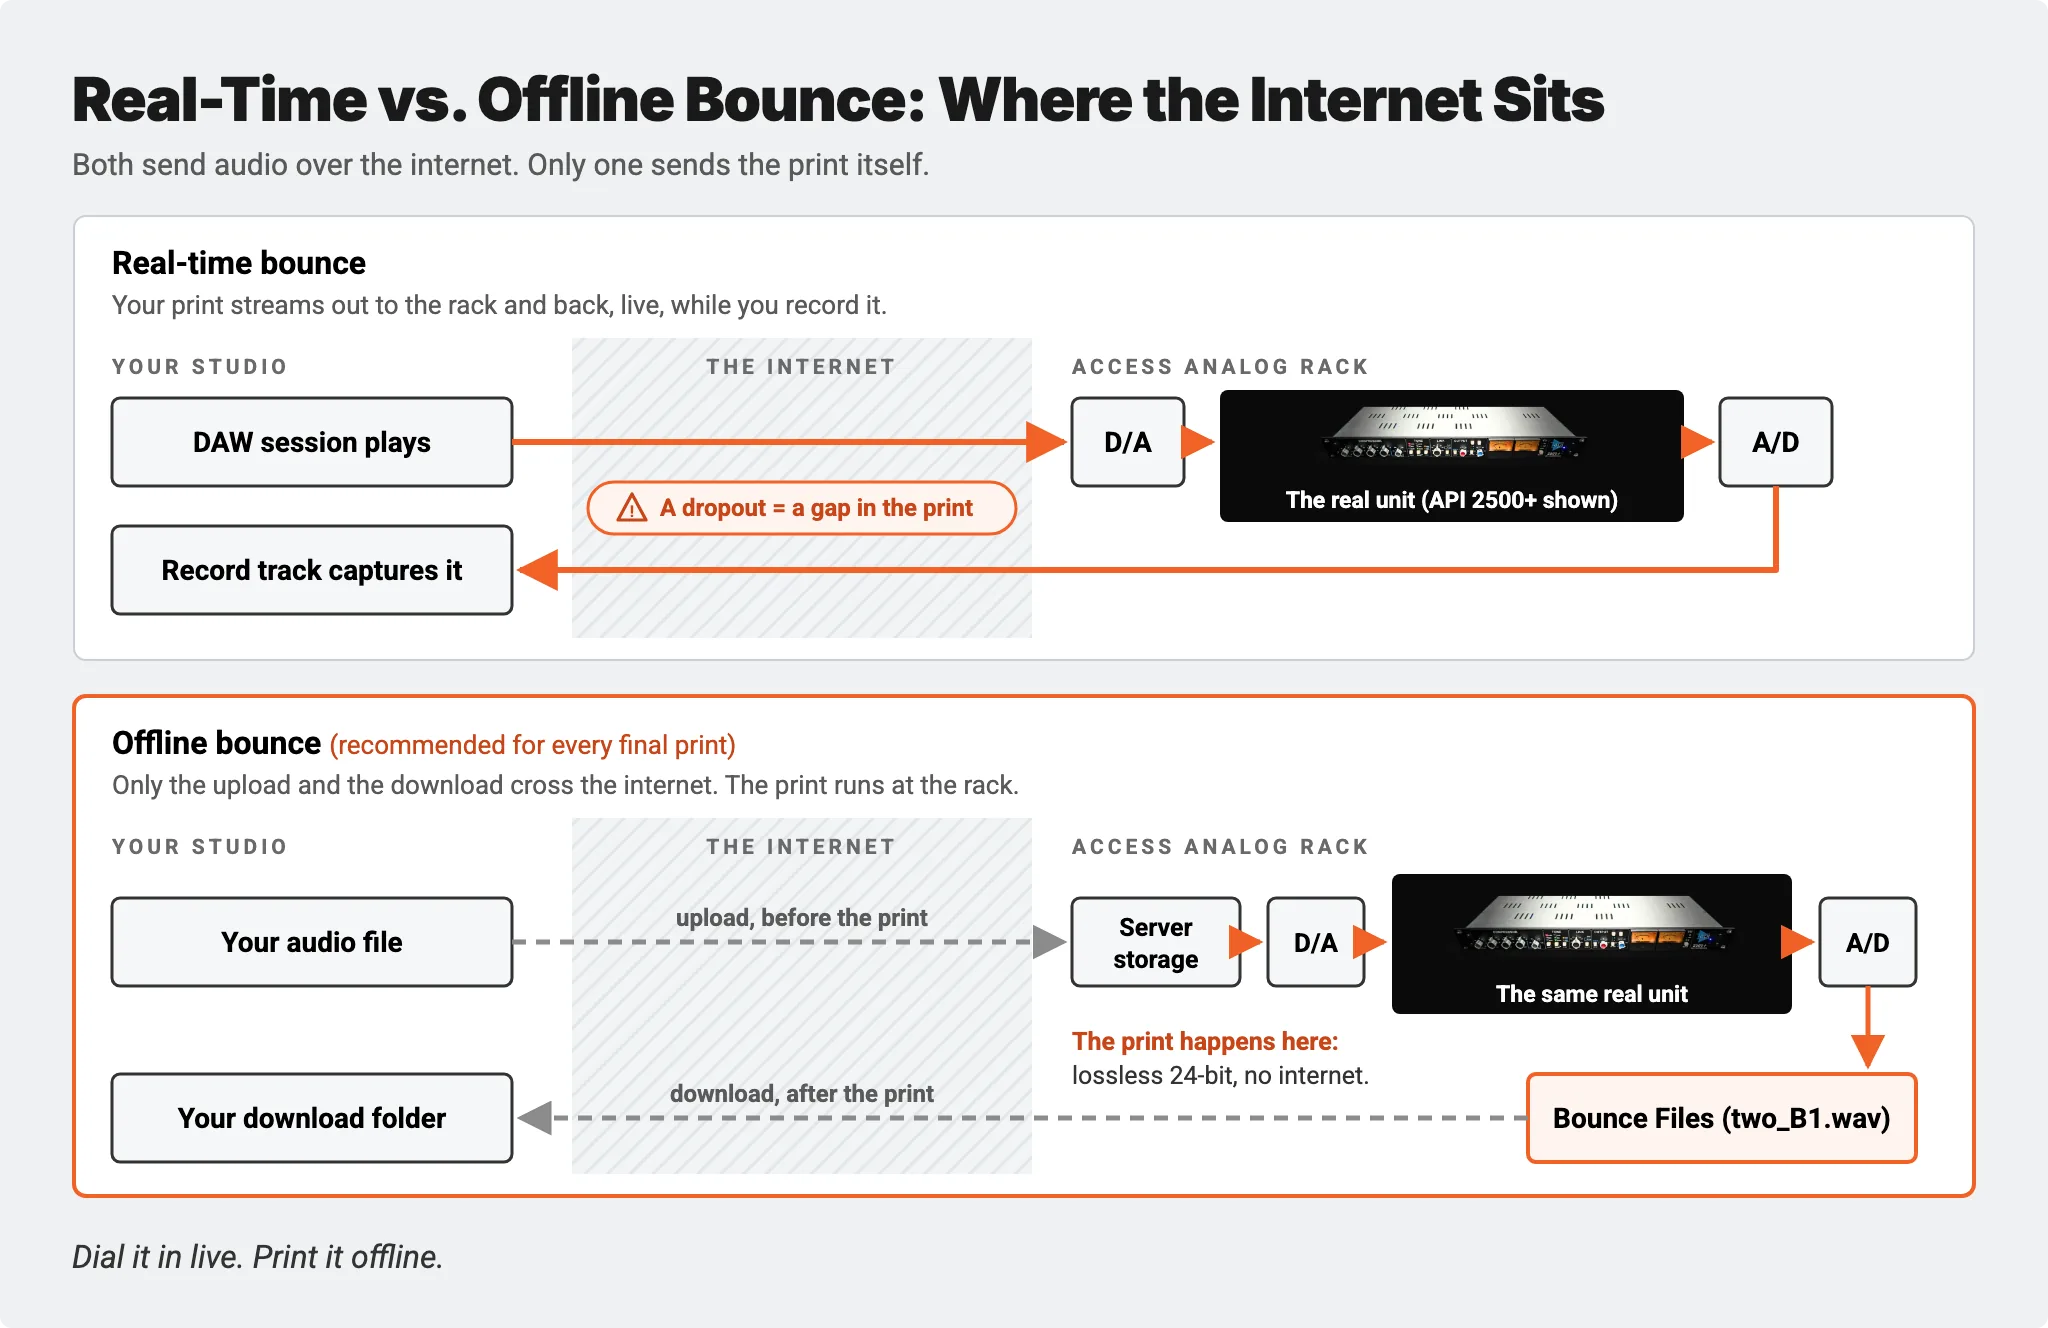
Real-time streaming is still how you dial in the sound: you hear every knob move on your own mix. Offline bounce is how you capture it once it's right.
Dial it in live. Print it offline.
Step-by-Step: Your First Offline Bounce
Step 1: Upload Your Audio
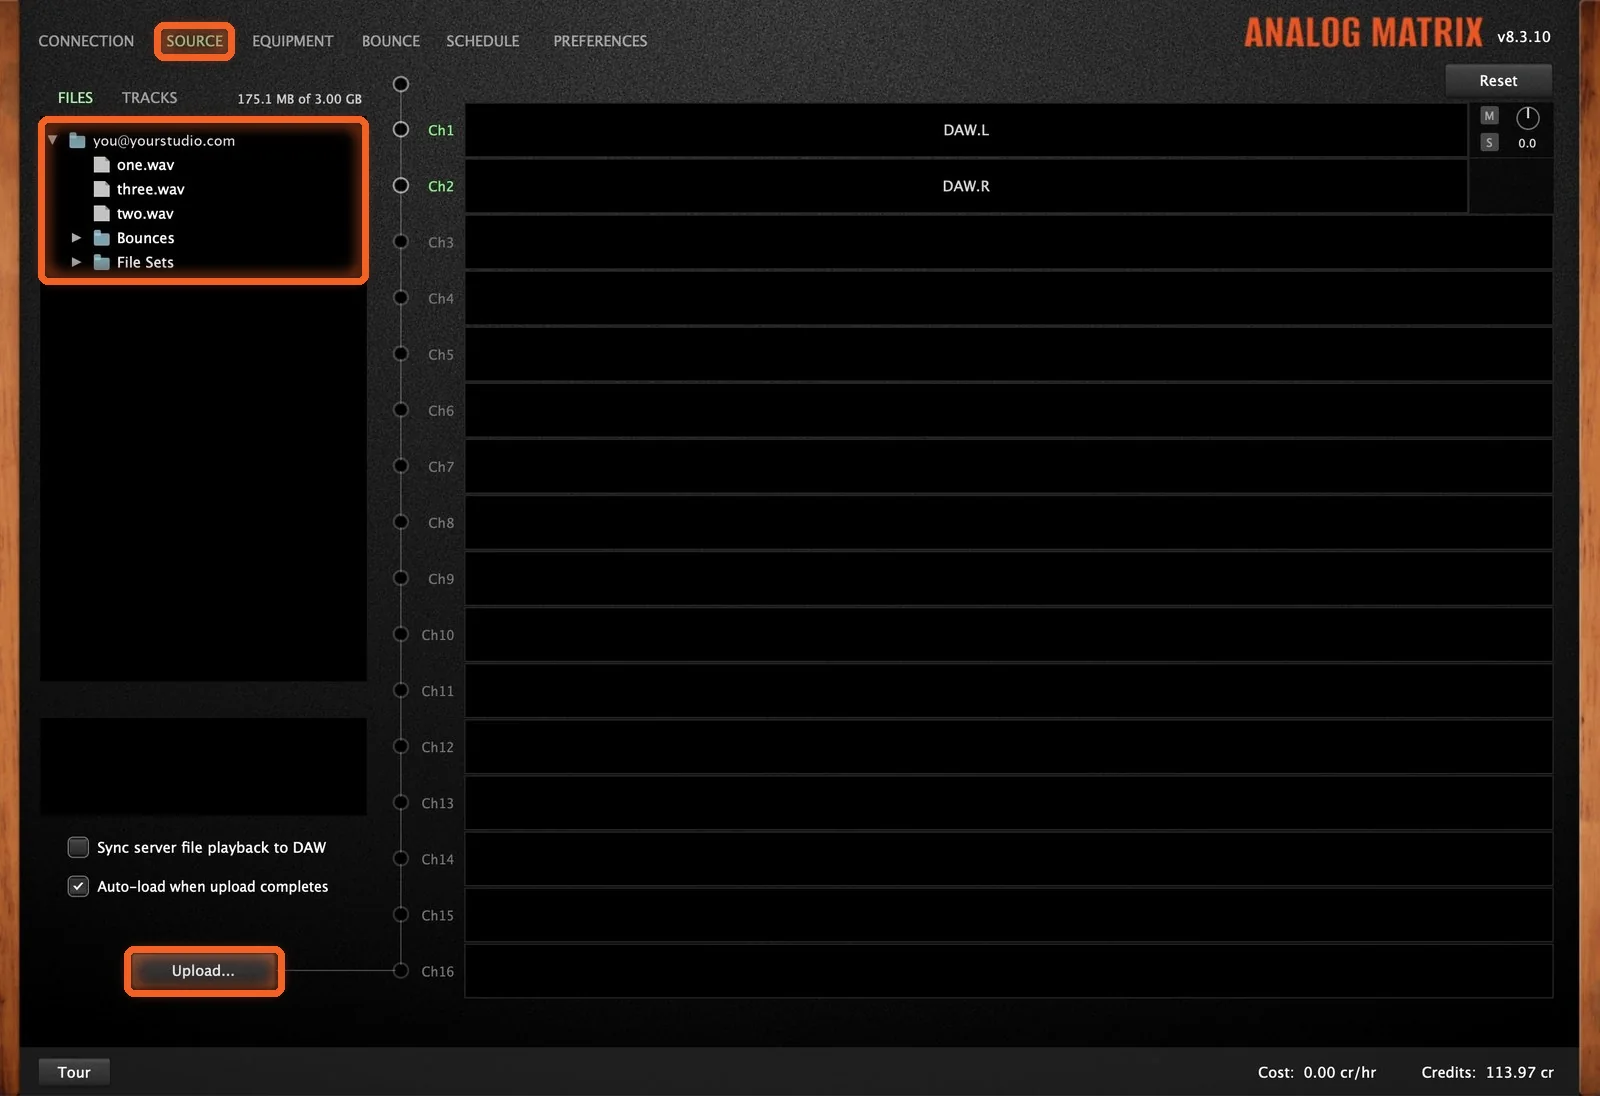
Start on the Source tab. An offline bounce always works from a file on our server, so first, get your audio up there. Just drag a file onto the Files list, or click Upload... and pick one. It uploads into your server storage, under your account.
You can also upload straight from your DAW with Upload From DAW..., which our Upload From DAW guide covers.
Step 2: Load the File
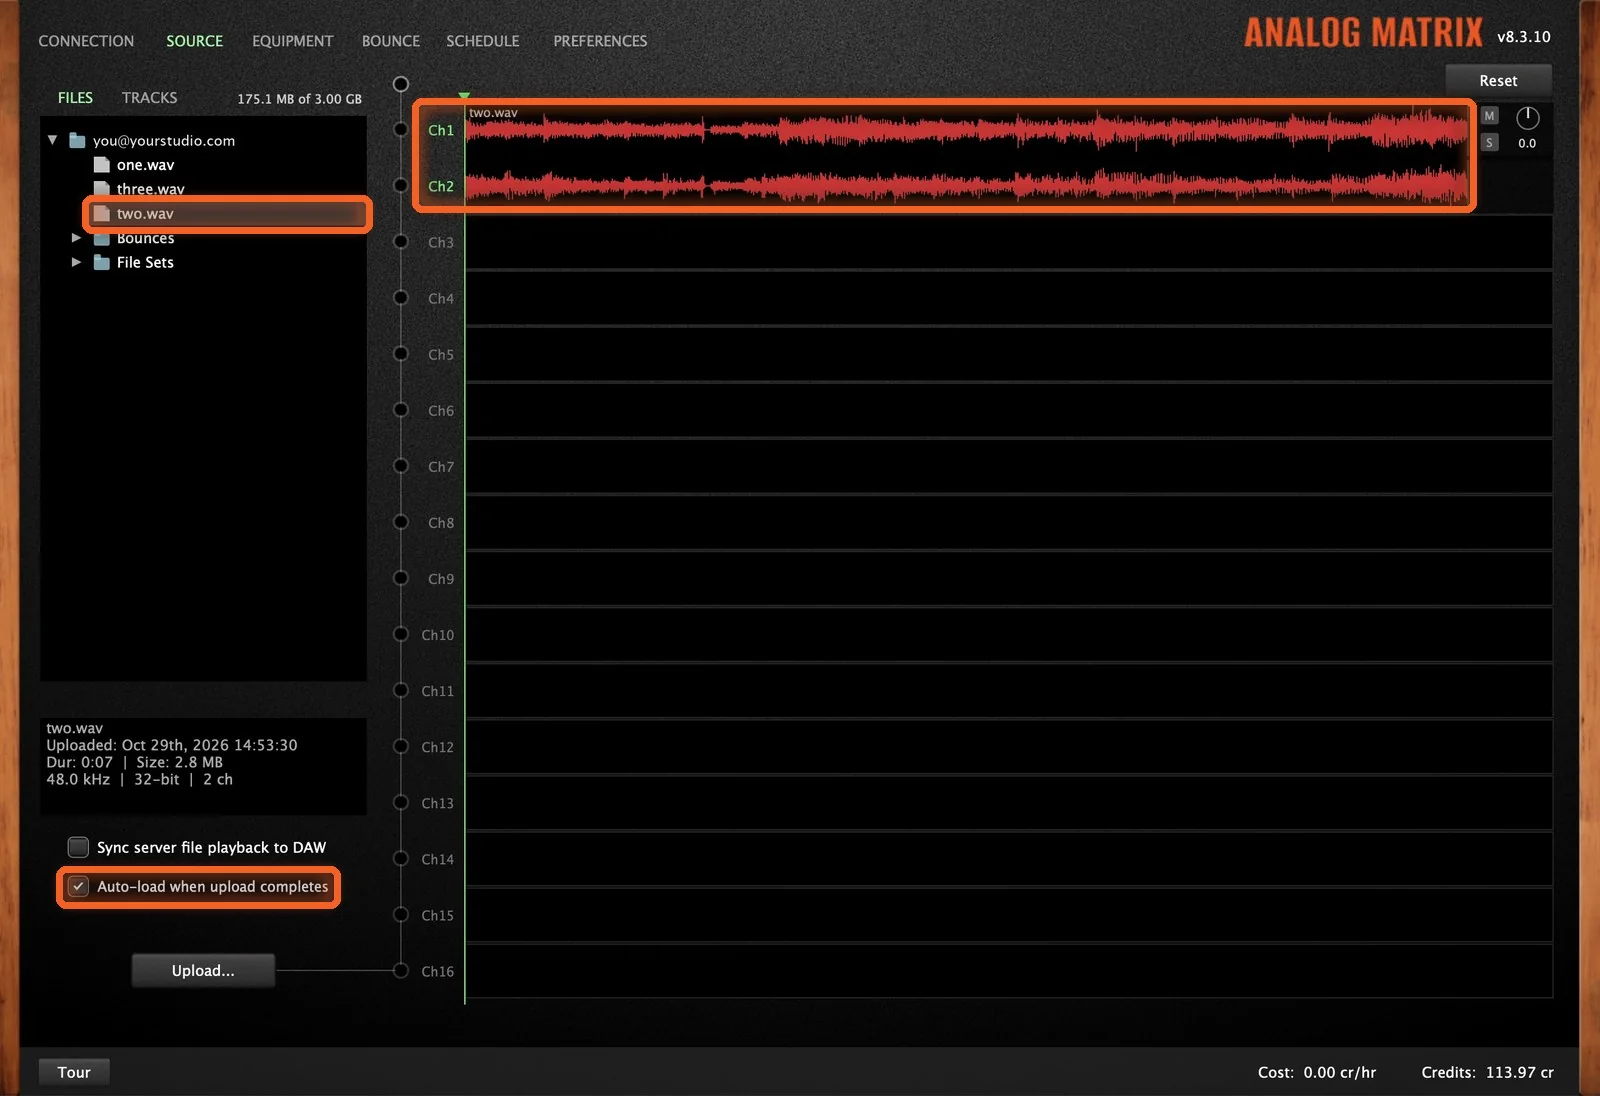
Double-click a file to load it, or drag it onto the channels. It takes the place of your DAW input on channels 1 and 2, and the file's waveform shows on those channels. With Auto-load when upload completes checked, you can skip this step: the file loads on its own as soon as it finishes uploading.
Step 3: Build Your Chain
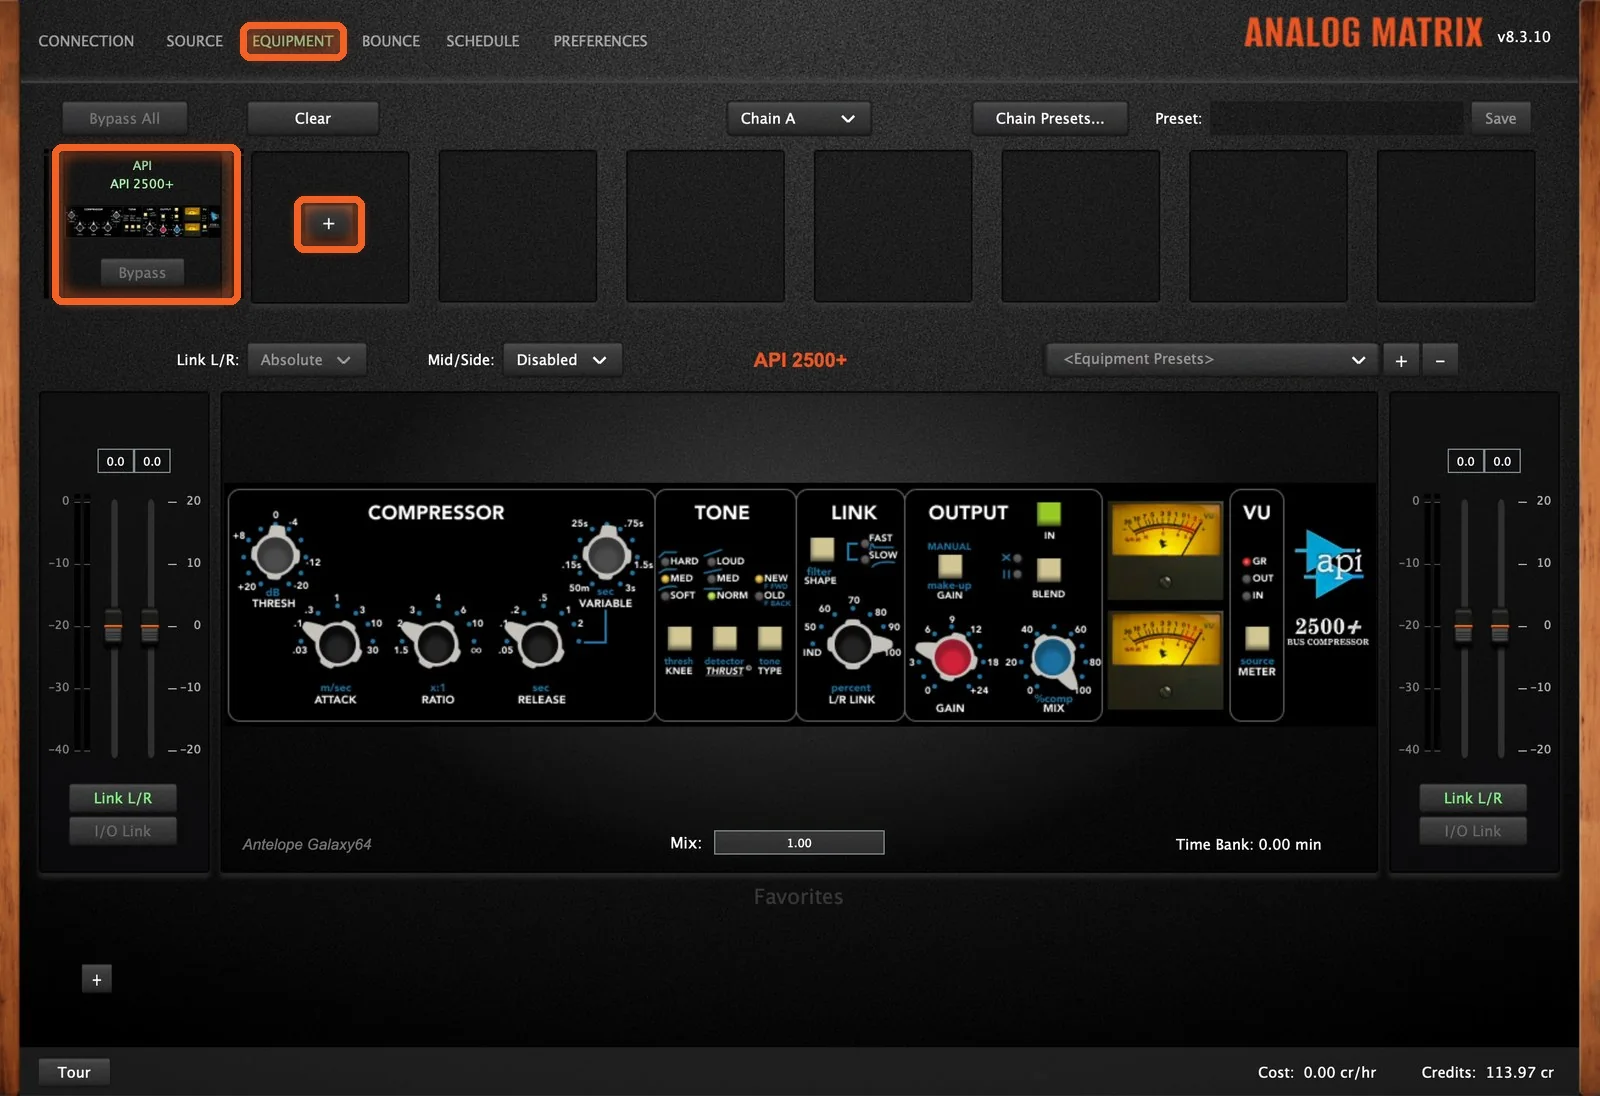
Open the Equipment tab and build your chain the same way you would for a real-time session. Click +, pick a device, and it drops into the rack. In the guide, Dan uses an API 2500+.
Step 4: Set Up the Bounce
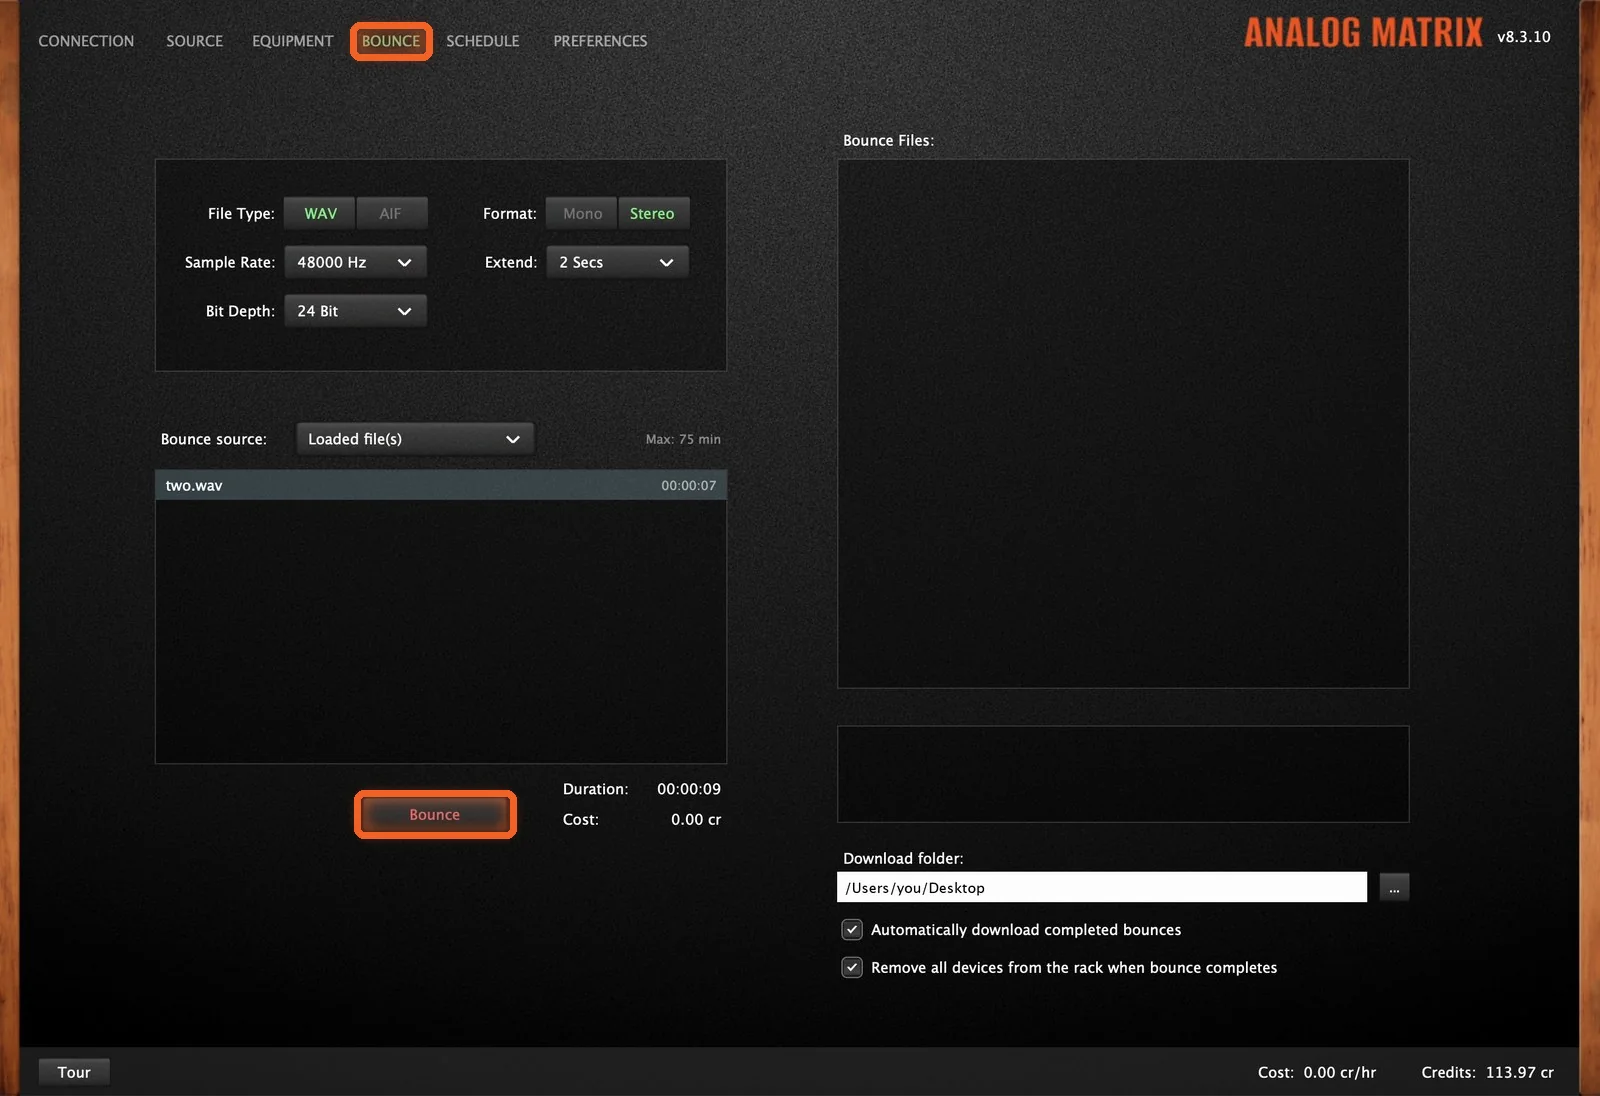
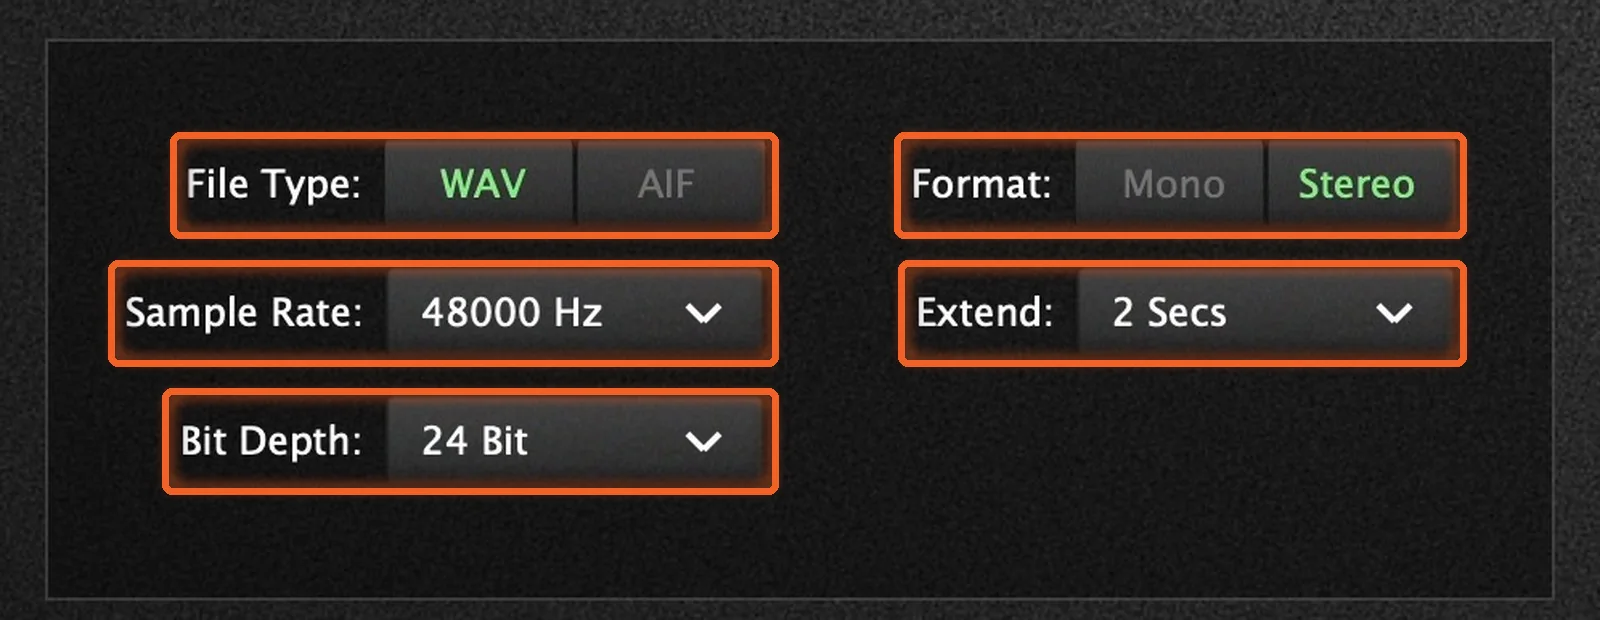
Now open the Bounce tab and choose what the finished file should be:
- File Type: WAV or AIF.
- Sample Rate and Bit Depth for the finished file.
- Extend: adds a few seconds at the end, to catch a reverb tail.
- Format: mono or stereo.
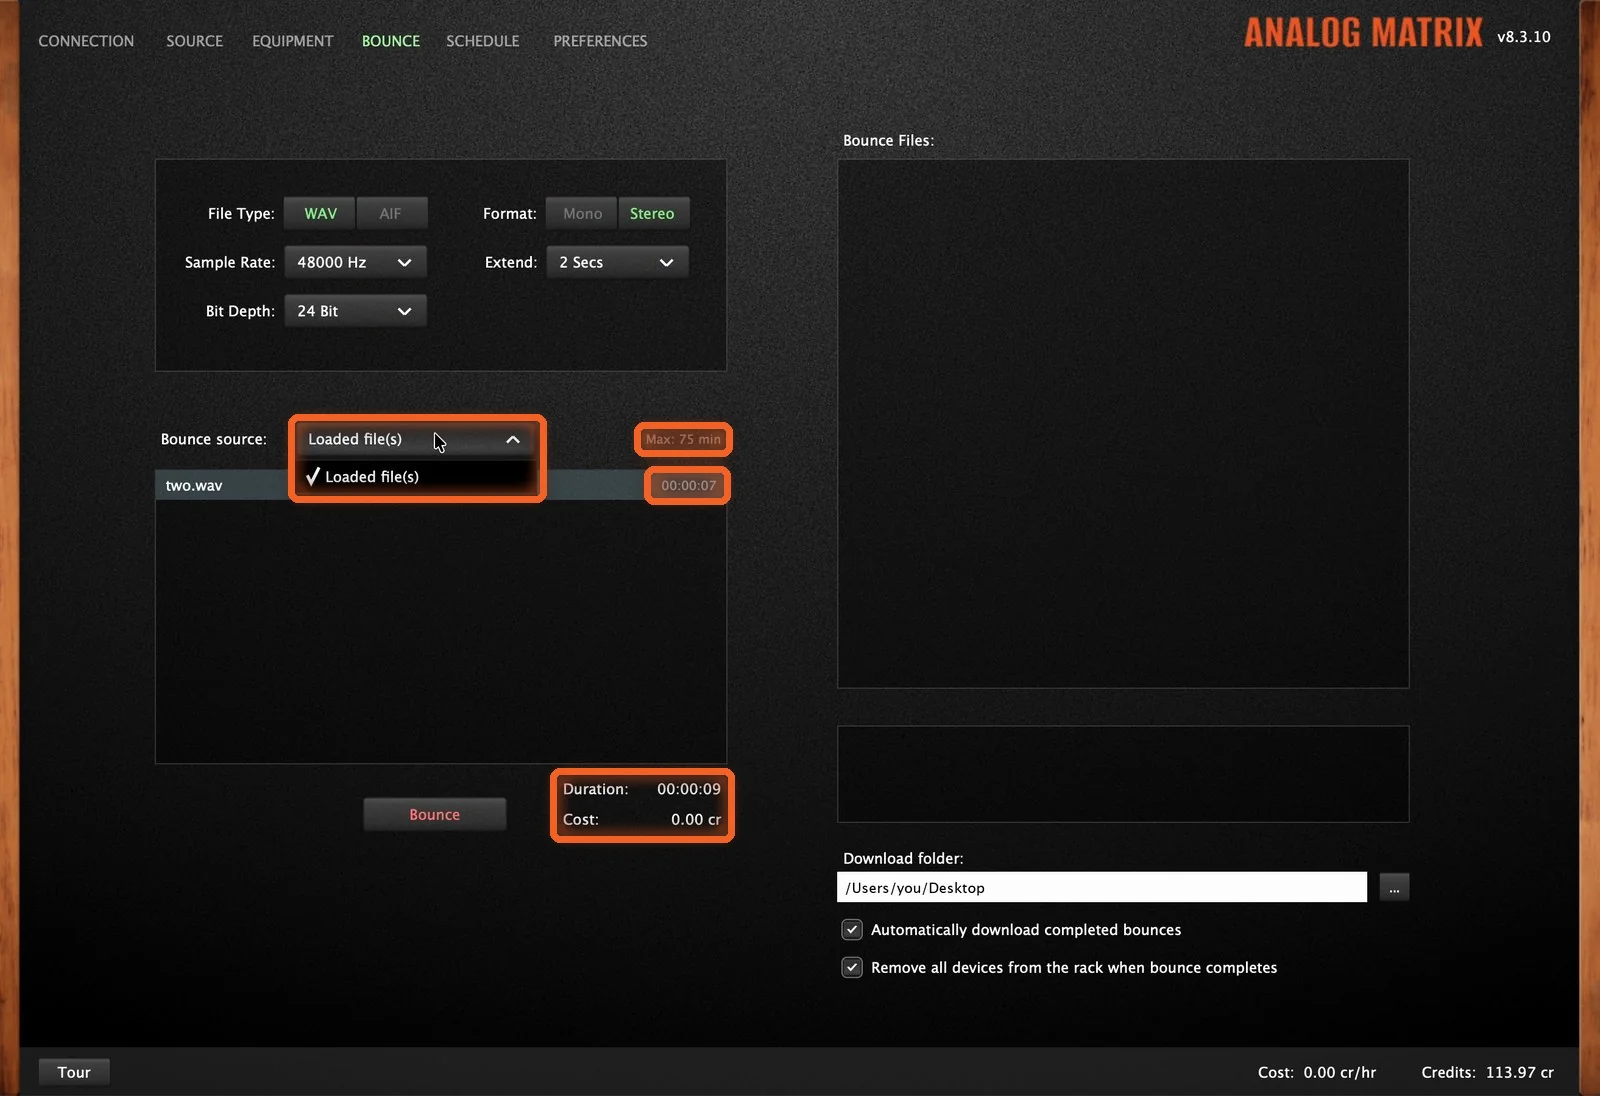
Bounce source picks up your loaded file for you. You'll see the file and its length, the total duration of the bounce, and the cost in credits. The duration includes the Extend tail, so a 7-second file with 2 seconds of Extend reads 00:00:09. One bounce can run up to 75 minutes.
Step 5: Run the Bounce
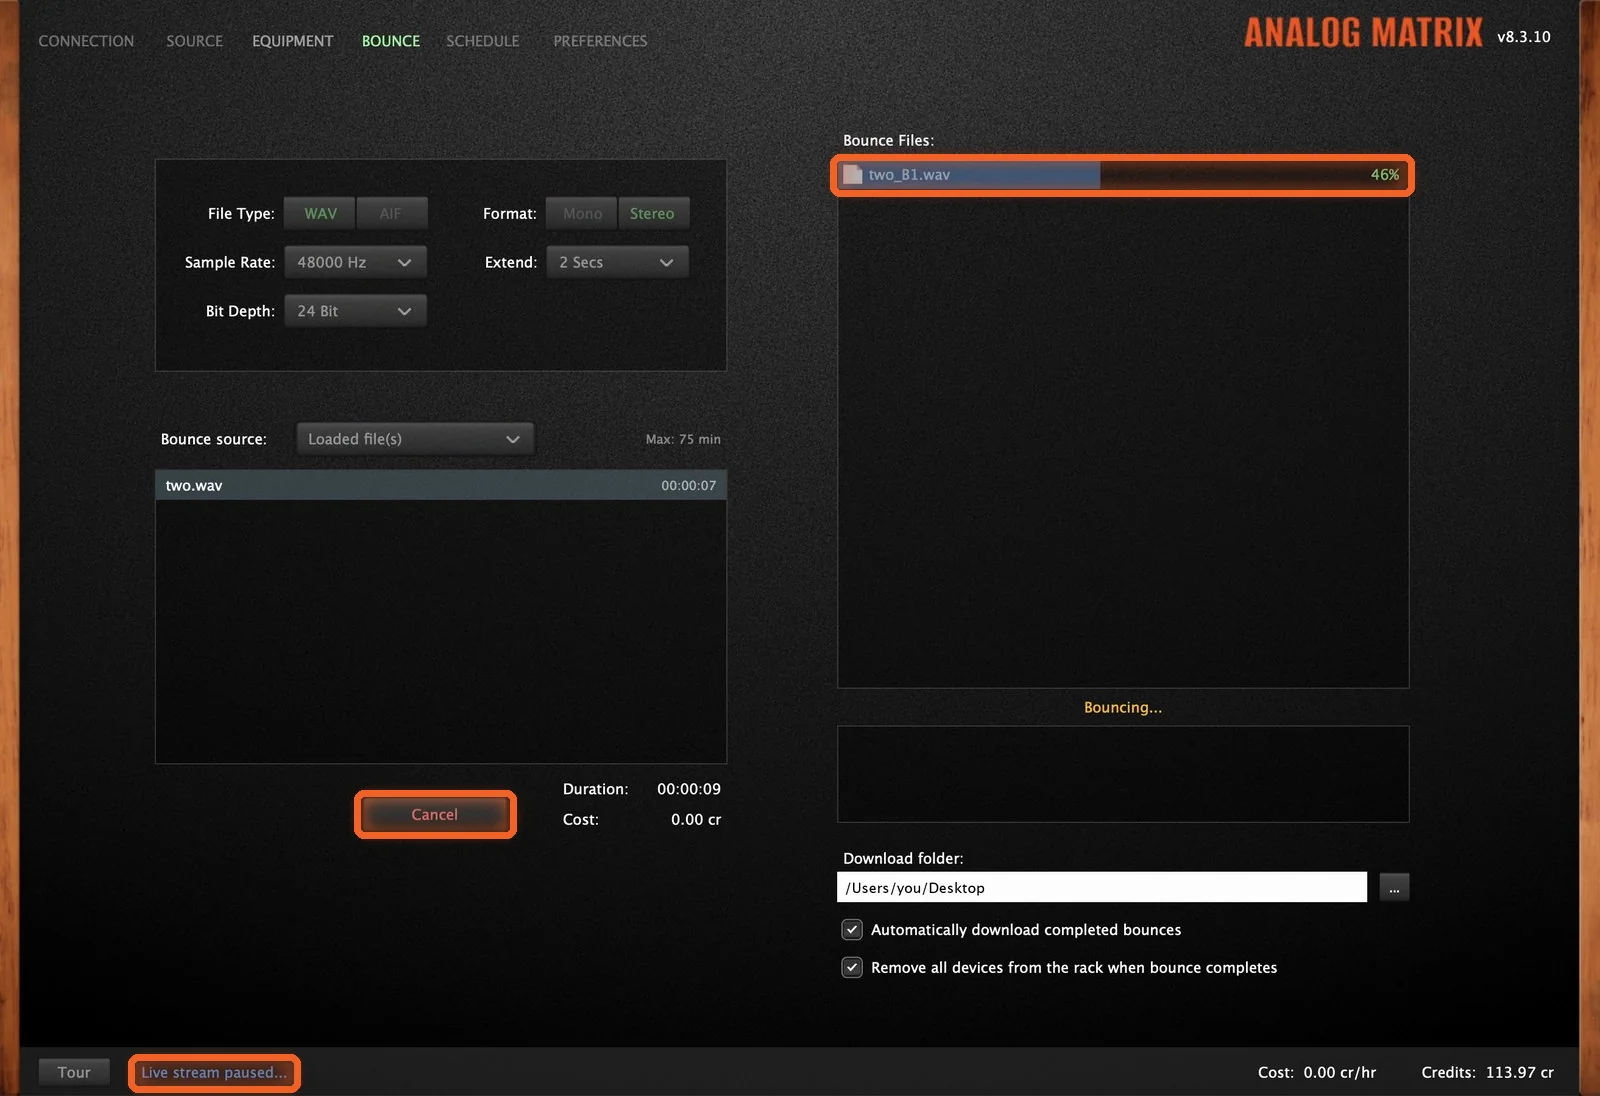
Press Bounce. The new file appears in Bounce Files with its progress climbing, and the button turns to Cancel. While it runs, your live stream pauses, so the bounce gets all the bandwidth. If you need to stop it, hit Cancel.
Upload, load, build, set, bounce. Five steps, and your connection is out of the print.
When the Bounce Finishes
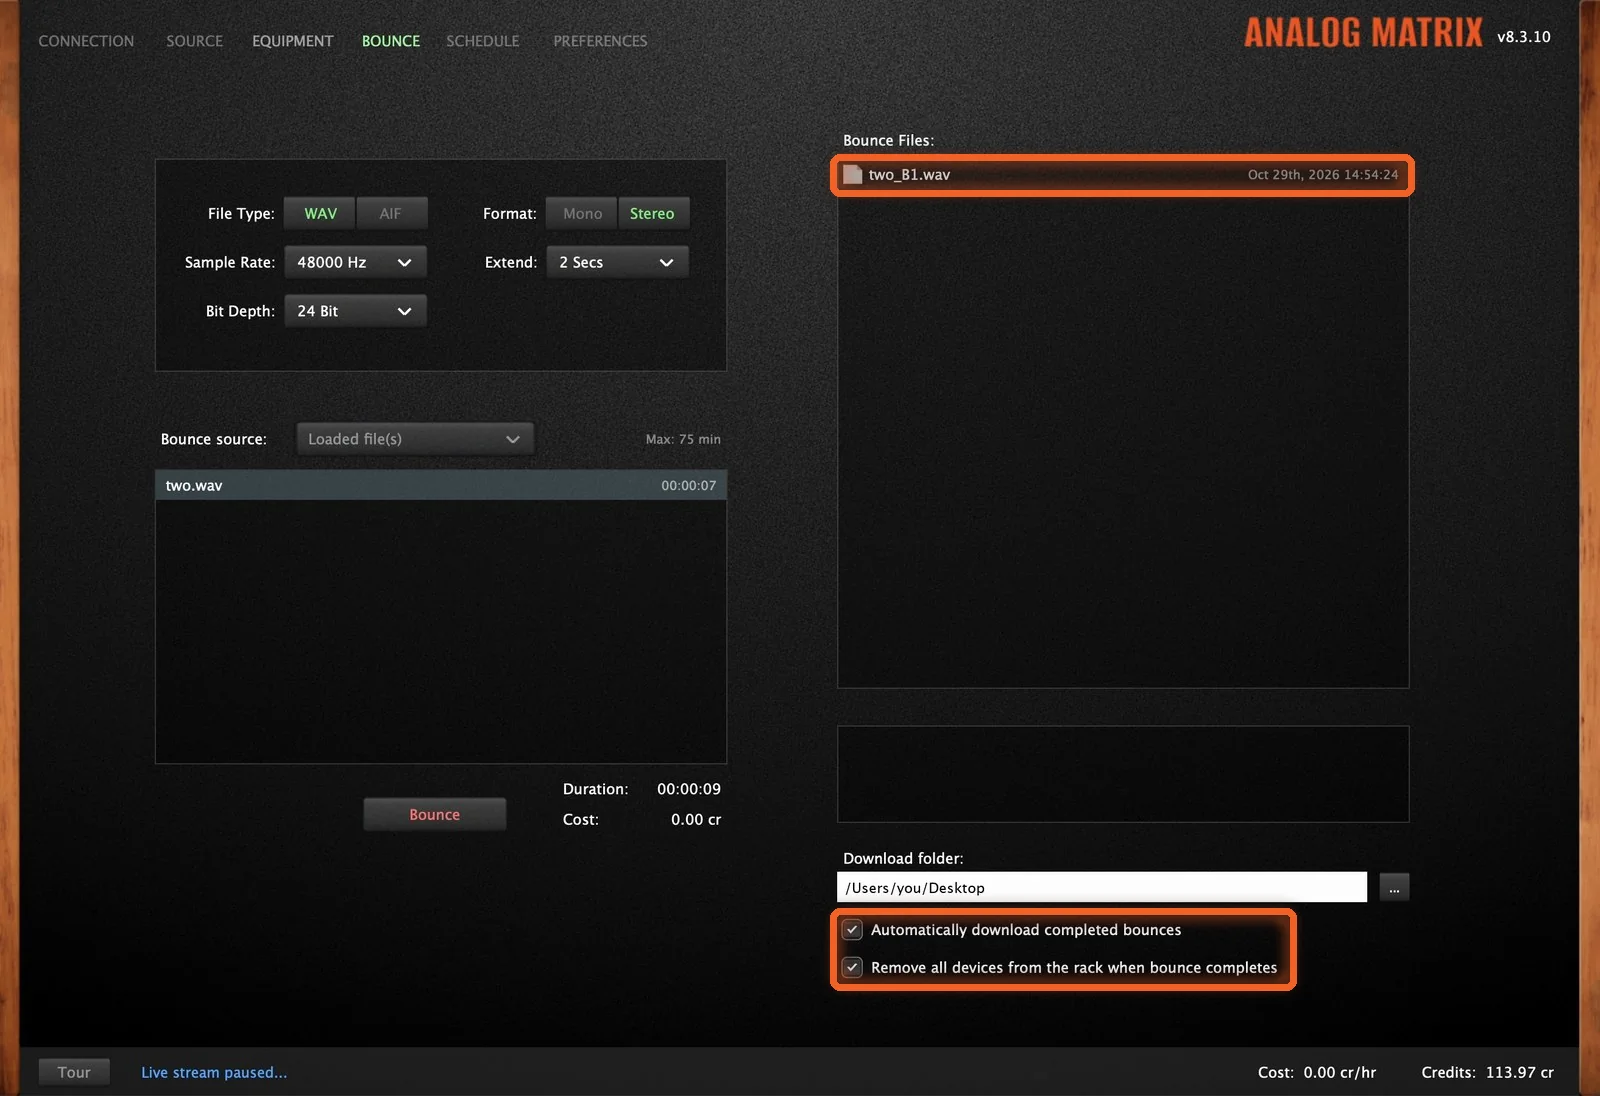
The finished file lands in Bounce Files, named after your source and ending in _B1 (two.wav becomes two_B1.wav). Bounce it again and you get _B2, so each print gets its own file.
Two checkboxes on the Bounce tab save you time and credits:
- Automatically download completed bounces: the finished file also goes straight to the download folder you've set.
- Remove all devices from the rack when bounce completes: the rack clears the moment the bounce is done, so you only pay for the time you use.
Managing Your Bounces Later
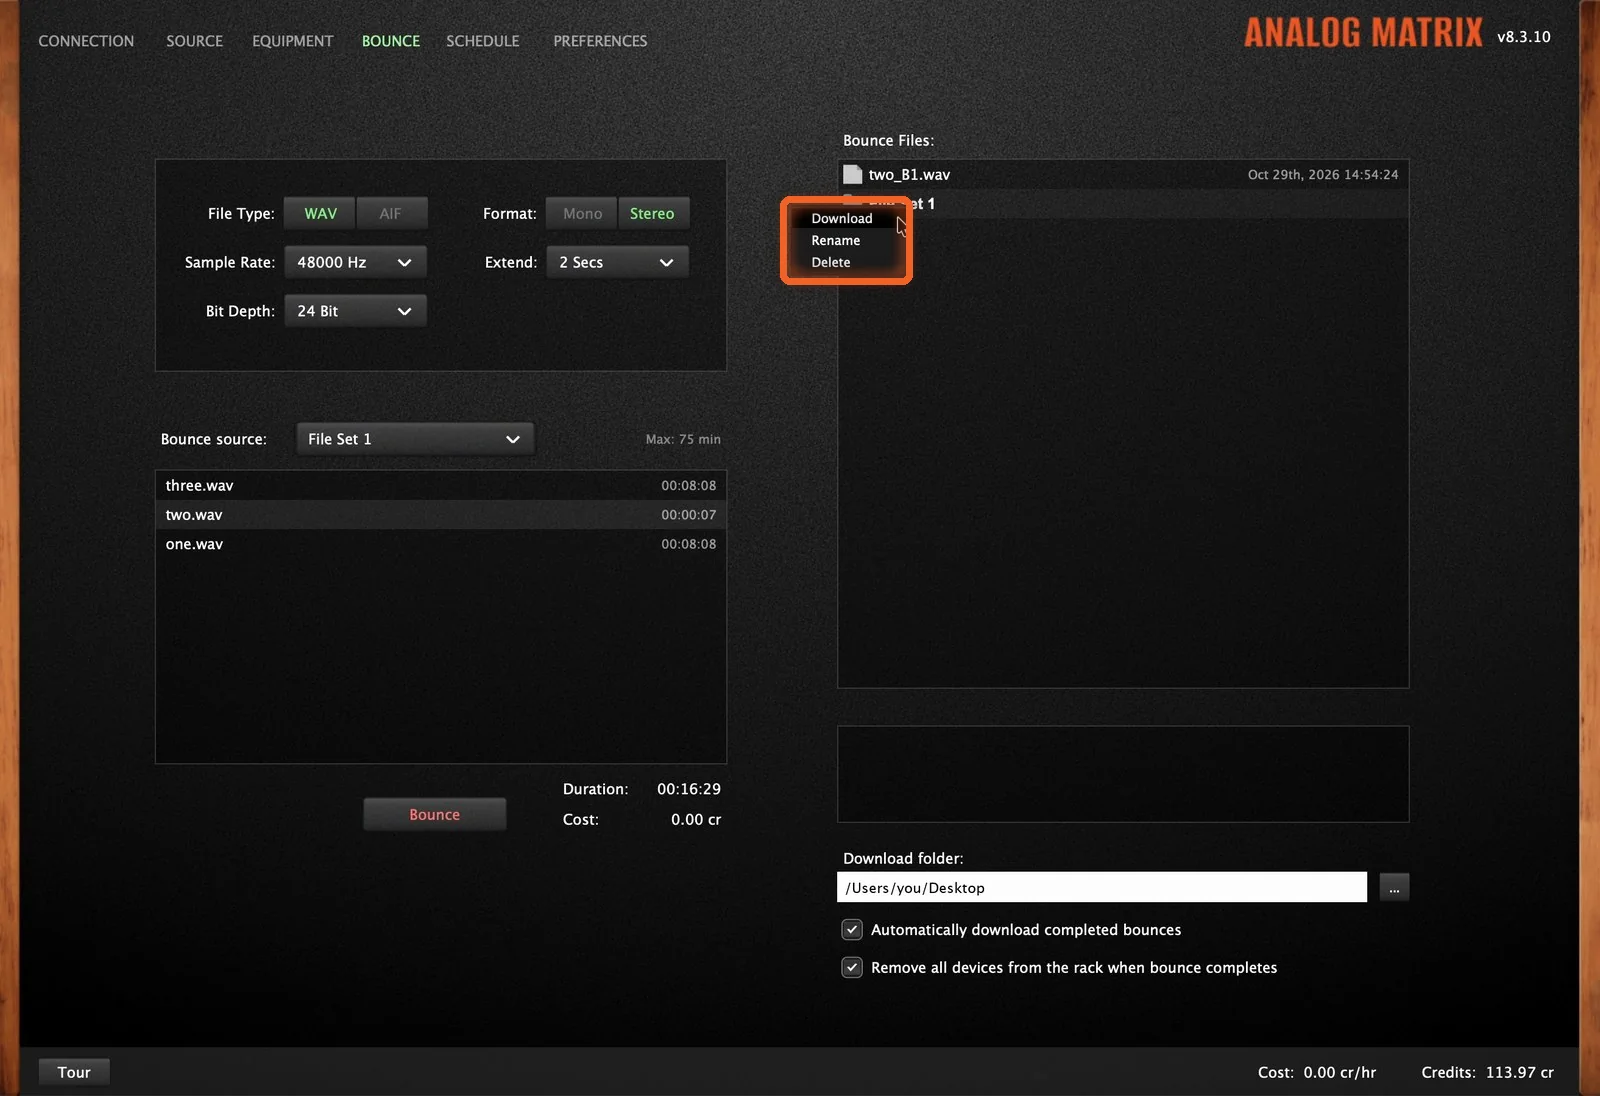
Your bounces stay on the server. Right-click any bounce to download it again, rename it, or delete it from the server.
Bouncing Many Files at Once with File Sets
To run several files through the same chain with the same settings, use a file set. Multi-file bouncing is for Elite subscribers. It's ideal for a batch of stems, an album's worth of masters, or alternate mixes of one song.
1. Create a File Set
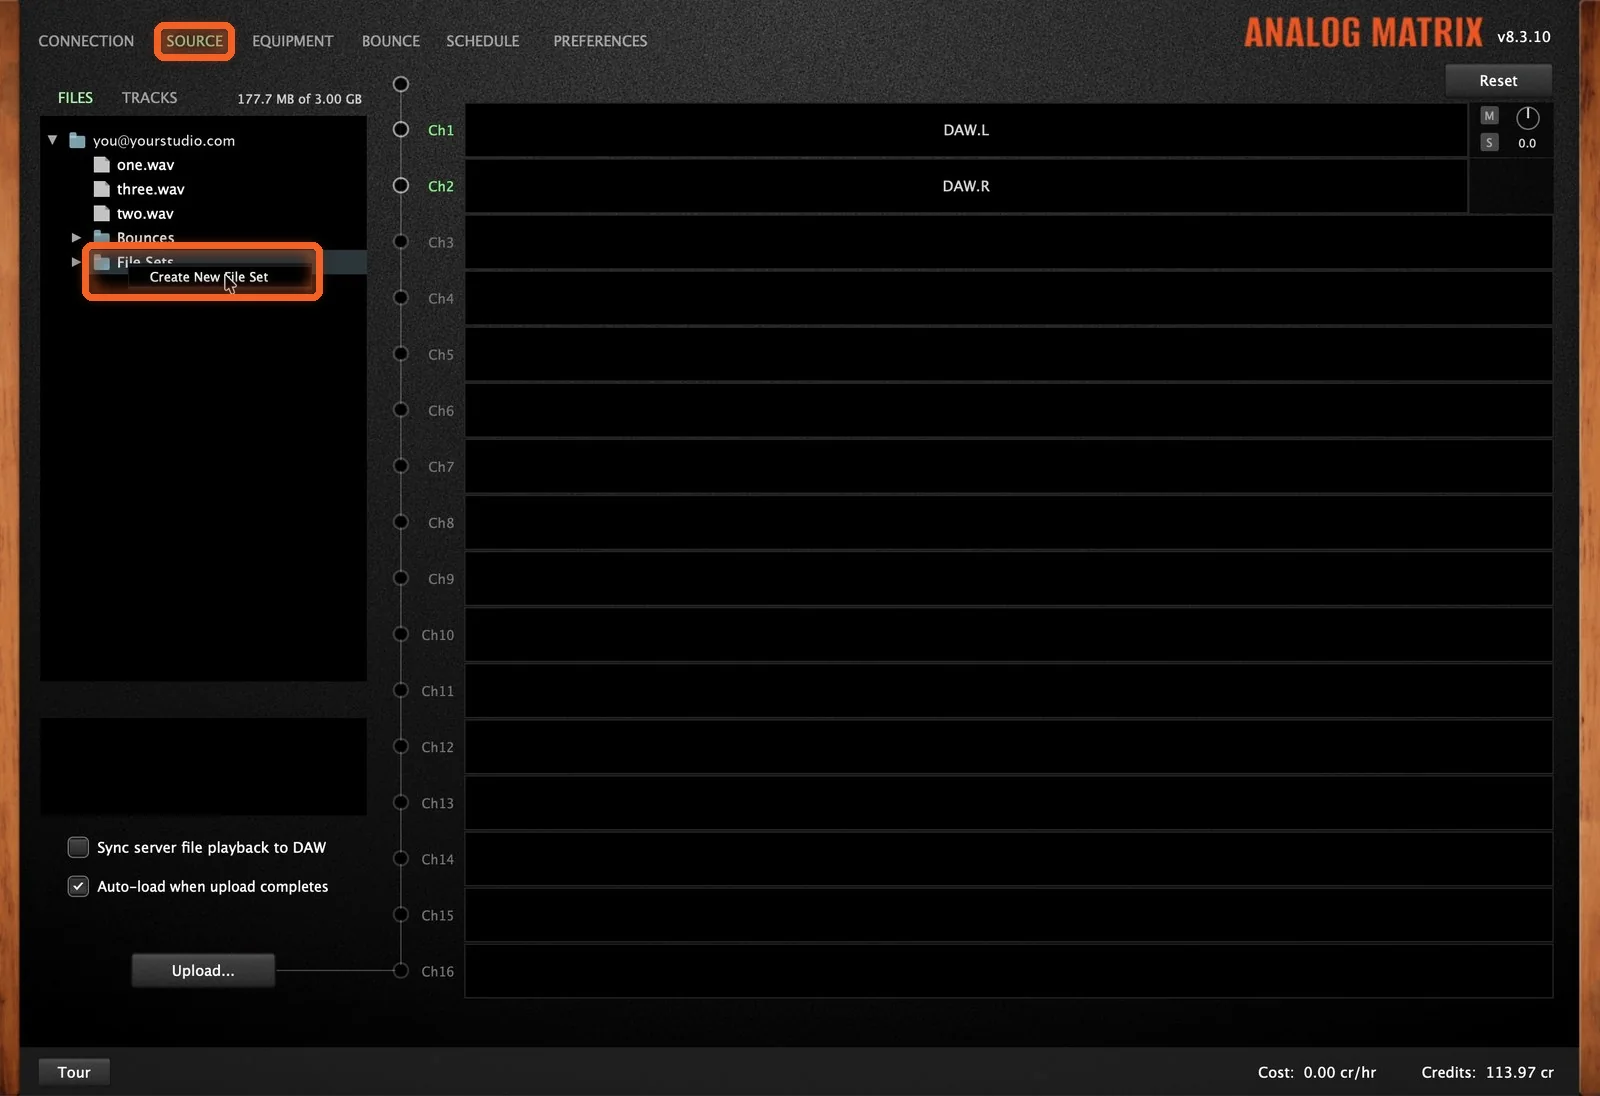
On the Source tab, right-click File Sets and choose Create New File Set. File Set 1 appears in the Files tree.
2. Fill It
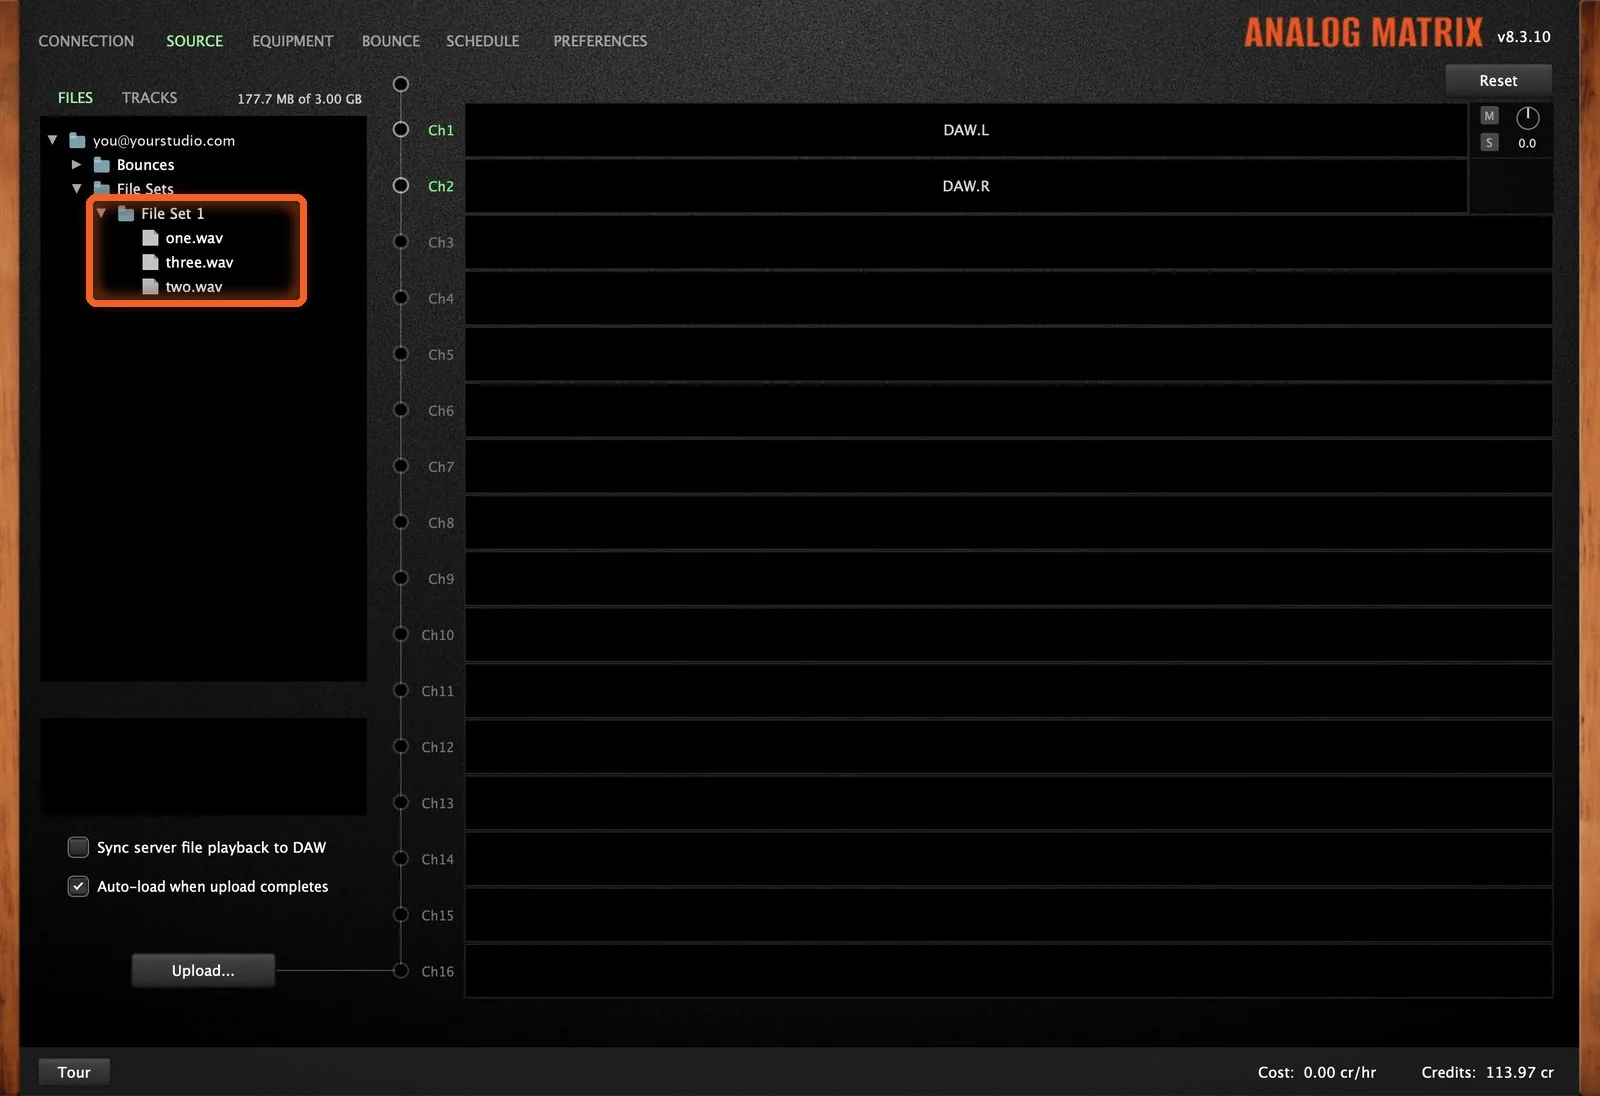
Drag in the files you want to bounce together.
3. Pick the Set and Bounce
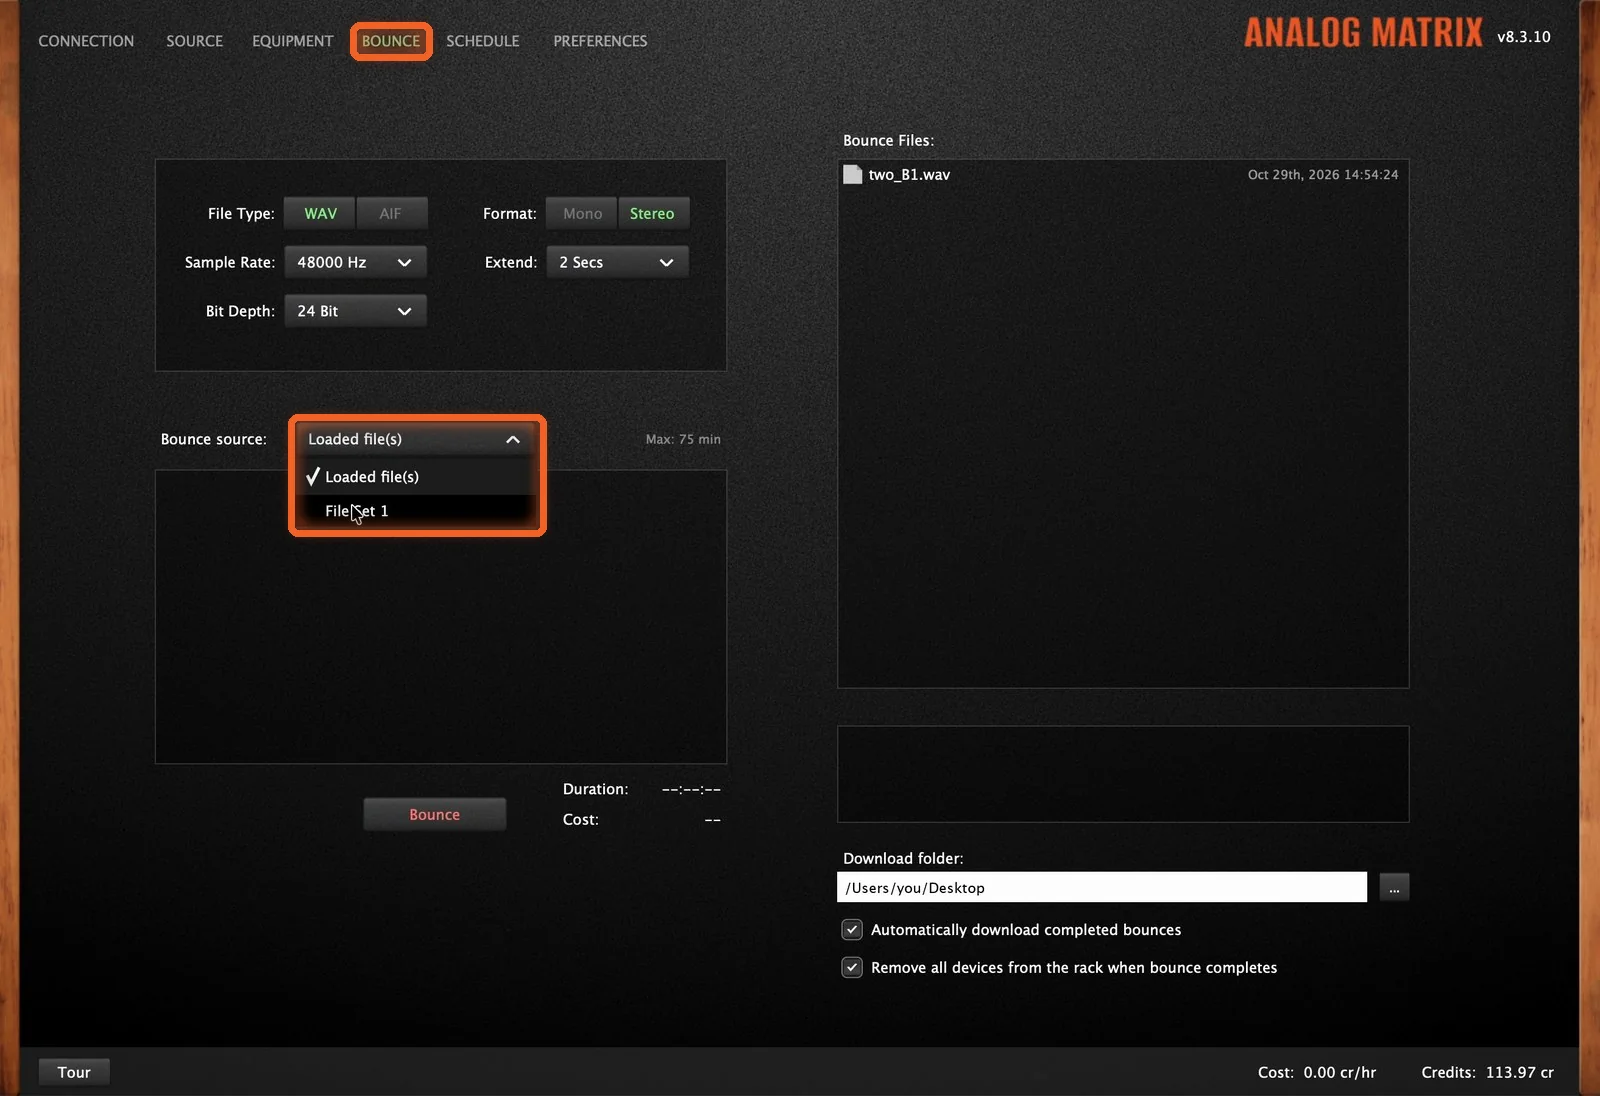
Back on the Bounce tab, set Bounce source to your file set. The list shows its files in the order they'll bounce, with the total duration and cost.
Press Bounce, and each file runs through the chain in turn. You can watch each one's progress in Bounce Files.
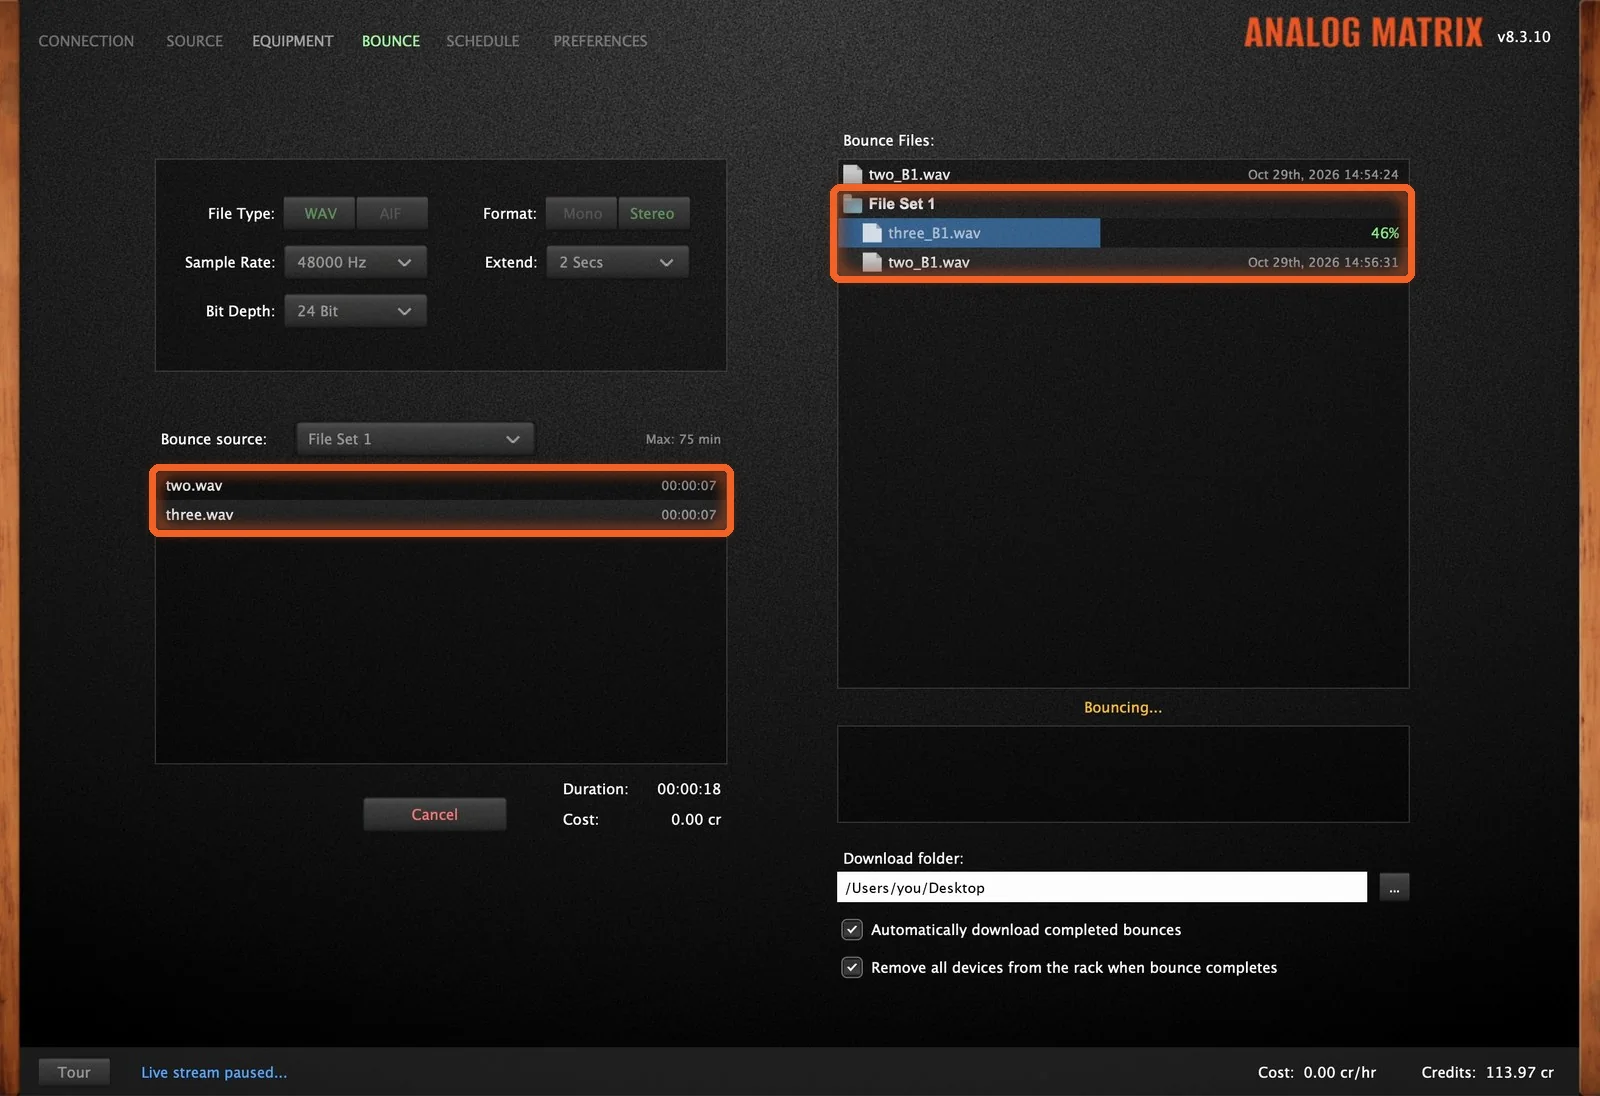
When they're done, they download together, in a folder named after the set.
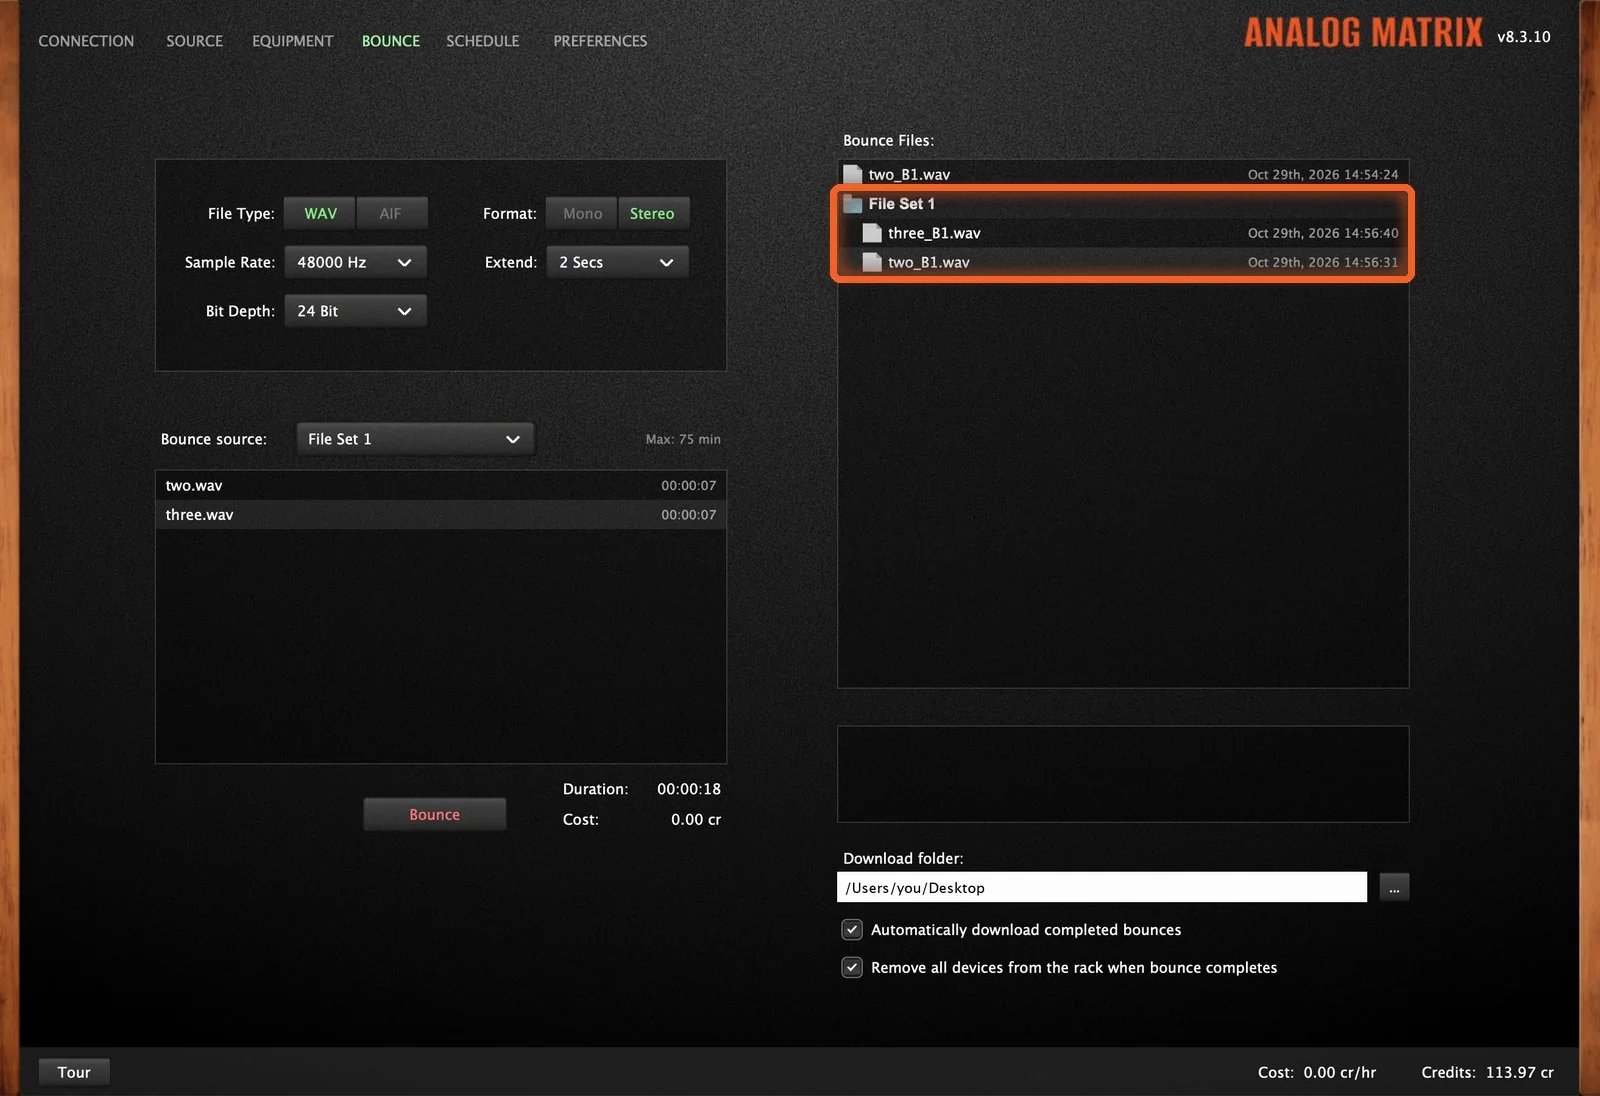
One chain, one set of settings, a whole album's worth of prints.
How Do I Get Started?
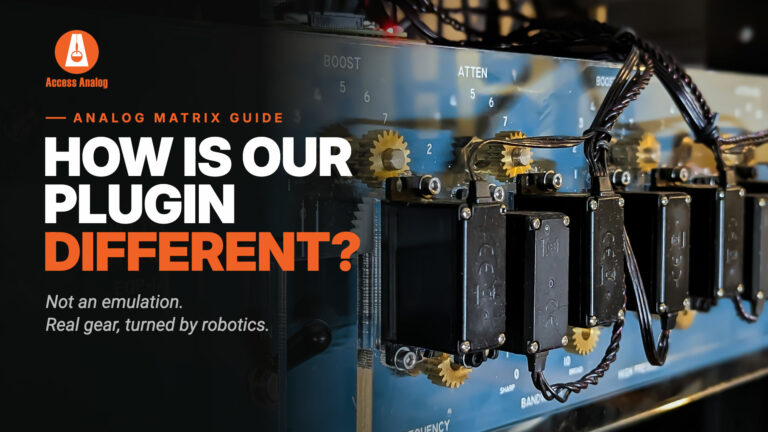
Download the Analog Matrix. The plugin is free from our downloads page for Mac and Windows in VST, VST3, AU and AAX. It is not an emulation: every knob you move turns a real control on real hardware in our racks.
Practice the workflow for free. A new account starts with 12 free credits, roughly an hour on an average device. The Iron Age LH95 EQ and the AudioScape Buss Compressor never use credits, so they're a good place to run your first offline bounce before you print through anything else.
Pick how you pay for gear time. Buy credits on demand, reserve a unit for a set time, or move to the Access Analog Subscription (Essential, Pro or Elite) for the best rate. Multi-file bouncing comes with Elite.
Print It Once. Print It Right.
Your final print is the one that matters, and offline bounce makes it the safe one. Upload, build your chain, and bounce: the gear does the work on our end, your connection stays out of it, and the finished file lands in your download folder.
Print through the real API 2500+, SSL, Neve and more from inside your DAW, with offline bounce.
FAQs
What is offline bounce in Access Analog?
It's a way to print your audio through real analog gear without streaming it live. You upload your file to our server, build your chain, and the bounce runs on our end, next to the rack. The finished file comes back to you.
What's the difference between real-time and offline bounce?
A real-time bounce plays your DAW through the plugin and records the result on another track. It works on a solid connection, but a dropout can ruin the print, and you have to export at real-time speed. An offline bounce uploads your file first, so it's immune to connection dropouts. It's the method we recommend.
Will I be charged credits while bouncing?
Yes. Bounce time counts as usage time, about 1 credit per 5 to 6 minutes on one piece of gear, depending on the device. The Bounce tab shows the cost before you start. If you run out of credits mid-bounce, the bounce stops. Check Remove all devices from the rack when bounce completes so you only pay for the time you use.
How long can an offline bounce be?
Up to 75 minutes per bounce. The Bounce tab shows the total duration, including any Extend tail, before you press Bounce.
What audio quality does offline bounce use?
Offline bounces always use lossless 24-bit audio, whatever transmit format you use for real-time streaming. You choose the finished file's type (WAV or AIF), sample rate, bit depth and format (mono or stereo).
Can I bounce several files at once?
Yes, if you're an Elite subscriber. Put them in a file set, then set Bounce source to that set. Each file runs through the same chain with the same settings, one after another, and they download together in a folder named after the set.
Do I need a DAW to use offline bounce?
No. The Analog Matrix standalone app, also on our downloads page, has the same gear selection and controls as the plugin and runs without a DAW. It's especially handy when you're only processing files. Our Standalone App guide shows four ways to use it.
Can I upload audio straight from my DAW?
Yes, with Upload From DAW... on the Source tab. Our Upload From DAW guide walks through it.
Hear what real analog gear does to your own mix, before you buy a single piece of it.
Run real outboard hardware from your DAW. New accounts get 12 free credits.
Connect todayMore in Getting Started
All posts →