
Everyone wants tape on their mix. Almost nobody wants to own a tape machine.
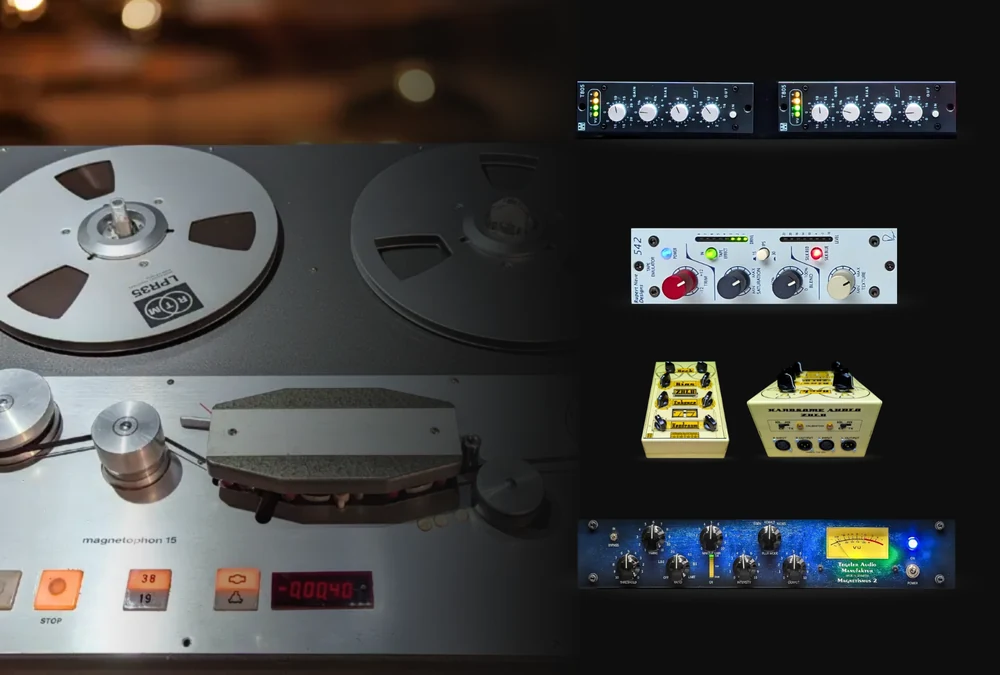
A tape deck needs reels, alignment, head cleaning, and a tech who knows the machine. That's why most engineers settle for a plugin and quietly wonder what they're missing. Access Analog now racks five different ways to get tape sound on your tracks, and no two of them get there the same way: a real 1971 tape machine, three hardware tape simulators that each rebuild a different part of the tape process, and one dynamics processor that rounds transients the way tape does.
Tape is not one sound. It's a handful of behaviors, and the trick is picking the tool that delivers the ones your track needs.
In this guide you'll learn what actually makes tape sound like tape, how the five units compare, when to reach for each one, which short chains pair well with them, and how to run all of it from your DAW for a fraction of what one machine costs to keep running.
Tape sound is the combined effect of five behaviors: magnetic saturation, soft compression, a low-frequency head bump, a top end shaped by bias, and the tiny speed variations of a moving transport. Hugh Robjohns makes the point in Analogue Warmth for Sound On Sound that analog character isn't one effect. It's many small, level-dependent imperfections adding up, and tape contributes several of them at once.
Think of tape like a sponge. At first it soaks up everything you pour on it. As it fills, it takes in less and less, until it can't hold any more. Tape does the same with magnetic energy: quiet signals go down cleanly, and as level rises the tape accepts each extra decibel a little more reluctantly. That's why tape rounds peaks instead of chopping them off.
Saturation. As record level rises, peaks are rounded, harmonic distortion increases, and high frequencies saturate before low ones. Robjohns notes that tape distortion is often dominated by odd-order harmonics, especially the third, though the whole tape sound is far more than its harmonics.
Soft compression. The same saturation curve reduces dynamic range and softens transients. That's the "glue" engineers talk about: the loud moments get a little less loud, so everything sits closer together.
Head bump. The replay head adds a low-frequency rise whose frequency and size change with tape speed, head design and alignment. It's a big part of why tape feels heavier in the bottom end.
Bias and the top end. Tape machines add an inaudible high-frequency bias tone to the record signal so the tape responds cleanly to quiet audio. How much bias a machine runs changes its character: more bias means less distortion but a softer top, less bias means more color and grit.
Movement. No transport runs perfectly steady. Wow and flutter add tiny pitch and timing variations, and Robjohns points out that many emulations recreate saturation and EQ far more successfully than these mechanical effects.
Saturation, compression, head bump, bias and movement. Every tape tool delivers some of those five, and only a real machine delivers all of them.
Because buying one is only the start. A good vintage tape machine is expensive and hard to find, and once you have one, the running costs are what keep real tape out of most studios. We know those costs first-hand from running our own Telefunken M15.
Real tape is consumable. Reels of tape stock run about $90 each. We erase the tape on our M15 daily, clean the heads weekly and replace the reel every few weeks, and calibrating an M15 is famously hands-on because its record and repro boards do double duty for input and output. A clean, properly calibrated M15 is rare, heavy, and needs a tech who's fluent in vintage German circuit boards.
Plugins solve the cost, and many are excellent. What they can't do is respond with physics. A tape plugin runs a model of a machine. The hardware below runs a real magnetic element, a real transformer, or real tape, and its behavior changes with your actual signal. We covered that trade-off in full in analog hardware vs. plugins.
| Tape plugin | Own a tape machine | Access Analog Remote | |
|---|---|---|---|
| What processes the audio | A software model | Real tape and heads | Real tape, or real tape-simulator hardware |
| Upkeep | None | Tape stock, alignment, head cleaning, a tech | None for you; we do it |
| Recall | Instant | Notes and photos | Instant, robotically restored with your session |
| What it takes to start | A license | The machine, tape, alignment tools and a tech | Plans from $9.98 a month, or free credits to try |
Access Analog racks five tape tools: one real tape machine, three hardware tape simulators, and one tape-like dynamics processor. Here they are, from real tape to tape-like.

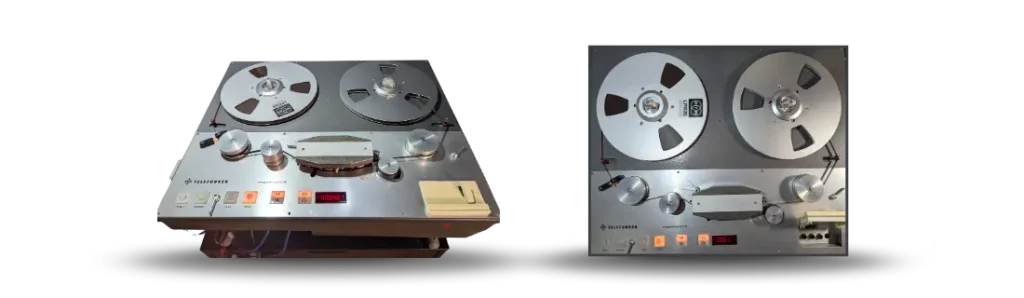
The only unit in the rack where your mix is actually printed to a moving reel of tape.
The Telefunken M15 is a fully discrete, transistor-based master recorder introduced by AEG-Telefunken in 1971, with butterfly heads and a synchronous AC capstan motor driving a large capstan for speed stability. Your audio goes past the erase, record and playback heads and comes back off real tape, so you get the whole package: magnetic saturation, real head bump, and the subtle movement of a real transport. The input gain adjustment in the Analog Matrix plugin is analog gain after the D/A converter and before the tape, so it sets how hard you hit the tape. Start at the default and move it right for more saturation, left for a cleaner pass. If you want the whole tape process, not a part of it, this is the one.
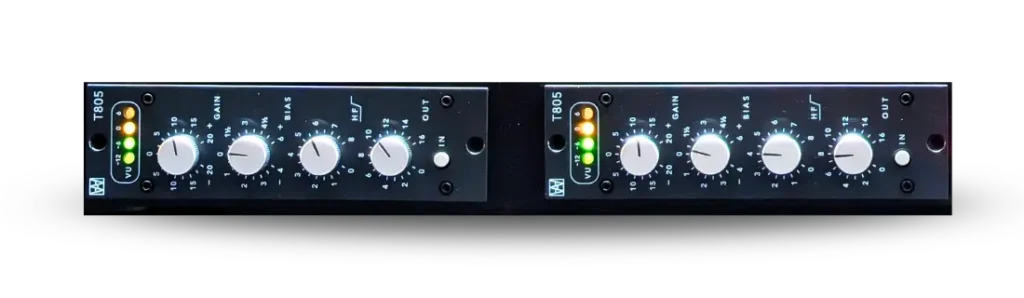
A magnetic element and a real AC bias circuit stand in for tape and heads.
The Walters Audio T805 is a 500-series module built on Walters Audio's patented Full Spectrum Magnetization technology. Its record driver and 100 kHz bias oscillator are inspired by a Swiss tape machine introduced in 1970, and they drive a Tape Element made from a magnetic material similar to the ferric oxide in classic tape. The head bump is inspired by a high-end Swiss machine from 1985. Gain sets the magnetic field strength with automatic output compensation, Bias moves from cleaner overbiased behavior to colorful underbiased saturation, HF adds up to 8 dB at 20 kHz ahead of the element, and Out gives up to 16 dB of makeup. Walters Audio's manual puts subtle enhancement below −6 VU, significant coloration around 0 VU and saturation from about +6 VU, on a soft knee like 1950s and 1960s tape formulas. Because the bias signal's even harmonics transfer into the audio, the T805's distortion is dominantly even-order, which gives it a distinctly vintage color. The T805 is the simulator that lets you tune bias the way a tape tech would.
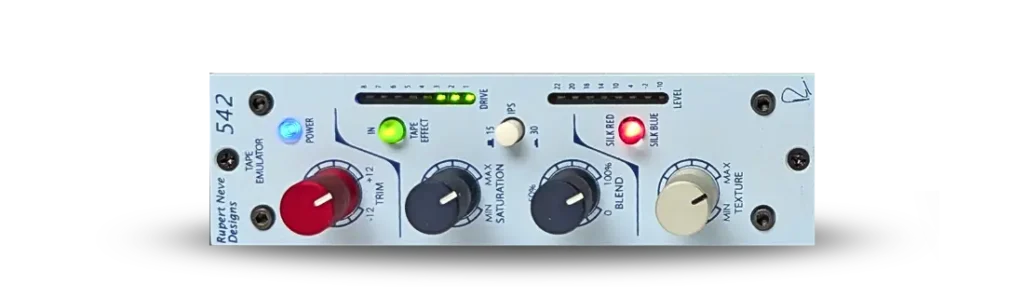
A custom transformer plays the record head, a replay amplifier plays the playback head, and Silk adds Rupert Neve's own harmonics on top.
The Rupert Neve Designs 542 uses a custom interstage transformer to simulate a record head in tandem with a replay amplifier. As you turn up Saturation, the record head is driven harder and the replay gain drops, so output stays consistent while the color grows; a soft-clip circuit joins in once the Drive meter passes 5. The 15/30 IPS switch selects two tape-speed responses. In the Rupert Neve Designs manual's measurements, 15 IPS has the bigger head bump, peaking about 5 dB around 60 Hz at minimum Saturation, while 30 IPS moves the bump up to roughly 110–125 Hz with less lift and extends the top end. Blend mixes pre- and post-tape signal, and Silk Red (high mids and highs) or Silk Blue (lows and low mids) with Texture adds harmonics from the output transformer. A single 542 is a mono, single-channel module. Access Analog racks two of them together as one stereo unit, so on our platform the 542 works on a stereo bus or a full mix as well as on single sources. The 542 puts tape weight under a source or a whole mix, and the Blend knob keeps the punch you started with.
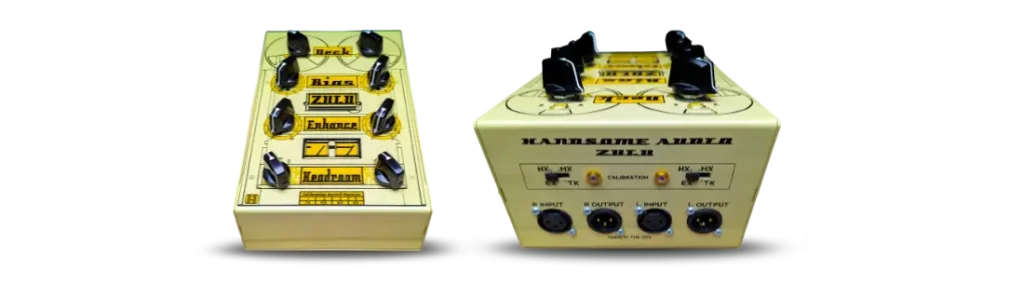
No power supply, three modeled tape machines, and a parallel "Enhance" circuit that works like a harmonic EQ.
The Handsome Audio Zulu is a passive analog tape simulator and bus processor built around custom Altran input and output transformers. Its Deck switch picks a machine: LO (cassette 4-track, crunchy and heavily compressed), PRO (1970s and 1980s Japanese ½-inch machines at 15 IPS, mellow with a harmonic midrange), and HI (the Swiss professional deck, the cleanest of the three), plus a bypass that keeps only the electronics. Bias has 11 settings and changes saturation and compression along with tone, Enhance blends a harmonically sweetened dry signal back in parallel, Headroom sets how much level the "tape" takes, and Calibration changes compression, frequency response and saturation globally. Because the Zulu is passive, it has insertion loss; the presets from mixing and mastering engineer Karl Barnes list a makeup gain of about +10 to +13.5 dB for each setting. The Zulu gives you a choice of machine, from cassette grit to Swiss polish, without changing boxes.
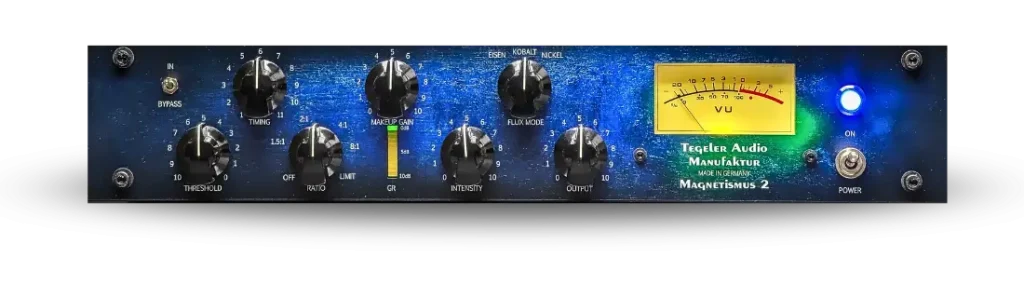
It doesn't model tape at all. It rounds transients the way tape does, then adds transformer density.
The Tegeler Magnetismus 2 is a stereo VCA compressor followed by a transient shaper and an output transformer. Tegeler describes the transient stage as rounding transients off rather than cutting them down, for a smoother result similar to a tape machine. The compressor has Threshold, Ratio (up to Limit), Makeup Gain, and a ten-position Timing control that pairs attack and release, from 7 ms / 11 ms up to 1.3 s / 4.5 s. Makeup Gain also sets how hard the signal hits the transient stage. The Flux Mode switch (Eisen, Kobalt, Nickel) sets the time window of the rounding, with Eisen catching the widest transients and Nickel the narrowest, and Intensity sets how much it happens. The Output control drives the output transformer: gently, it stays out of the way; harder, it adds density and punch. It was first designed for drums, synths and acoustic guitars. The Magnetismus 2 gives you tape's softened transients and density, and it's the entry point on the Essential tier.
Each unit covers a different set of tape behaviors, so the right comparison is "which parts of tape does it deliver," not "which is best."
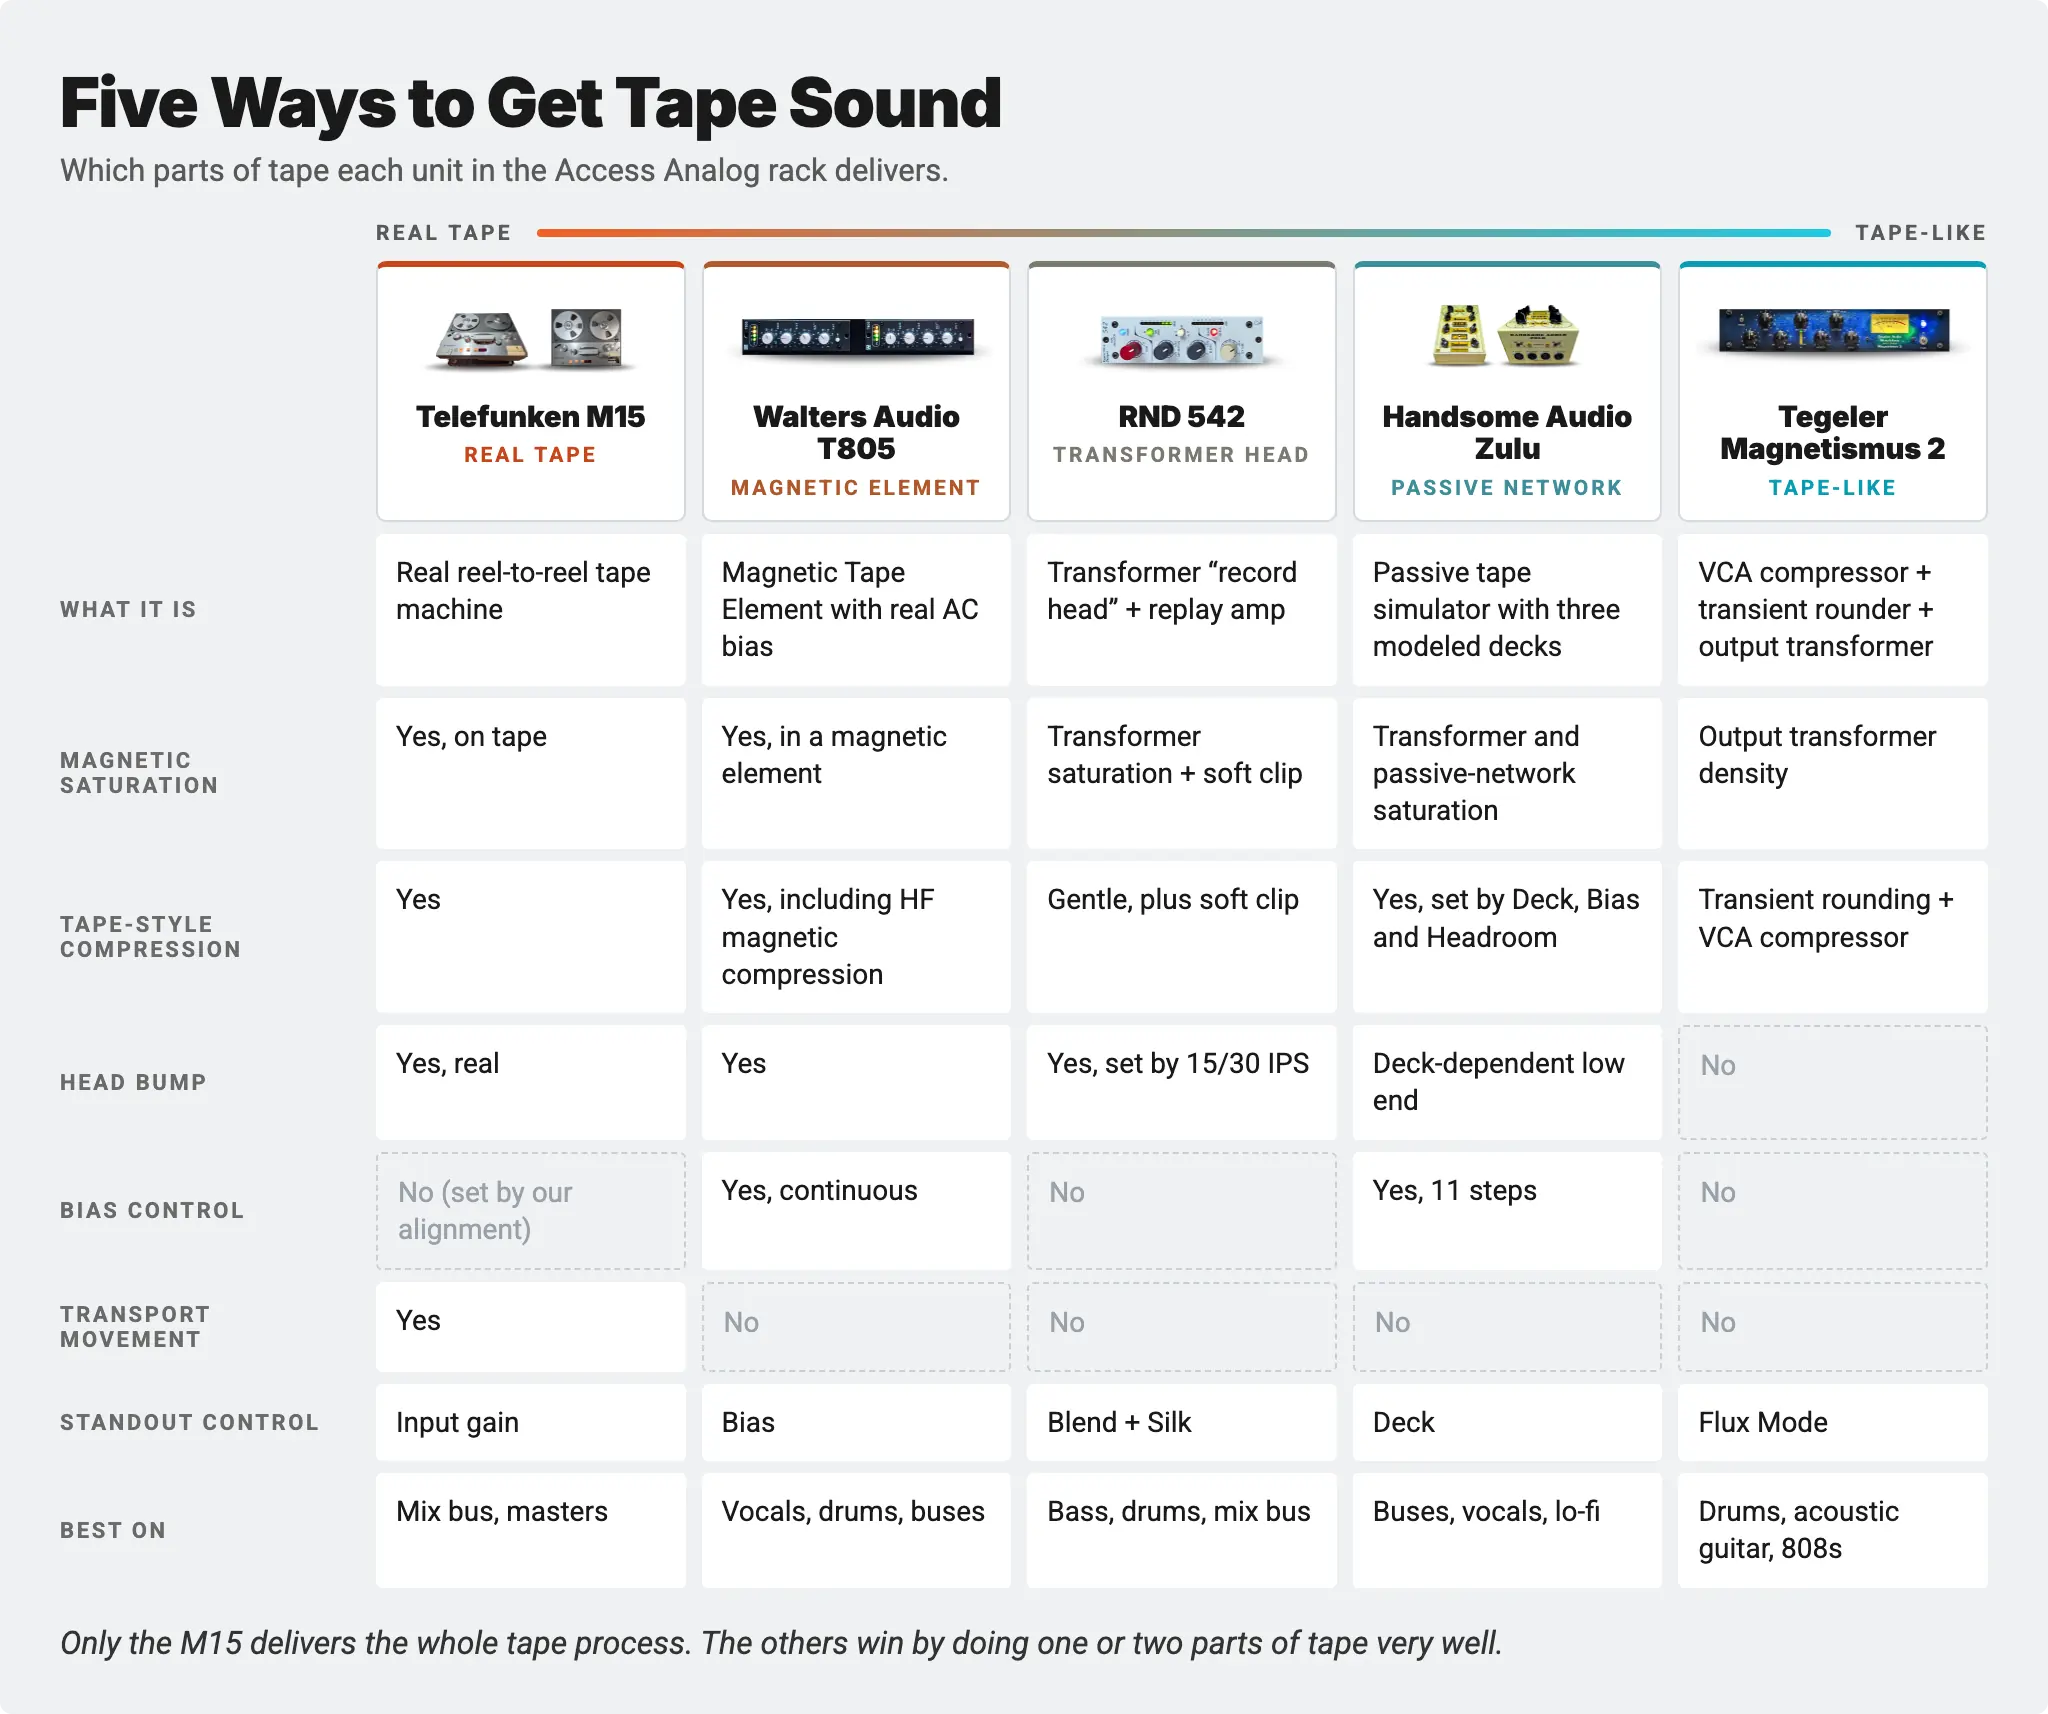
Only the M15 delivers the whole tape process. The others win by doing one or two parts of tape very well, with controls a tape machine never had.
Pick by the job, not the brand. Here's where each unit earns its place first.
Printing a mix or a master to tape. The Telefunken M15. Nothing else gives you real tape, a real head bump and real transport movement in one pass.
Mix bus glue with a choice of era. The Walters Audio T805 or the Handsome Audio Zulu. On the T805, Walters Audio's Nominal setting targets the tape sound of the 1950s to early 1970s, while Overbias leans toward the cleaner tape of the 1970s and later. On the Zulu, the HI deck is Handsome Audio's suggested setting for mixes and masters. The Rupert Neve Designs 542 at 30 IPS, with Blend backed off, adds tape color while keeping the low end tight.
Drum bus punch and density. The Tegeler Magnetismus 2, which was built for exactly this. For dirtier, cassette-style drums, the Zulu's LO deck; Handsome Audio calls it "monstrous" on a parallel drum bus.
Bass and kick weight. The Rupert Neve Designs 542 at 15 IPS with Silk Blue. The bigger head bump and low-mid harmonics thicken the bottom without an EQ boost.
Vocals. The T805, whose high-frequency magnetic compression smooths sibilance; the Zulu with Bias toward (−), Handsome Audio's suggestion for taming harsh or sibilant vocals; or the 542 with Silk Red for presence.
Acoustic guitar. The Magnetismus 2 (another of its design targets) or the Zulu on a guitar bus, which Karl Barnes calls beautiful on acoustics.
Digital reverbs and delays. The Zulu's PRO deck, which Handsome Audio specifically suggests for adding analog harmonics to reverb and delay plugins.
Lo-fi and creative distortion. The Zulu's LO deck, the T805's Maximum Hysteresis setting (a fully unbiased element with aggressive, higher-order distortion), or the Magnetismus 2 at extreme settings. Our analog saturation chains for lo-fi, chill and ambient tracks build on this.
Tape rarely works alone. These five short chains are starting points built entirely from gear in our racks, one per tape tool. Chain order is a strong starting point, not a rule.
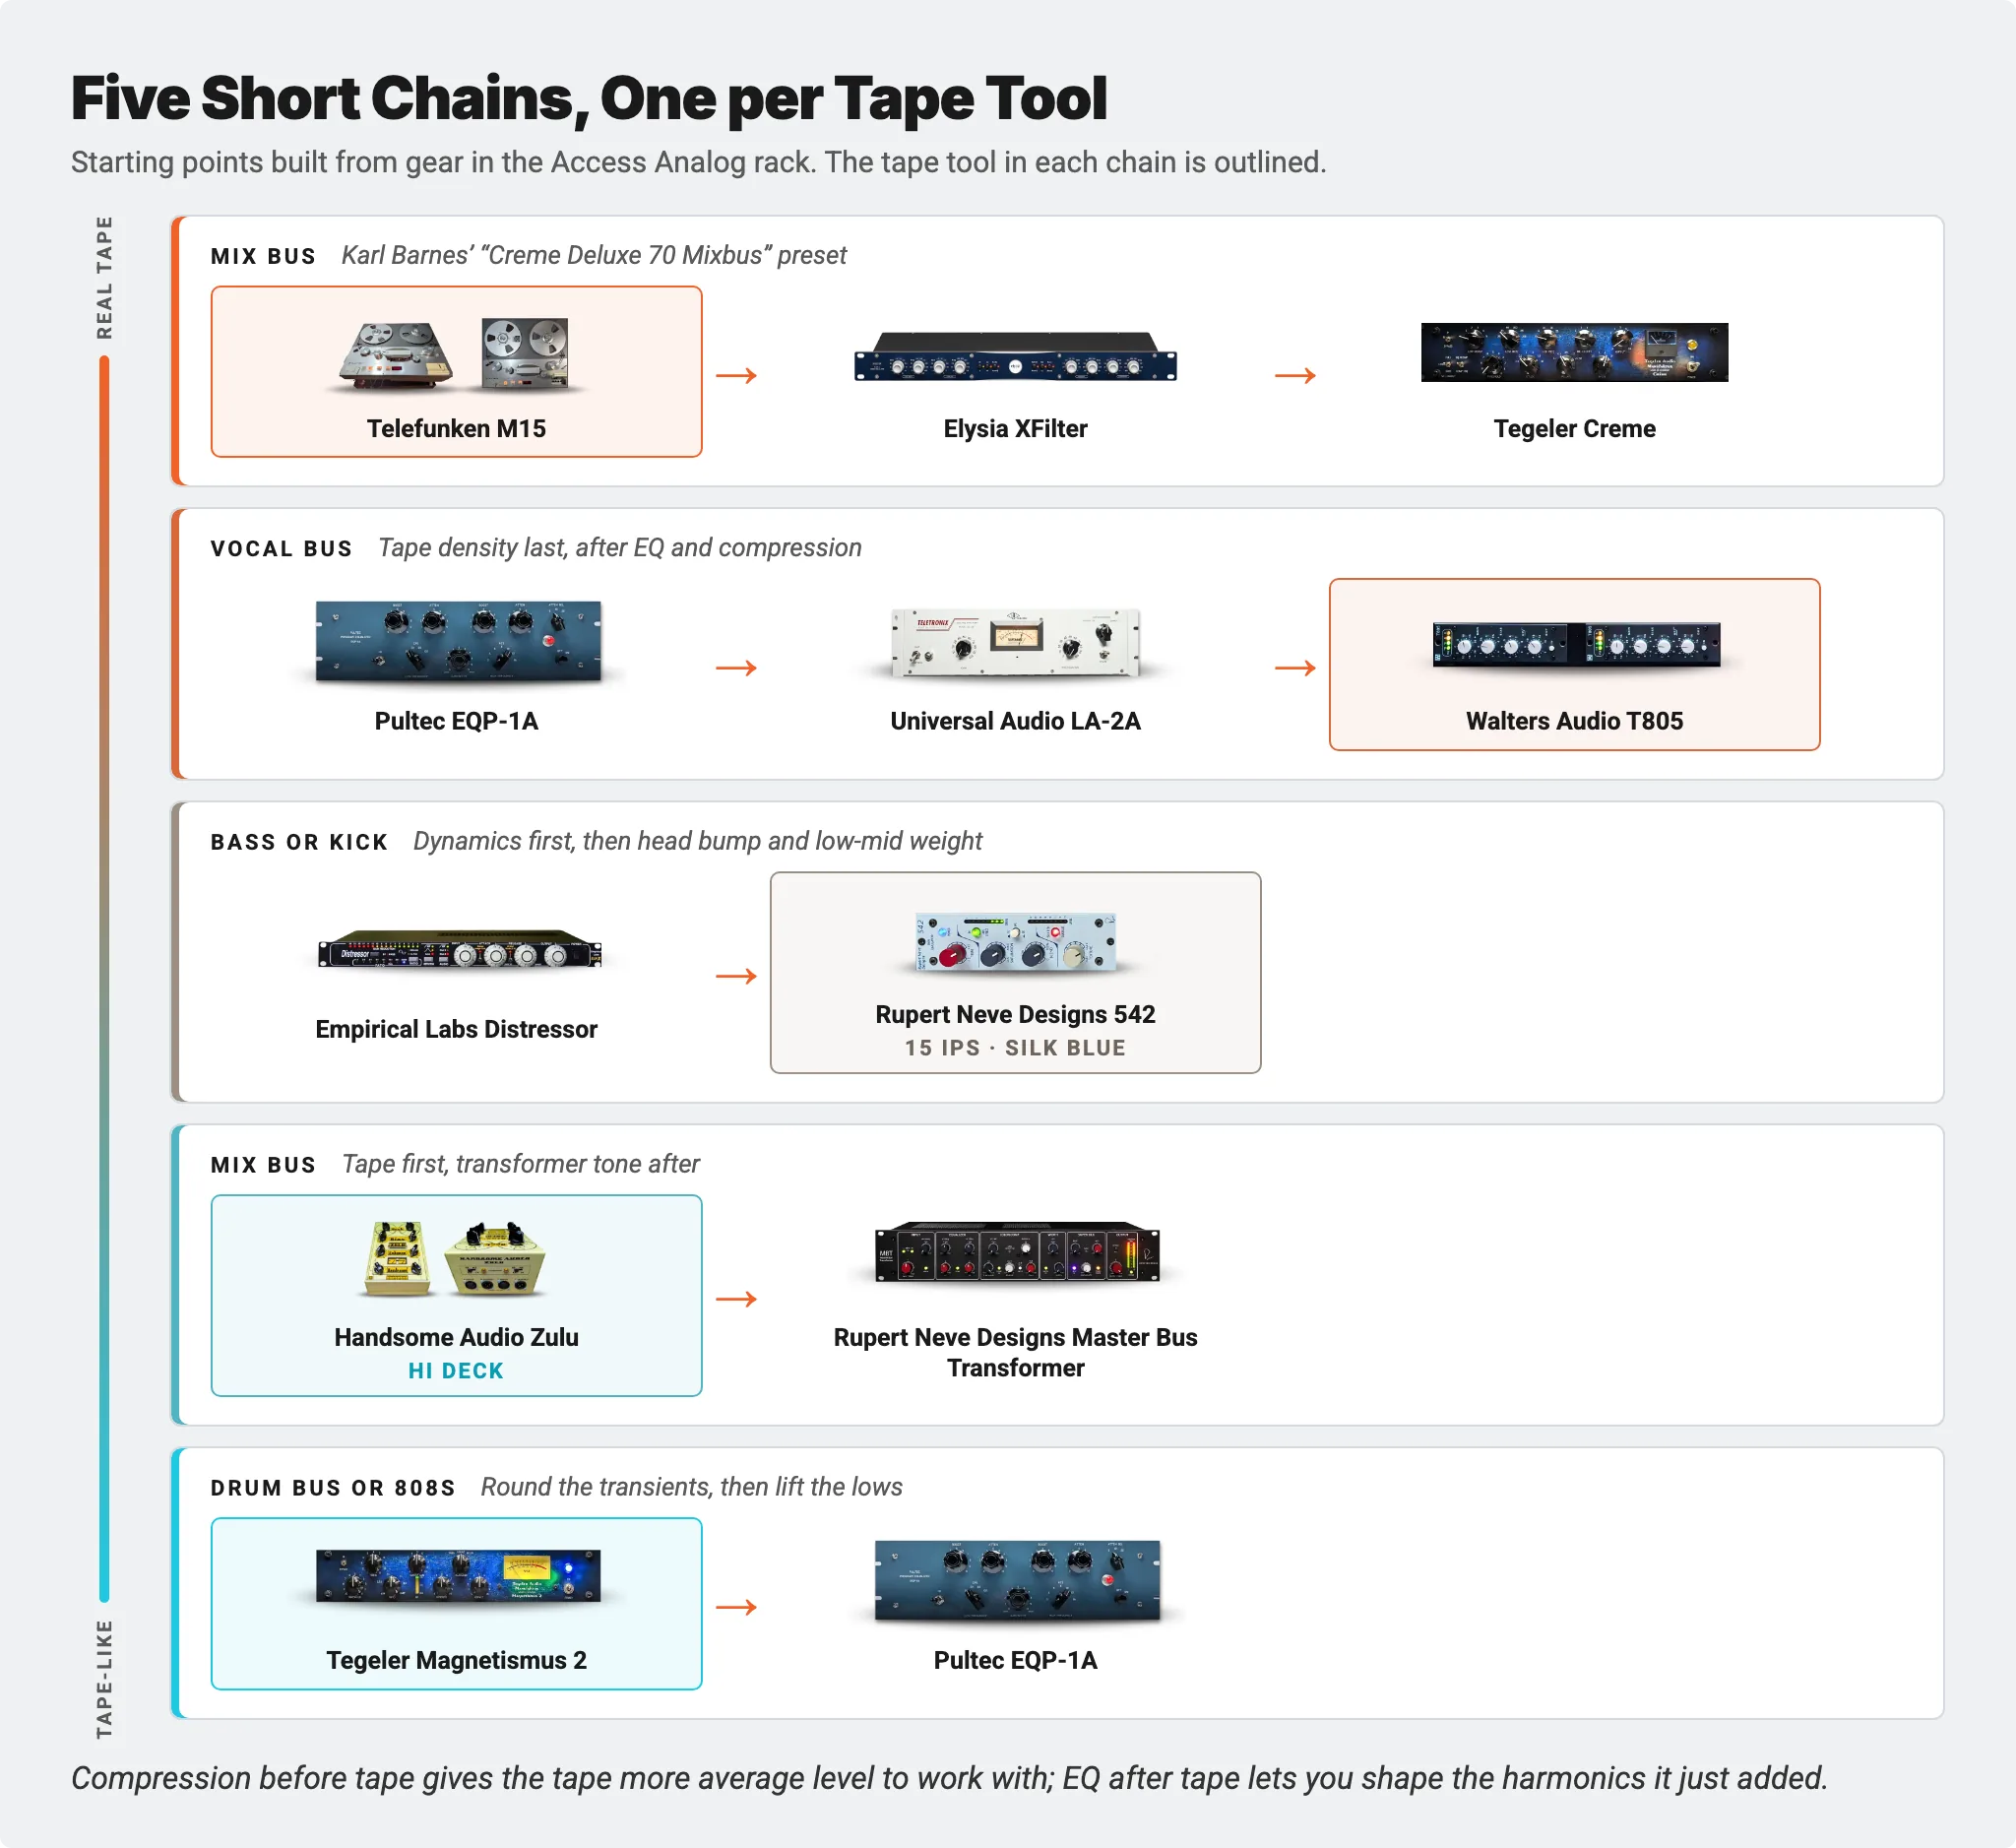
Telefunken M15 → Elysia XFilter → Tegeler Creme (mix bus). This is Karl Barnes' "Creme Deluxe 70 Mixbus" preset. The tape goes first, the XFilter shapes what tape did to the top and bottom, and the Creme finishes with gentle bus compression. Karl walks through it, plus Pro and Elite versions, in M15 gain staging, presets and tips.
Pultec EQP-1A → Universal Audio LA-2A → Walters Audio T805 (vocal bus). Karl's T805 vocal preset is built to glue a vocal bus after EQ and compression, so the Pultec sets the tone, the LA-2A levels the performance, and the T805 adds tape density last. Push the T805's gain harder when the vocal needs to stand out as a feature.
Empirical Labs Distressor → Rupert Neve Designs 542 (bass or kick). Let the Distressor control the dynamics, then put the 542 at 15 IPS with Silk Blue to add head bump and low-mid weight. Use Blend to bring back some of the dry attack if the low end gets too soft.
Handsome Audio Zulu → Rupert Neve Designs Master Bus Transformer (mix bus). The Zulu's HI deck adds tape compression and saturation, then the Master Bus Transformer finishes the tone with its shelving EQ and Super Silk transformer harmonics. Set the Zulu's makeup gain first so the Master Bus Transformer sees a healthy level.
Tegeler Magnetismus 2 → Pultec EQP-1A (drum bus or 808s). Round the drum transients and add transformer density, then lift the lows on the Pultec. Karl suggests exactly this for his crunchy parallel 808 preset: a little low-end boost after the Magnetismus 2, and "Pultecs are king here."
Compression before tape gives the tape more average level to work with; EQ after tape lets you shape the harmonics it just added.
Yes, and it's the most authentic way to use these tools. Records made in the tape era didn't touch tape once. Tracks were recorded to a multitrack machine, then the mix was printed to a stereo master deck, and the character built up across both passes.
That's exactly Robjohns' point in Analogue Warmth: convincing analog character comes from several subtle stages, not one heavily processed one. You can rebuild that workflow in Access Analog:
Each stage adds a little saturation and a little compression, and the M15 ties the whole mix together on real tape at the end. Because every setting recalls with your session, you can go back and change one bus without rebuilding the rest.
One heavy tape stage sounds like an effect. Three light ones sound like a record made on tape.
Set the level by ear, not by number. With real analog gear, the level you send is part of the tone, so there's no single "right" send level. Drive the unit until transients soften and the sound thickens, then back off a touch. For the M15, start at the default input gain and move the slider from there. Our guide to getting started with the Telefunken M15 walks through it.
Compress before tape when you're mixing. Tape responds to average level more than peaks. A mix with wild transients hits the converter ceiling before the tape starts working, so taming peaks first lets you drive more average level into the tape.
Gain-match before you judge. Louder always sounds better. The passive Zulu loses level, so use the makeup gain from Karl's Handsome Audio Zulu presets to get back to unity. Gain-match the others with their output controls, then compare.
Use the parallel controls. The 542's Blend and the Zulu's Enhance both work in parallel, so you can push the tape stage harder and blend in clean signal to keep the punch.
Stepped controls automate in steps. The Zulu's Deck and Bias switches are stepped, so automating them changes the sound in discrete jumps rather than a smooth sweep. Switching decks between song sections is a quick way to change character.
Use the dual A/B chains. The Analog Matrix plugin can hold two chains, so you can compare the T805 and the Zulu, or 15 IPS and 30 IPS on the 542, on the same pass.
You load the Analog Matrix plugin in your DAW, pick the tape tool, and stream your audio through the real hardware in our Colorado racks. The hardware's controls are robotically operated from the plugin, and every setting recalls with your session.
What it costs. New accounts get 12 free credits, about an hour on an average device, so you can hear a tape tool on your own material first. Plans start at $9.98 a month. For whole tiers of gear, the Access Analog Subscription climbs in three steps, and the tape tools climb with it:
You don't need a subscription at all to try one. Any of these units can be booked with reservations or paid for with credits.
A month on our entry plan costs less than a single reel of tape.
Tape is not one sound. It's a machine doing five things at once (saturating, compressing, bumping the low end, shaping the top with bias, and moving just slightly), and engineers choose machines, tape stock and alignment to get the balance they want.
You now have that choice without the upkeep. The Telefunken M15 gives you all of it on real tape. The Walters Audio T805, Rupert Neve Designs 542 and Handsome Audio Zulu each rebuild part of it in hardware, with controls no tape machine ever had. The Tegeler Magnetismus 2 gives you tape's smoothing on the sources that need it most.
Real tape and real tape hardware, one plugin away. Pick the part of tape your track needs and print it.
What is tape saturation, and why does it sound good?
Tape saturation is what happens when a signal is pushed toward the limit of how much magnetic energy tape can hold. Peaks are rounded rather than clipped, harmonic distortion rises gradually, and transients soften, so the sound gets denser and more cohesive. Engineers like it because the effect grows smoothly with level instead of breaking up suddenly the way digital clipping does.
What's the difference between a tape machine and a tape emulator?
A tape machine records audio onto moving magnetic tape and plays it back, so it delivers saturation, compression, head bump, bias-shaped top end and transport movement all at once. A tape emulator recreates some of those behaviors without tape, either in software or in analog hardware such as the Walters Audio T805, Rupert Neve Designs 542 and Handsome Audio Zulu. Hardware emulators still generate their color with real magnetics and transformers, but none of them reproduces the movement of a real transport.
Is the Handsome Audio Zulu real tape?
No. The Handsome Audio Zulu is a passive analog tape simulator: it uses transformers and a passive circuit to recreate the saturation, compression and frequency response of three tape decks (a cassette 4-track, a Japanese professional machine and a Swiss professional machine). It's real analog hardware, and on Access Analog you control the physical unit, but there is no tape inside it.
Does the Tegeler Magnetismus 2 sound like tape?
It shares tape's smoothing without being a tape emulator. The Tegeler Magnetismus 2 combines a VCA compressor with a transient shaper that rounds transients off instead of cutting them down, then an output transformer that adds density. Tegeler describes the result as similar to a tape machine. It doesn't add bias or head bump, so it's best where you want tape's softened transients on drums, synths or acoustic guitars.
Which tape emulator is best on the mix bus?
For printing a finished mix, the Telefunken M15 is the only option that puts the mix on real tape. Among the simulators, the Walters Audio T805, the Handsome Audio Zulu (on its HI deck) and the Rupert Neve Designs 542 are all strong mix bus choices: the T805 if you want to tune bias and era, the Zulu if you want a choice of deck and its parallel Enhance circuit, and the 542 if you want a Blend control and Silk to dial the amount and tilt of the color.
Should tape go before or after compression?
When mixing, compressing before tape usually works best, because tape responds to average level and taming the peaks lets you drive more level into it. When mastering, tape after compression gives you good signal-to-noise and room to push level. Both are starting points, so try the other order if the result feels wrong.
Can I use tape saturation when mastering?
Yes, with a light touch. A clean pass through a real tape machine such as the Telefunken M15 adds glue and rounds peaks before you've heard any obvious distortion. Start with a modest level, compare against the unprocessed master, and increase drive only if the music needs it.
How can I get real tape sound without buying a tape machine?
Access Analog streams your audio from your DAW through a real Telefunken M15 tape machine and through hardware tape simulators (the Walters Audio T805, Rupert Neve Designs 542 and Handsome Audio Zulu), plus the tape-like Tegeler Magnetismus 2. Everything is controlled from the Analog Matrix plugin and recalls with your session. New accounts get 12 free credits to try it, and plans start at $9.98 a month.