The Rupert Neve Designs 542: Tape Saturation Without the Tape Machine
There is a particular sound engineers chase when a mix feels too clean: a softer top, a thicker body, a sense that the recording has been through something. The traditional way to get it was to print to a reel-to-reel machine.
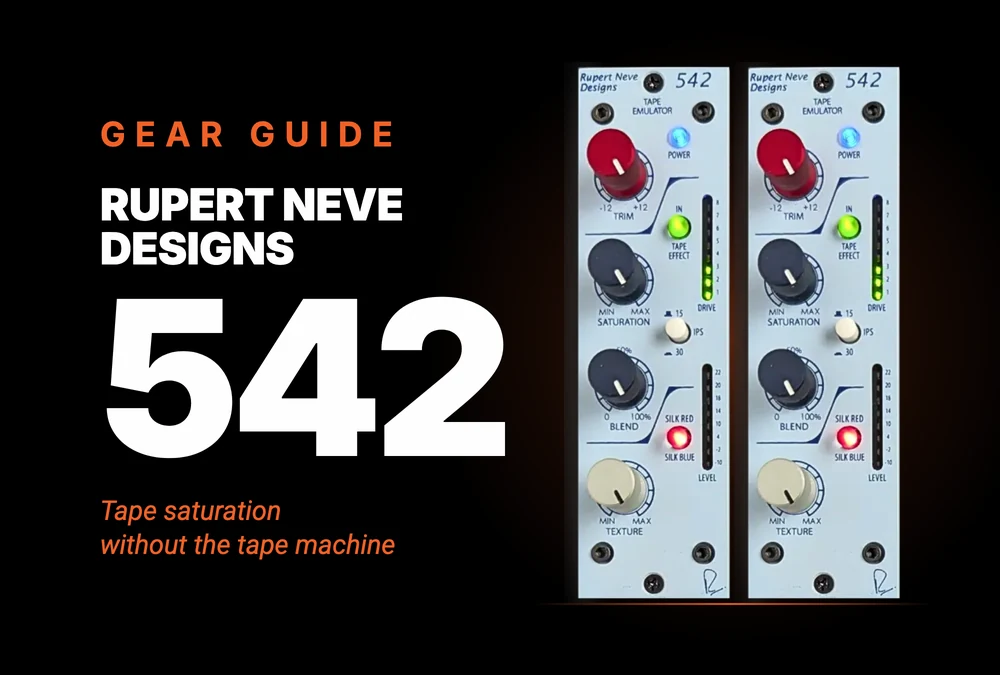
The Rupert Neve Designs 542 takes a different route. It is a single 500 Series module that reaches for that character without spooling any tape at all. This guide covers what the 542 is actually emulating, how its tape circuit works, what every control does, starting settings by source, the gear it pairs well with, and how to run the real one from your DAW with Access Analog.
Key Takeaways
- A transformer plays the record head. The 542 drives a custom transformer the way a tape machine drives its record head, then recovers the signal through a replay stage with a tape EQ curve. There is no tape and no DSP.
- Saturation is level-compensated. Turning Saturation up raises the drive and lowers the recovery gain together, so you hear more color at roughly the same level.
- 15 IPS adds weight, 30 IPS stays open. 15 IPS puts a head bump at 60 Hz and rolls off the top. 30 IPS moves the bump to around 120 Hz and leaves the top extended.
- Blend keeps the punch, but it doesn't touch Silk. Blend mixes the signal from before and after the tape circuit. Silk sits later, on the output transformer.
- It evokes tape. It isn't tape. When you want the whole process, that is what a real machine such as our Telefunken M15 is for.
Think of the 542 as a saturation device with a tape accent, and every control on it starts to make sense.
What Is the Rupert Neve Designs 542 Actually Emulating?
The Rupert Neve Designs 542 is a single-channel, all-analog tape emulator in the 500 Series format. Rupert Neve Designs released it in 2013 as a descendant of the Portico 5042. The front panel has four knobs, three buttons and two LED meters.

The most useful description of it didn't come from a spec sheet. The musician Bibio, interviewed by Rupert Neve Designs about his 5088 console, said he uses the 542 and the 5042 but thinks of them as saturation devices: "tape machines without the tape."
That is the right frame. A real reel-to-reel deck gets its sound from a chain of physical events: magnetic particles on a moving ribbon being pushed past their linear range, a bias signal keeping the quiet details clean, a head bump in the lows, high frequencies that saturate before the rest, and a transport that never moves at a perfectly steady speed. Tape formulation, tape speed and alignment all change the result.
The 542 rebuilds the electrical half of that chain. In place of a record head it uses a custom transformer, driven harder as you turn up Saturation, and in place of a playback stage it uses a recovery amplifier with a tape-style EQ curve. What it leaves out is the tape itself, the bias and the moving transport. So you get added harmonics, rounded transients, a head bump and a gently restrained top end. You don't get wow, flutter or hiss.
That is a trade with real advantages. A 542 never needs alignment, never sheds oxide, and recalls instantly.
The 542 is a saturation circuit doing a very good impression of tape. Use it as that, and it rarely disappoints.
How Does the 542's Tape Circuit Work?
The 542 saturates a transformer on purpose, between two EQ stages that mirror what a tape machine does on record and playback.
A quick refresher on why that matters. When any circuit saturates it generates harmonics, new content at whole-number multiples of the original tones. Even-order harmonics (second, fourth) tend to read as fullness, because they reinforce octaves. Odd-order harmonics (third, fifth) read as body, density and a controlled grit. Hugh Robjohns, in his Analogue Warmth article for Sound On Sound, notes that tape distortion is dominated by the third harmonic. In his Sound On Sound review of the Rupert Neve Designs 500 Series, he reports the same of the 542: its transformer generates third-order harmonics, and the soft clip adds second-order harmonics at higher levels.
Here is the path your audio takes, following the block diagram in the manual:
- Input transformer and Trim. The signal enters through a transformer, and Trim sets the level by up to ±12 dB.
- The signal splits. One copy stays clean. The other heads into the tape circuit.
- Drive stage. This is where Saturation adds gain, the IPS switch applies its pre-emphasis curve, and the soft clip lives. The Drive meter reads the level here.
- Saturation transformer. This is the "record head," and it is where the third-order color comes from.
- Recovery stage. A de-emphasis amplifier undoes the pre-emphasis and makes the level back up. Its gain is tied to the Saturation knob, falling as the drive rises.
- Blend. The clean copy and the tape copy are mixed.
- Output stage, Silk and the output transformer. The Level meter reads the signal here, before Silk does its work.
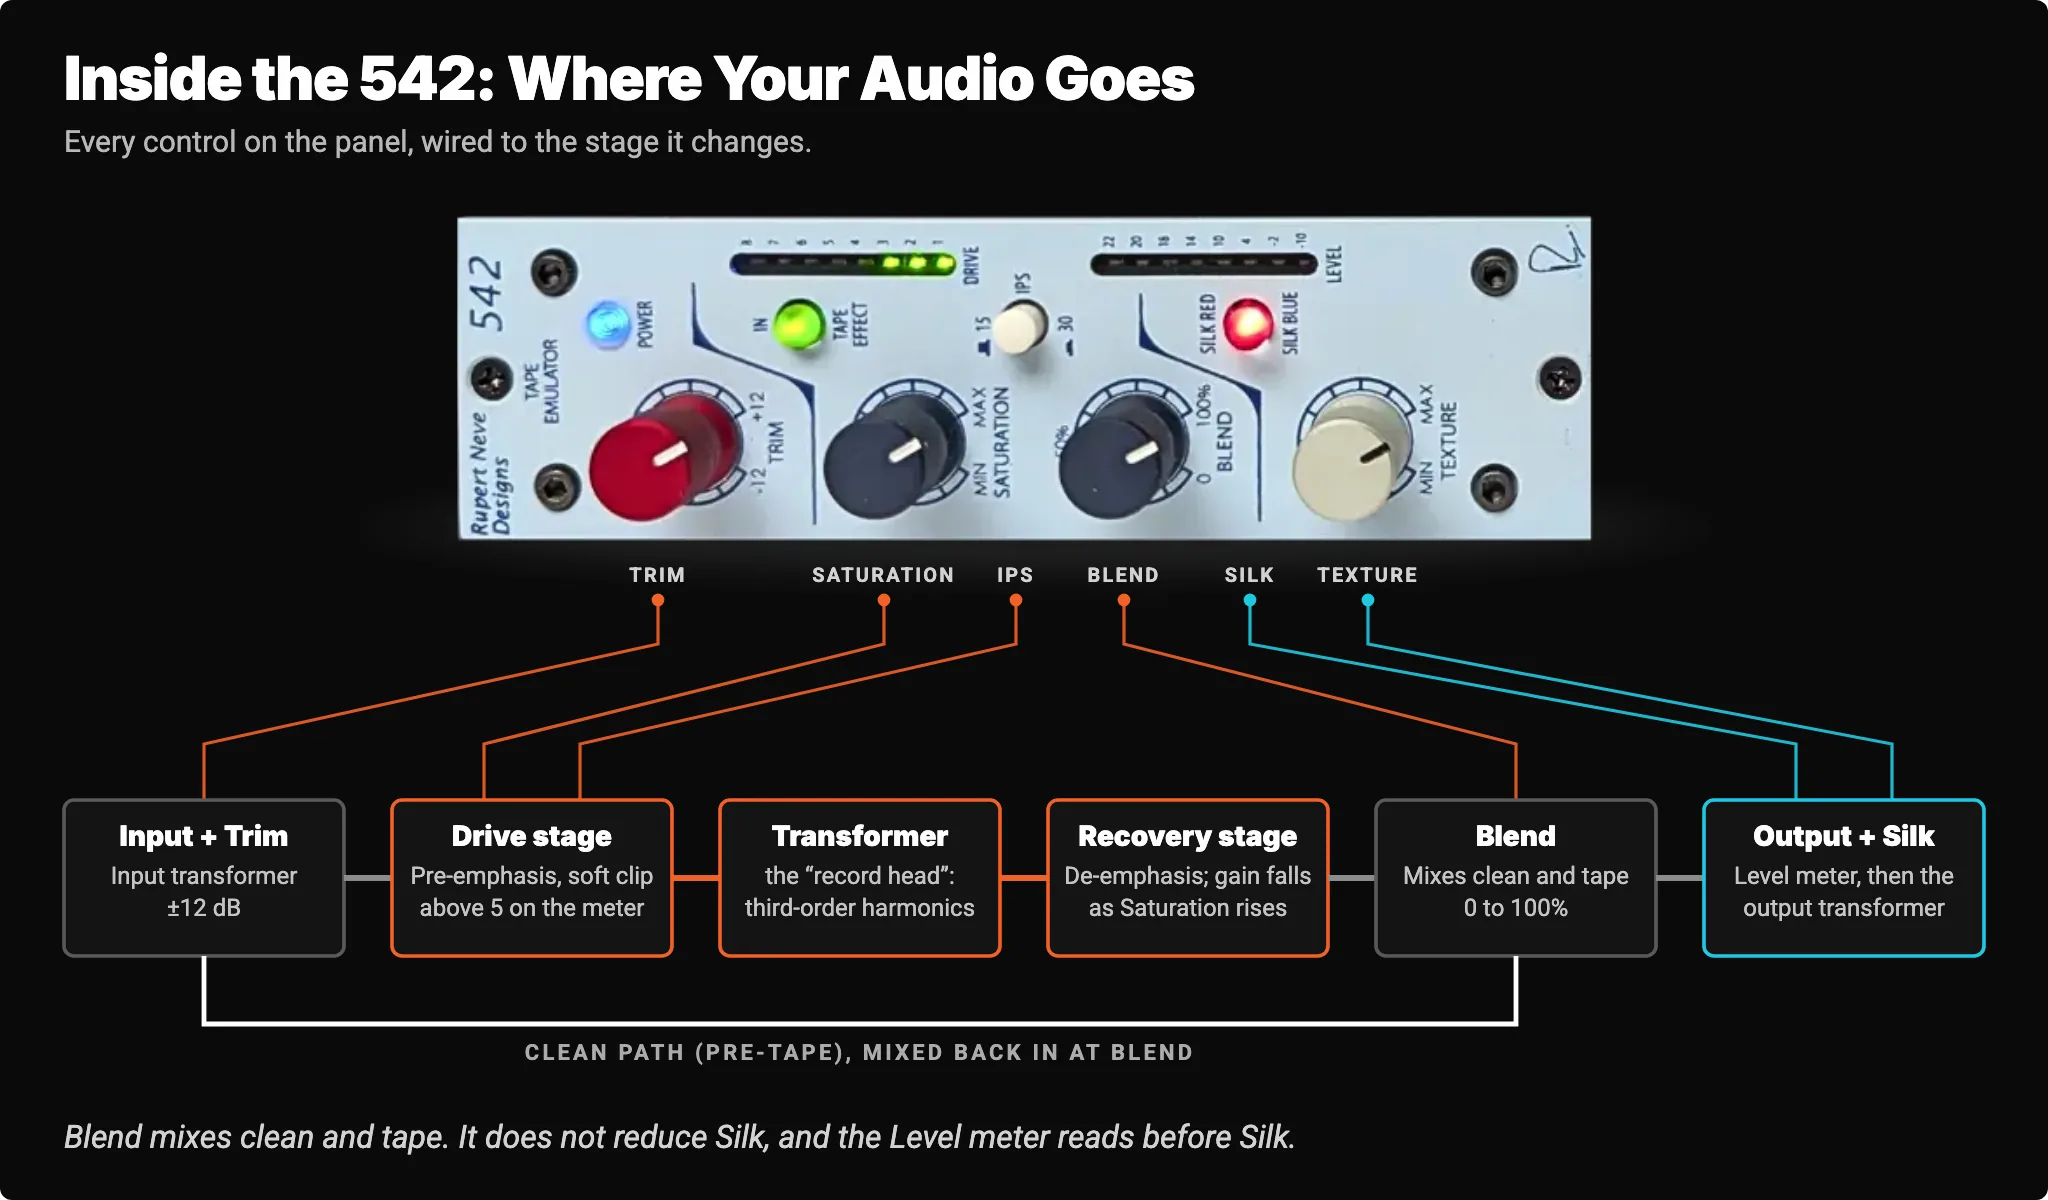
The order explains two things that catch people out. The soft clip belongs to the tape circuit, so it only works with Tape Effect engaged. And Silk comes after Blend, so backing Blend off does nothing to the Silk color.
What Does Each Control Do?
There are nine things on the panel, and three of them (Saturation, the IPS switch and Blend) do most of the work.
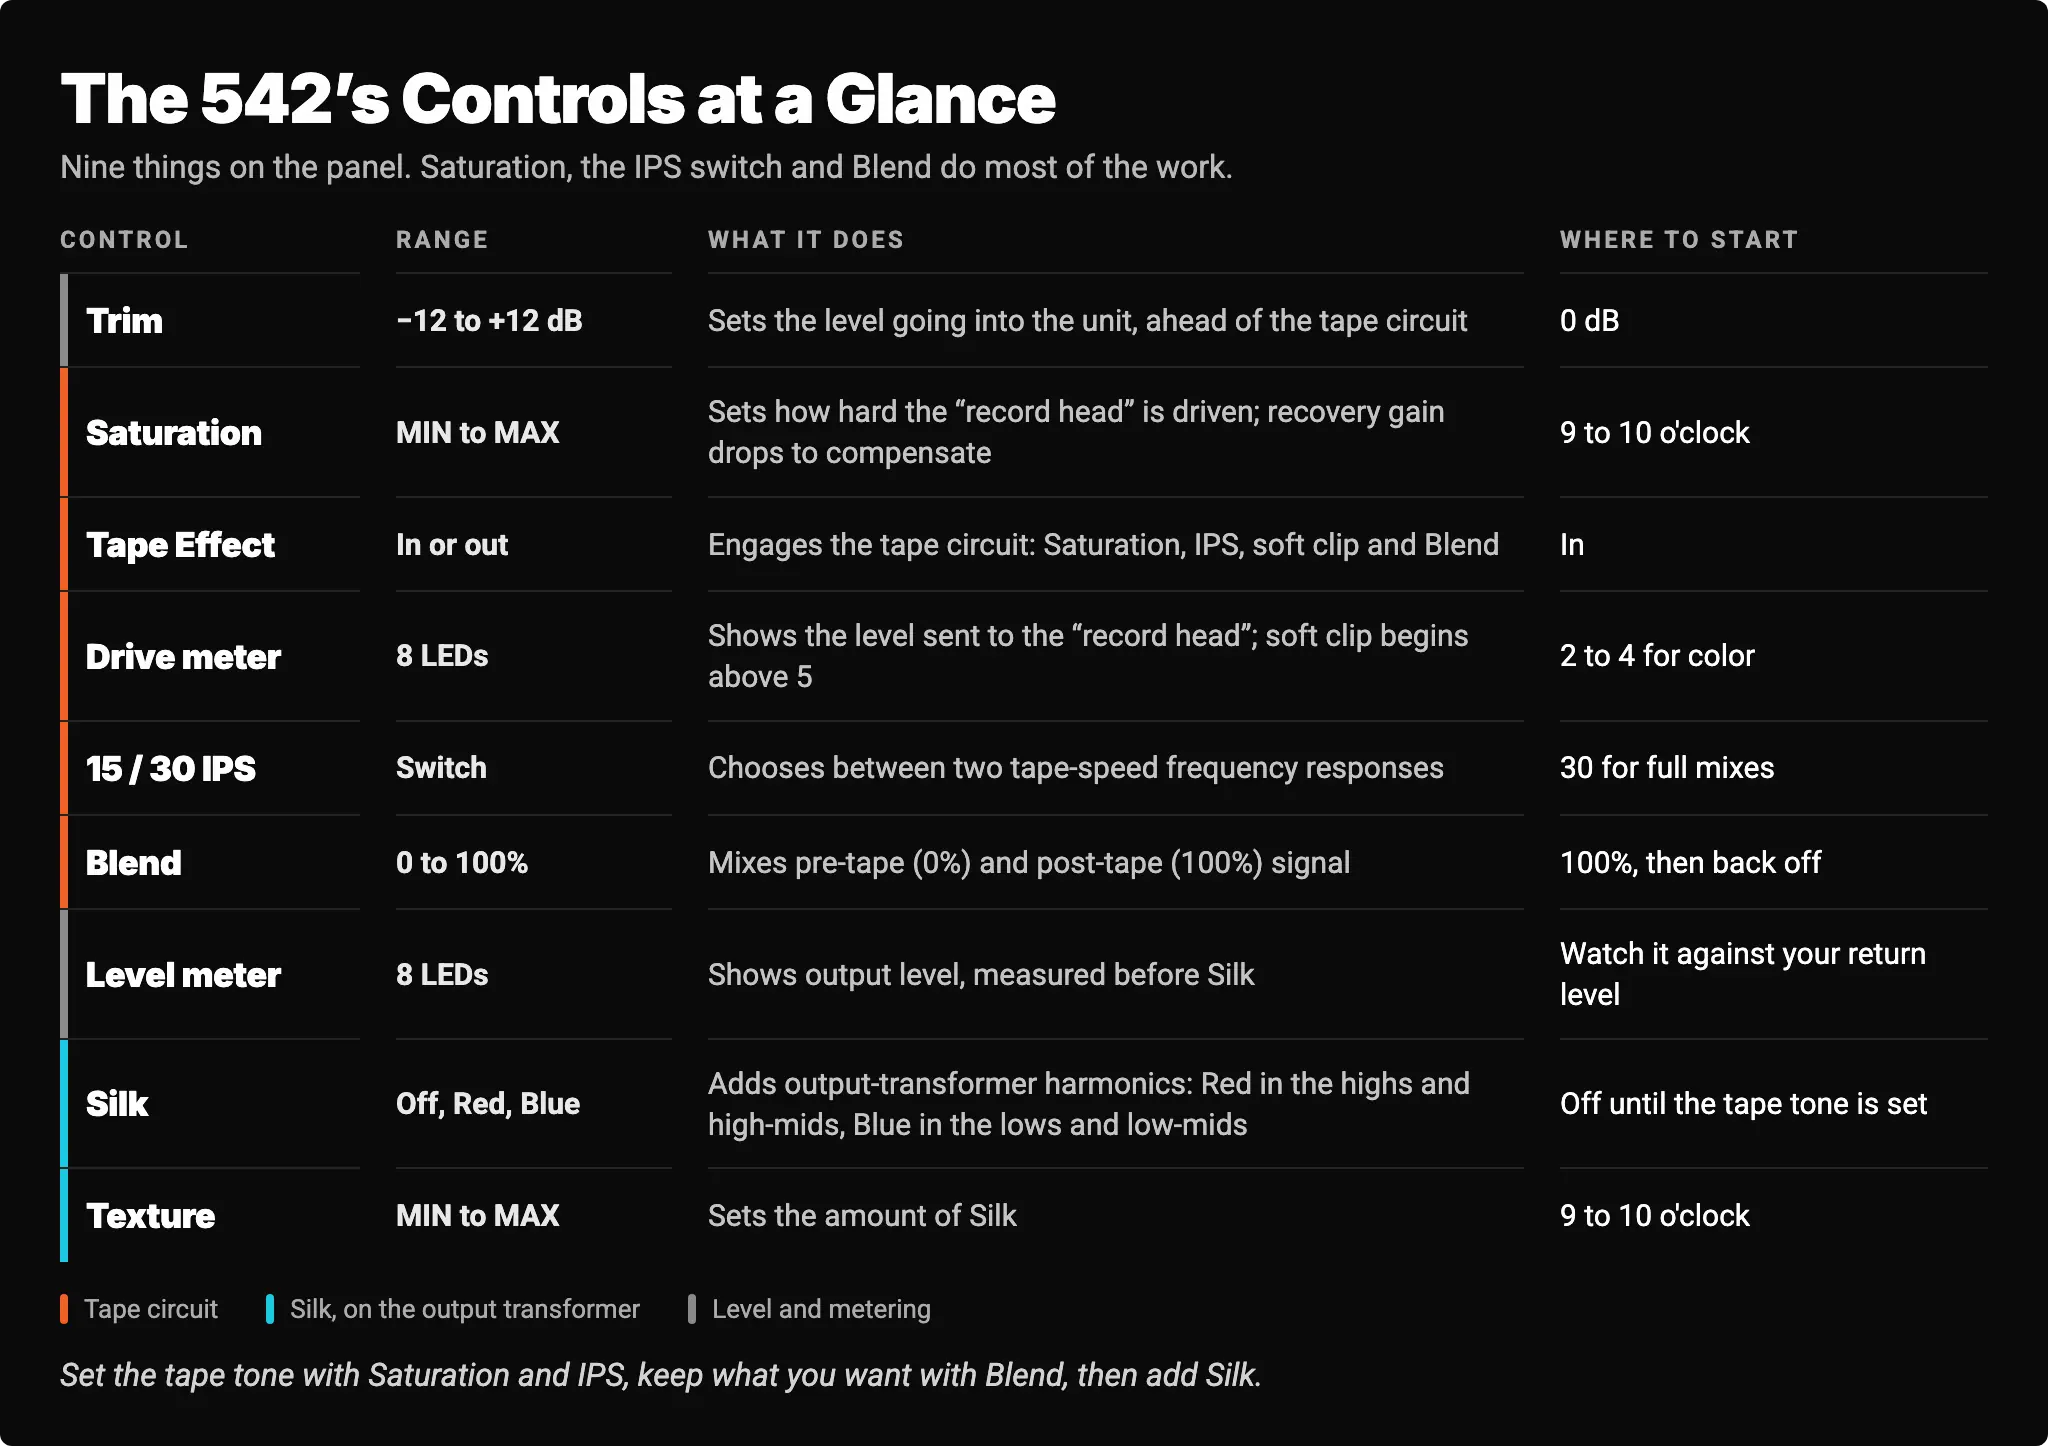
Saturation is the heart of the unit, and it is smarter than a drive knob. As you turn it up, the drive into the transformer rises and the recovery gain falls, so the output stays close to where it was. That makes honest comparison easy: you are hearing more color, not more level. Rupert Neve Designs notes that the output dips slightly as you approach MAX, because the saturation and soft clipping become extreme.
Saturation also controls a low-frequency compensation circuit. The low end is boosted a little more at low Saturation settings and less at high ones. In practice, low Saturation gives you a cleaner, bigger bottom, and high Saturation gives you a denser, more compressed one.
Trim sits ahead of everything, so it changes how hard the tape circuit is hit at any Saturation setting. In the 542 manual, a 0 dBu input reads 2 on the Drive meter with Saturation at minimum and 6 at maximum. If your source is quiet and the meter won't climb, Trim is how you get there.
The meters tell you different things. Drive shows what the transformer is seeing. Level shows what is leaving the tape circuit and Blend. Neither one shows what Silk adds.
Set the tape tone with Saturation and the IPS switch, decide how much of it to keep with Blend, and only then reach for Silk.
15 IPS or 30 IPS: Which Should You Use?
Use 15 IPS when you want weight and a softer top, and 30 IPS when you want the color without changing the balance much.
IPS stands for inches per second, the speed tape travels past the heads. Faster tape extends the high-frequency response and moves the head bump (a low-frequency rise caused by the playback head's geometry) higher up. The 542's switch selects two responses modeled on those speeds.
15 IPS has a pronounced head bump centred at 60 Hz and a rolled-off top. With a 0 dBu input, the manual measures the bump at +5 dB with Saturation at minimum and +2.4 dB at maximum, with the high end 3 dB down at 28 kHz and 20 kHz respectively.
30 IPS is flatter overall, with a bump around 120 Hz. The manual measures it at 125 Hz and +3.15 dB with Saturation at minimum, and 110 Hz and +1.3 dB at maximum. The top stays extended far beyond the audio band. Robjohns called the 30 IPS setting noticeably smoother and more open.
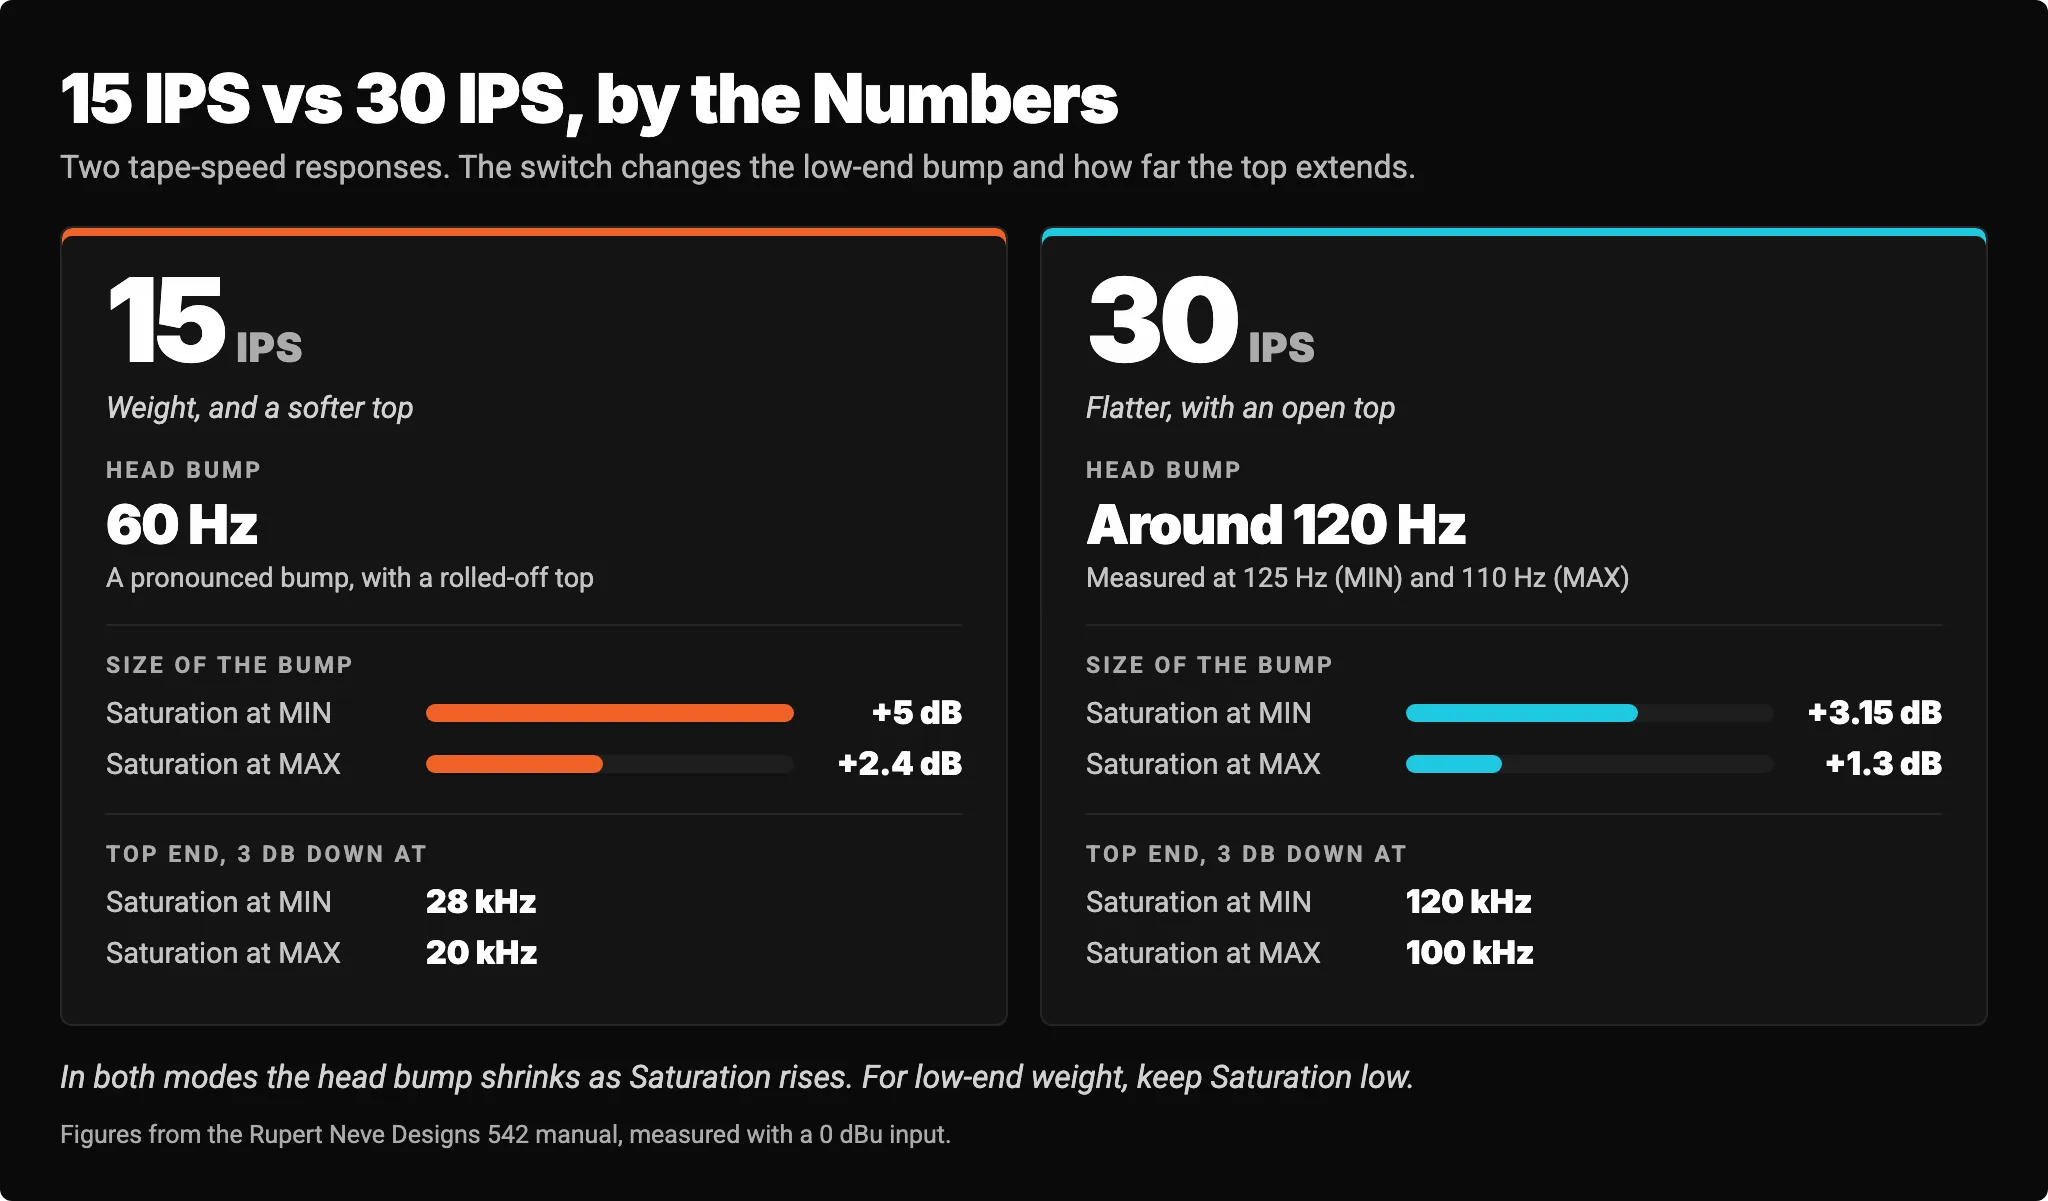
Notice what happens in both modes: the head bump shrinks as Saturation rises. If the reason you reached for the 542 is low-end weight, don't crank Saturation. Keep it low, where the bump is biggest, and let 15 IPS do the lifting.
Some starting logic: 15 IPS on kick, bass, and anything thin or brittle. 30 IPS on full mixes, vocals and acoustic instruments, where a 60 Hz lift and a softer top would change the balance you already built.
What Do Silk Red, Silk Blue and Texture Add?
Silk is a second, separate source of color. It saturates the 542's output transformer, and Texture sets how much.
Silk is a family trait across the Rupert Neve Designs line, and you will find a larger version on the Master Bus Transformer (our Master Bus Transformer quick start guide covers it). As Robjohns explains it, Texture reduces the negative feedback around the output stage, which lets the transformer's own character through.
Silk Red leans the harmonics toward the highs and high-mids. You hear presence and a sense of forwardness. Reach for it when a source feels dull or buried.
Silk Blue leans them toward the lows and low-mids. You hear weight and thickness. Reach for it on bass, kick, and anything that needs to feel bigger.
Texture is the dose. At minimum the effect is barely there. Turned up, it becomes obvious.
Three things about Silk are worth knowing before you use it:
- It works with Tape Effect out. Bypass the tape circuit and the 542 becomes a clean line stage (flat within ±0.25 dB from 5 Hz to 60 kHz) with Silk available on top. That is a useful color box in its own right.
- Blend does not reduce it. Silk sits after the Blend control, so the only way to turn it down is Texture.
- The Level meter does not show it. The meter reads before Silk, so trust your return level in the DAW.
What Does the Soft Clip Do?
The soft clip rounds off transient peaks inside the tape circuit once the Drive meter passes 5, the first yellow LED.
Hard clipping flattens a peak abruptly. The waveform hits a ceiling and squares off, which generates a burst of high-order harmonics the ear hears as harshness. Soft clipping curves the approach to the ceiling instead. The peak is still caught, but without the brittle edge.
On the 542 that is useful in two ways. It tames transients that poke out: the spike of a snare, the pick attack of a bass, the hard consonants of a loud vocal. And because those peaks are rounded before they leave the unit, you can carry more average level without a few sharp transients setting your ceiling. That is a small echo of one of the things engineers liked about printing to tape in the first place.
The soft clip is not a switch. It arrives with drive, becomes more apparent the further past 5 you go, and can be eased back with Blend. For gentle warmth, keep the Drive meter in the green. For controlled aggression on drums, push into the yellow and blend some of the clean signal back in.
Where Should You Reach for the 542?
The 542 is a flavor and control device, not a corrective one. You reach for it when a source is technically fine but emotionally flat.
These are starting points for your ears, not rules. Drive meter readings depend on how hot your source is, so use Trim to get the meter where the table says.
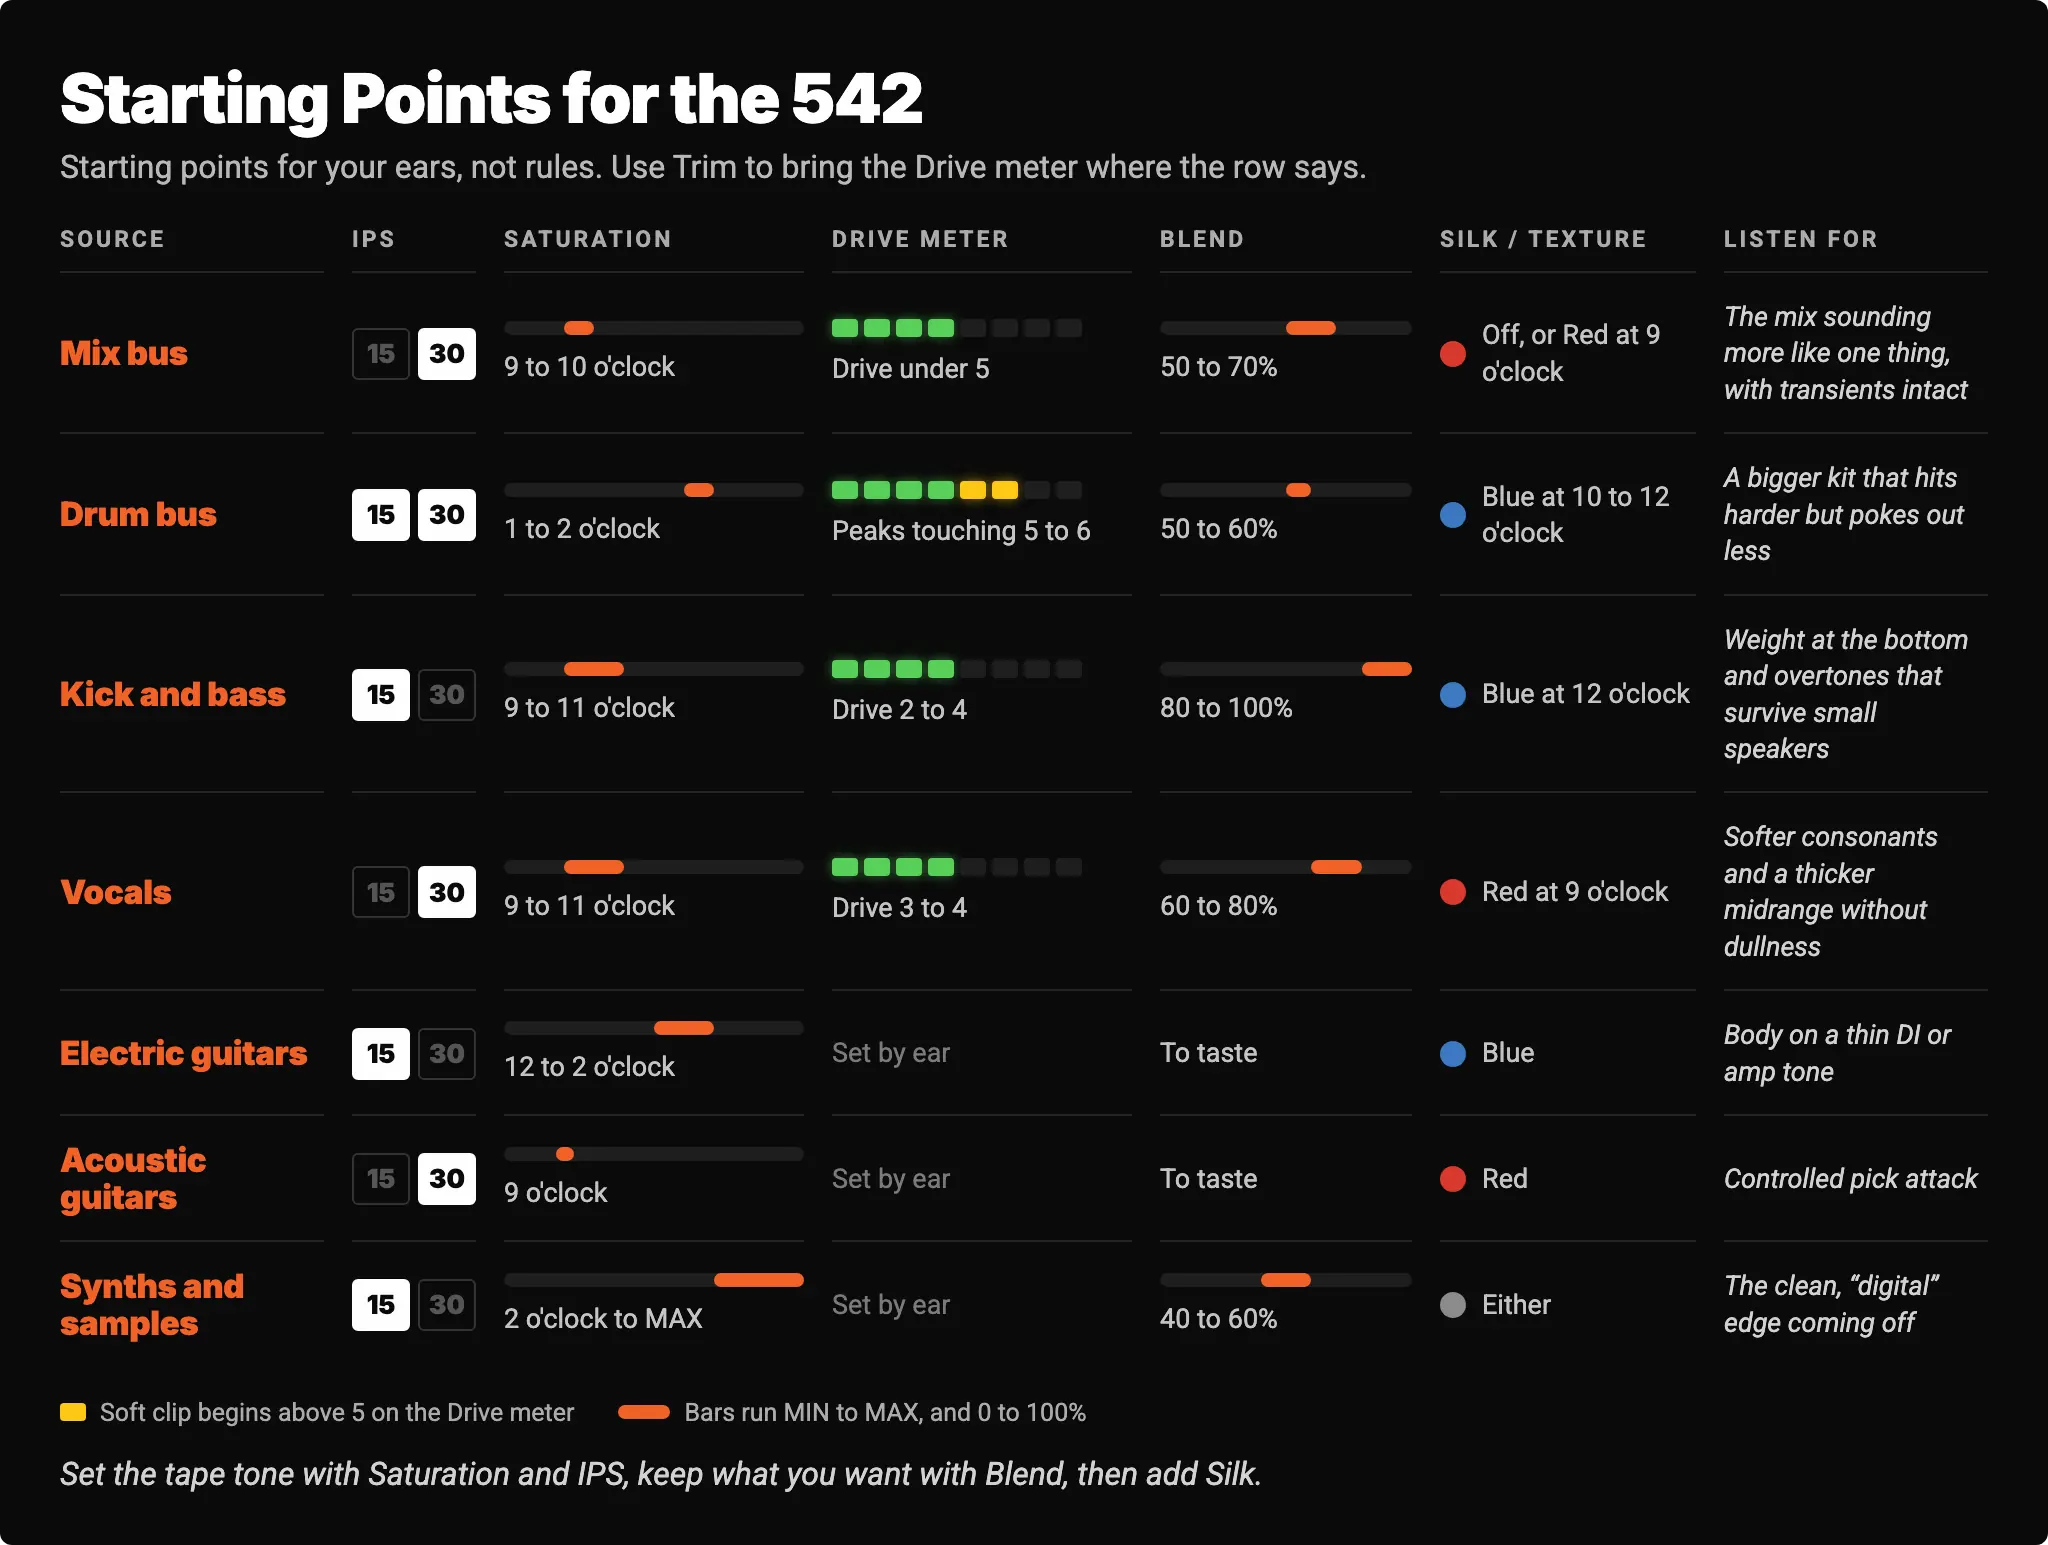
Mix bus. A small amount of tape color, with the soft clip barely working, helps a digital mix sum together more like a record. Keep Texture modest and lean on Blend to preserve transient life. If cohesion is the goal, our guide to mix-bus glue compares this route with compression and transformers.
Drums. This is where the 542 can be pushed. Let the peaks light the yellow LEDs, then use Blend to bring back as much attack as you want.
Bass. Third-order harmonics give the fundamental a set of overtones the ear can follow even when the real low end is missing, which is why saturated bass translates better on a phone or laptop.
Vocals. A lighter touch. The 542 can make a clean, slightly clinical vocal feel recorded-to-tape without dulling it.
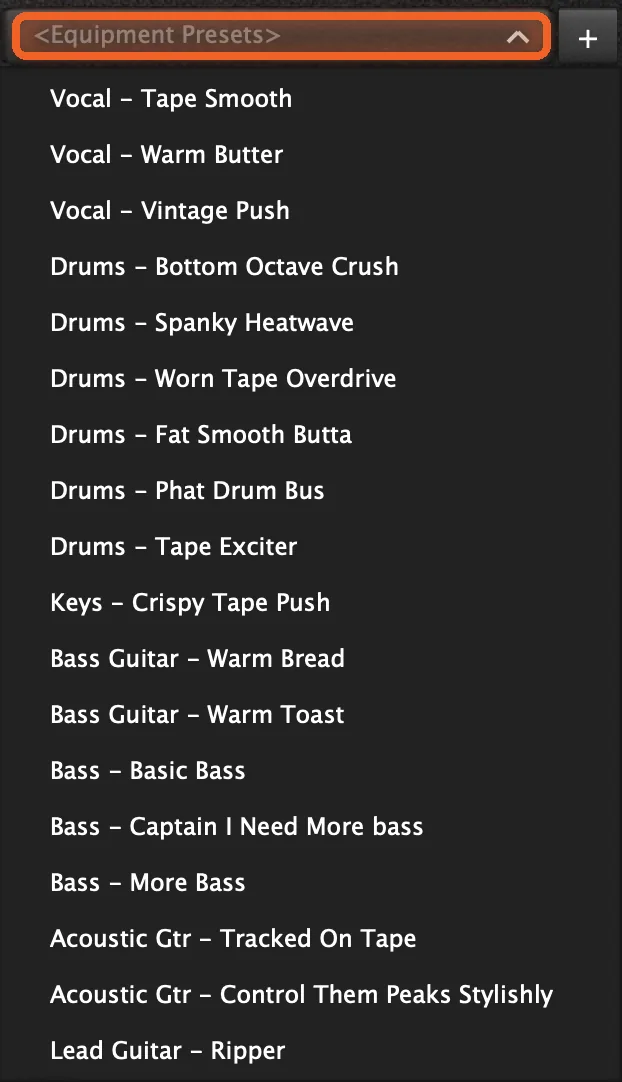
If you would rather start from someone else's ears, Karl Barnes, mixing and mastering engineer at Loom Sound Studio, built a set of 542 presets for our rack. They are sorted by source in the plugin's Equipment Presets menu: vocals, drums, keys, bass, acoustic guitar and lead guitar, with names like Vocal – Tape Smooth, Drums – Fat Smooth Butta and Bass – Captain I Need More bass. Load one, listen, then move Saturation and Blend until it fits your track.
What Does the 542 Pair Well With?
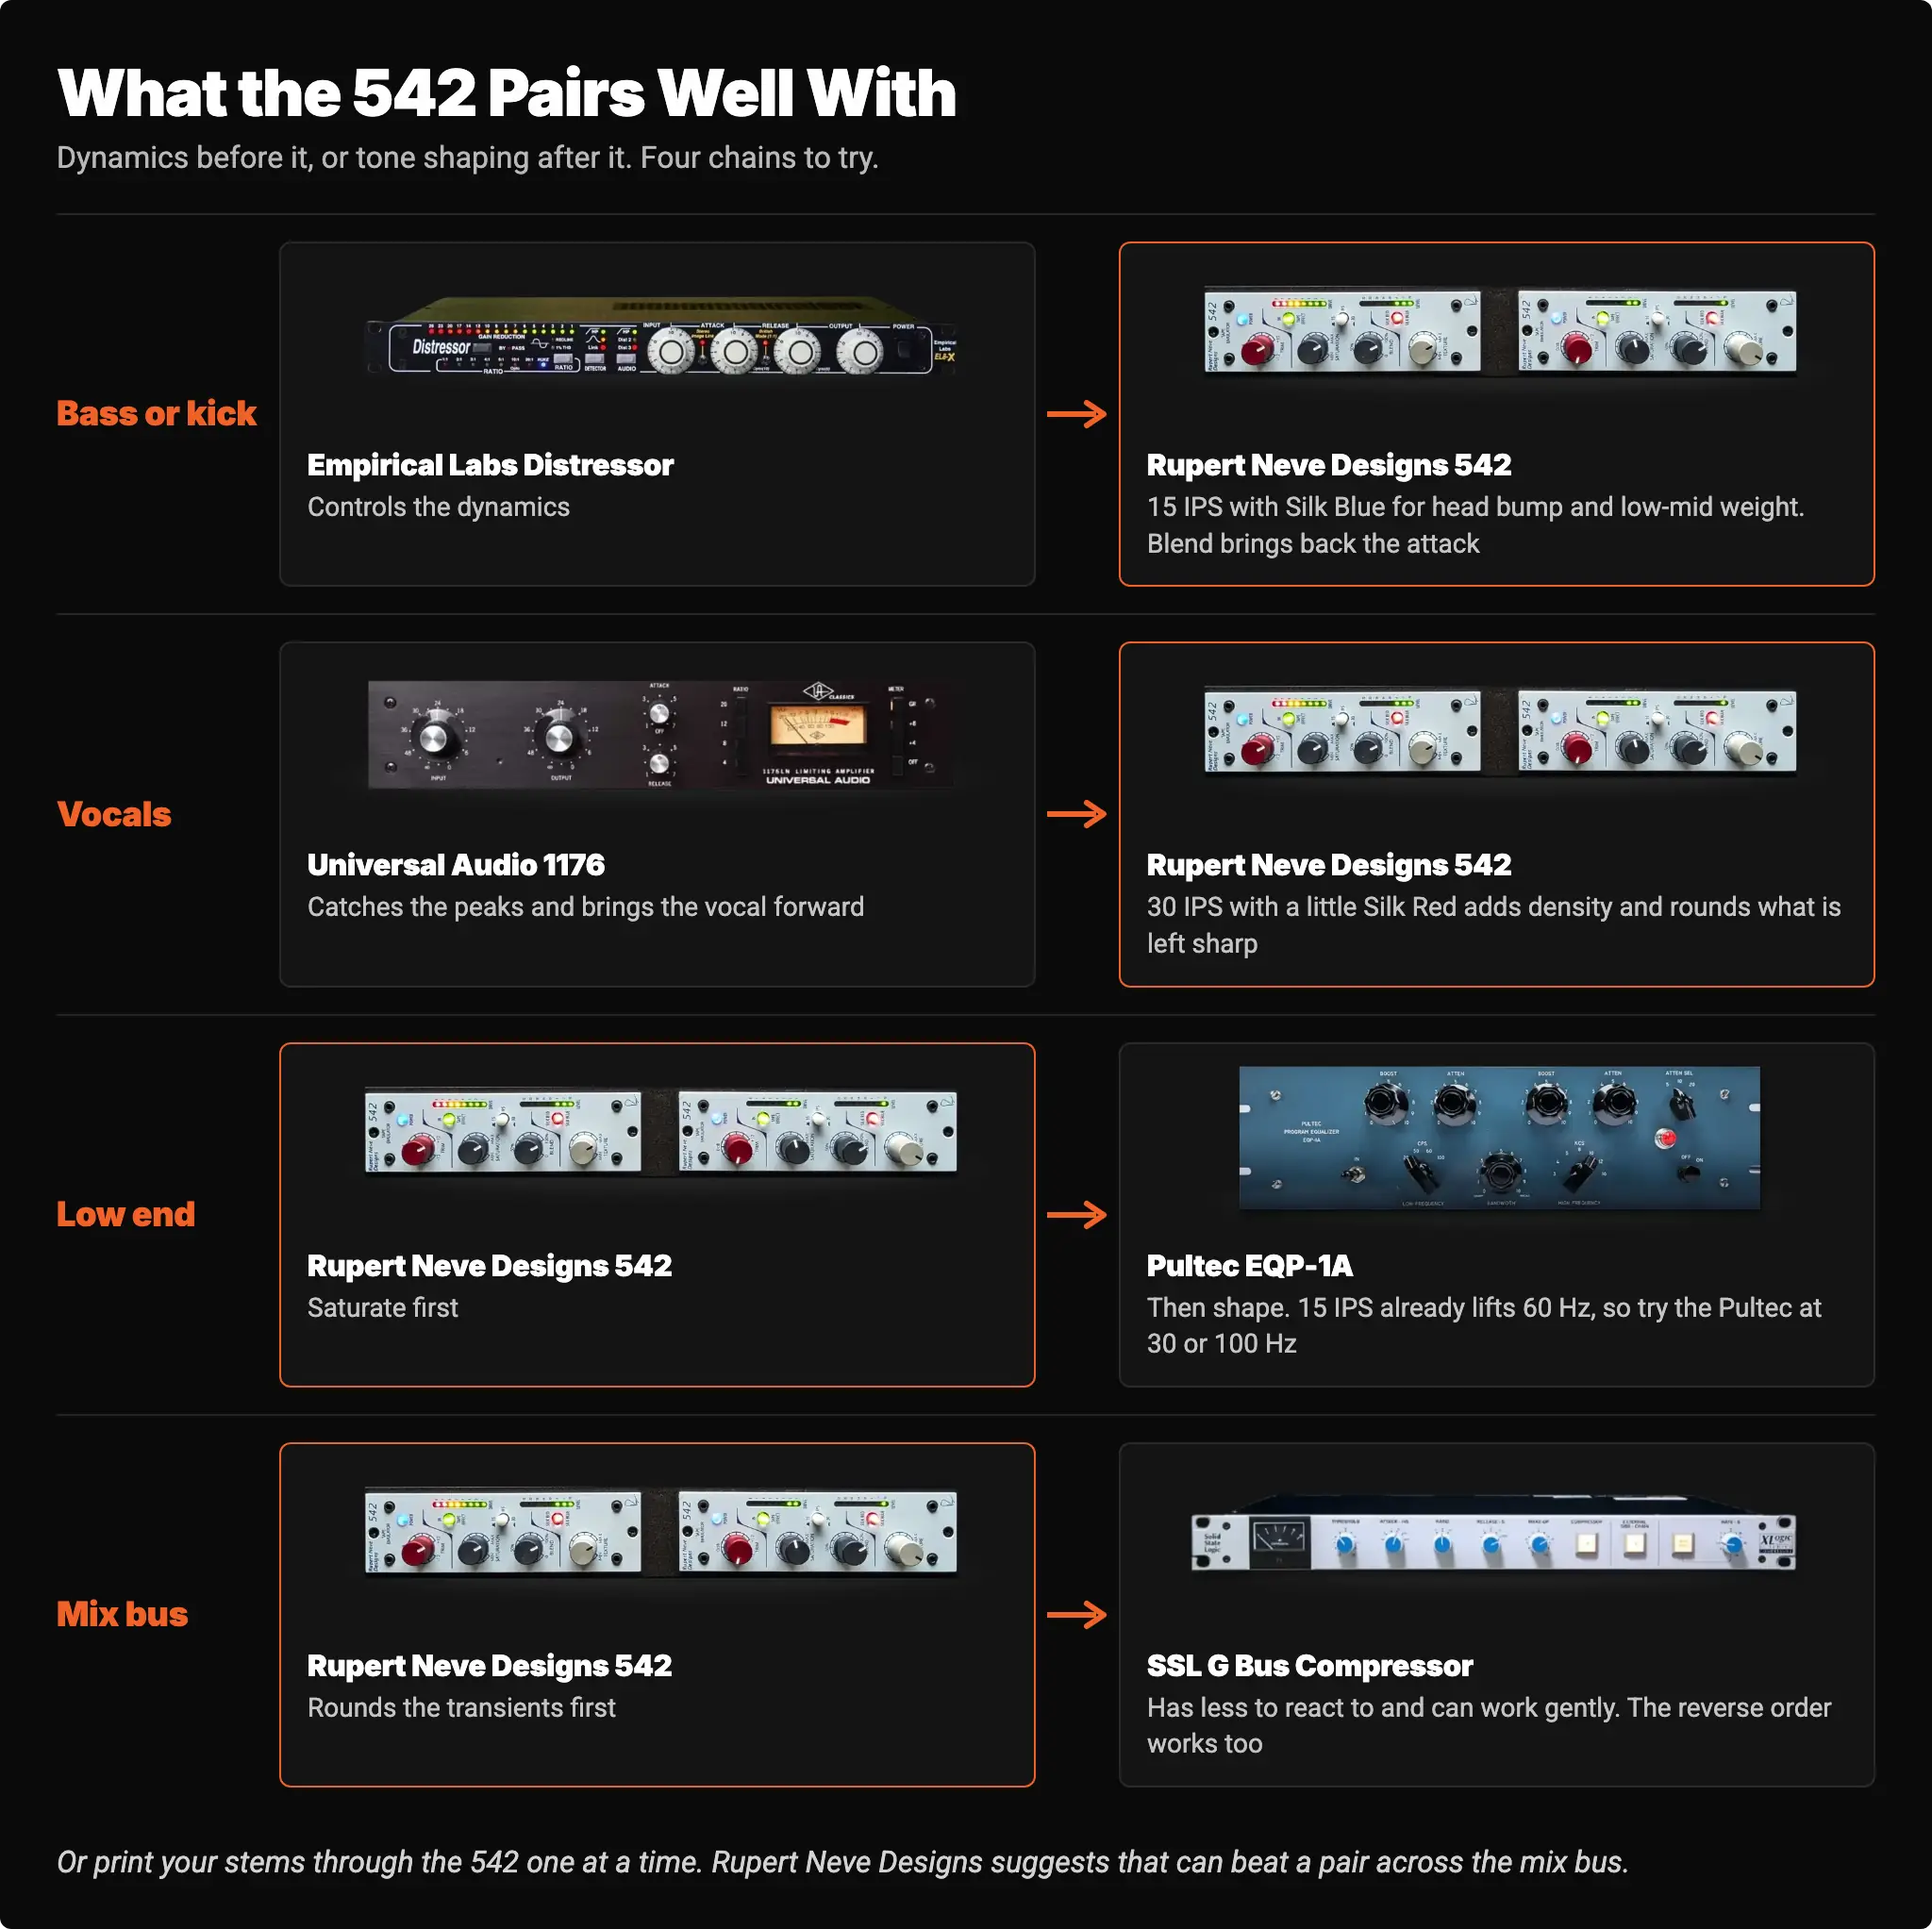
The 542 works best next to a unit that handles the job it doesn't do: dynamics before it, or tone shaping after it.
Empirical Labs Distressor into 542 (bass or kick). Let the Empirical Labs Distressor control the dynamics, then run the 542 at 15 IPS with Silk Blue for head bump and low-mid weight. Use Blend to bring back the attack if the low end gets too soft.
1176 into 542 (vocals). The 1176, which we covered in our deep dive on the FET limiter, catches the peaks and brings the vocal forward. The 542 at 30 IPS with a little Silk Red then adds density and rounds what the compressor left sharp.
542 into Pultec EQP-1A (low end). Saturate first, then shape. The Pultec EQP-1A is famous for its low boost-and-cut trick, and it follows the 542 well. One caution: 15 IPS already lifts 60 Hz, so a 60 Hz Pultec boost on top can be too much. Try the Pultec at 30 or 100 Hz, or switch the 542 to 30 IPS.
542 into SSL G bus compressor (mix bus). With the transients already rounded, the compressor has less to react to and can work gently. Our SSL G bus compressor guide has the classic glue settings. The reverse order works too, and it sounds different. Try both.
The multitrack approach. Rupert Neve Designs makes a point in its own FAQ that is easy to miss: the additive effect of saturating individual tracks can be more interesting than putting a pair of 542s across the mix bus. That is how tape worked on records, where every track passed through the machine before the mix did. Print your drum, bass and vocal stems through the 542 one at a time, each with its own settings, and compare that against a single pass on the mix bus.
One 542 on the mix is a color. A 542 on every stem is closer to how tape actually shaped records.
Is the 542 the Same as a Real Tape Machine?
No, and it doesn't claim to be. The 542 is a saturating transformer that evokes tape, and a tape machine is the physical process the 542 is named after.
What the 542 does well: harmonic density, rounded transients, a head bump, a restrained top end, and a sense of cohesion. For a stem, a bus, or a full mix that needs analog character, it is often the right tool. It is fast, repeatable and controllable.
What a real reel-to-reel machine still owns is the behavior that comes from the medium. Print a mix to tape and the whole program interacts with the tape at once: the low end blooms and compresses, the highs saturate first as you push level, and the moving ribbon adds a subtle time-domain character. No circuit on a channel fully replicates that. We rack one real machine for exactly this reason: the Telefunken M15. Our guide to getting real tape sound on a budget compares it with the 542 and three other tape tools.
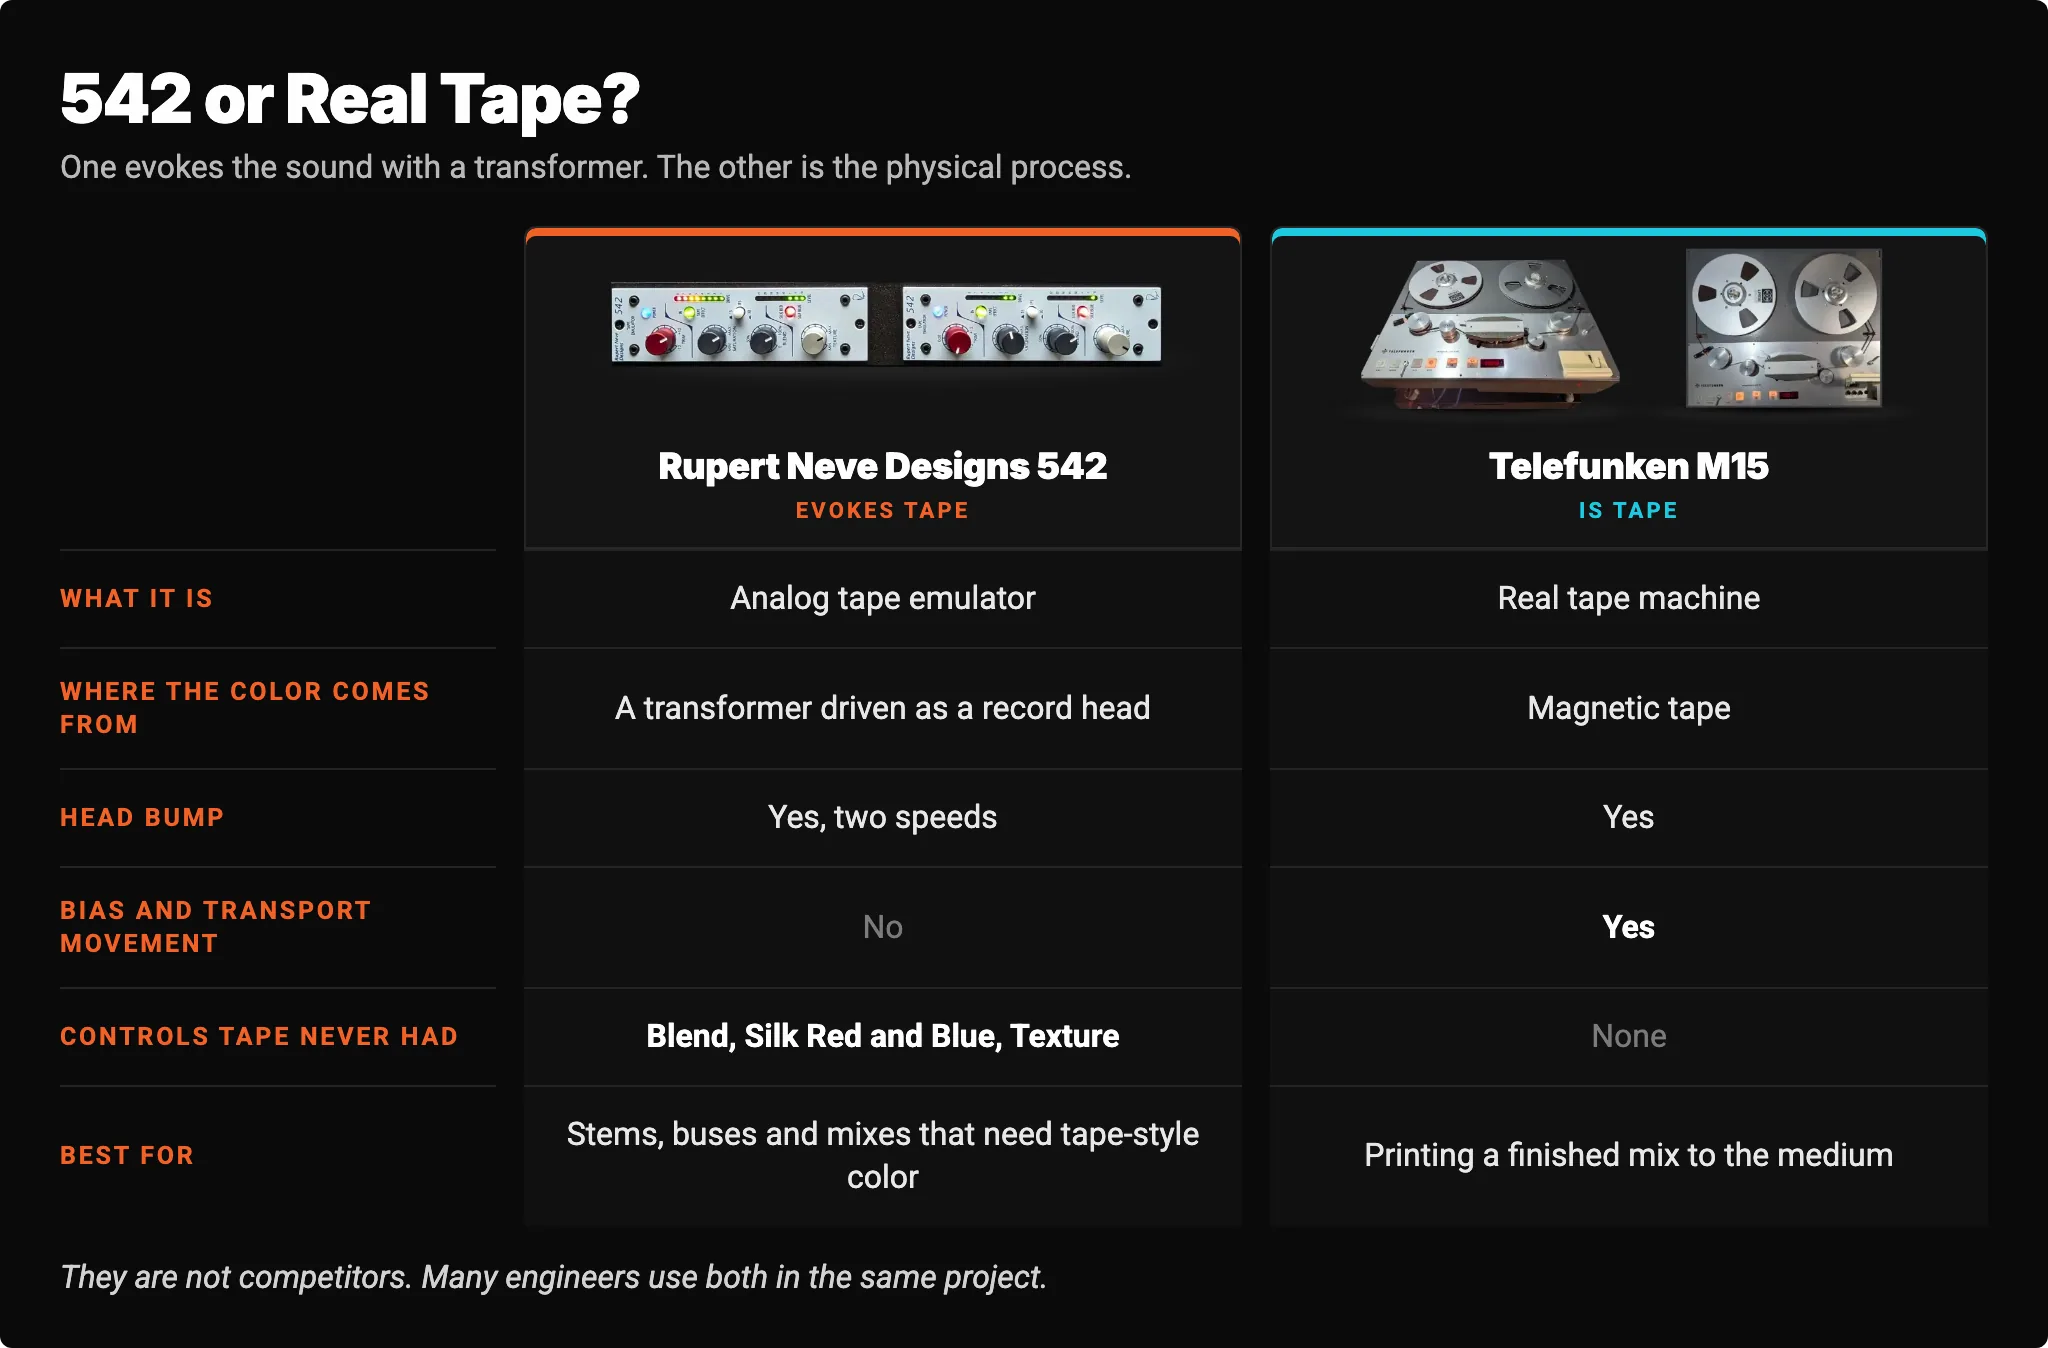
They are not competitors. Use the 542 when you want tape-flavored color and control on a track or a bus. Reach for the real machine when you want to print to the medium and let the physics do the rest. Many engineers use both in the same project.
Tape plugins belong in this conversation too. They are good, and they are convenient. What a model can't be is the iron itself: the 542's color comes from a real transformer being driven by your audio, and that behavior changes continuously with level and program. Our look at analog hardware versus plugins lays out the honest pros and cons of each.
How Do You Run the Real 542 From Your DAW?
Access Analog racks a pair of real Rupert Neve Designs 542 modules in Colorado, and you control them from your session.
- Load the Analog Matrix plugin on a track, bus or master. It is a free download from our downloads page.
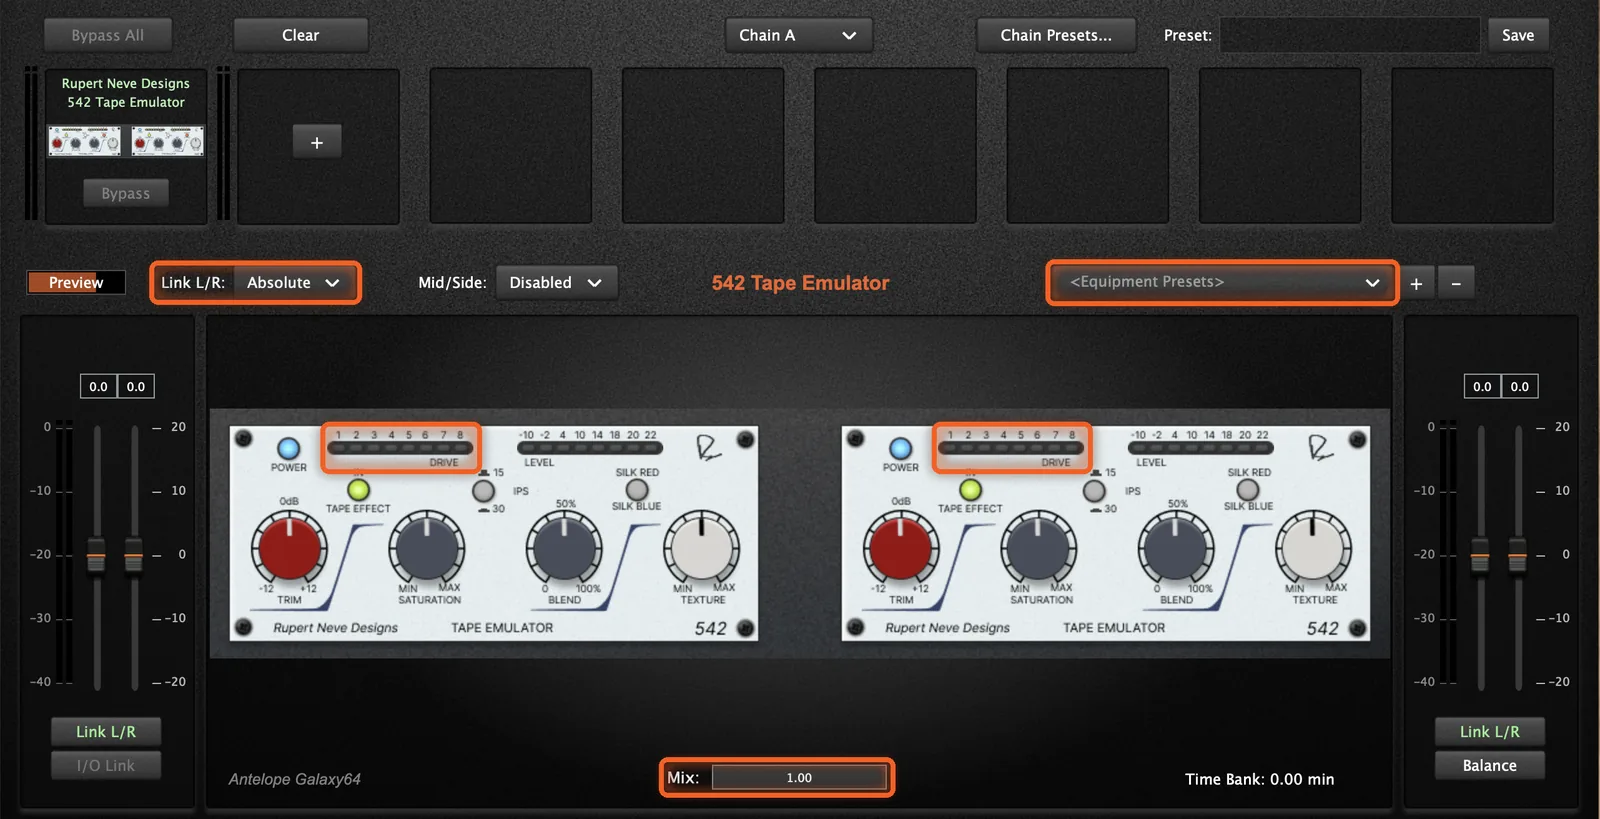
- Pick the 542 Tape Emulator from the Saturation category. Both modules appear side by side, and every knob and button you move in the plugin is moved on the hardware by servo robotics.
- Use Link L/R for stereo work. Rupert Neve Designs advises setting both units identically for proper stereo imaging, and Link does that for you. Unlink if you want different settings per side.
- Start from a preset if you like. Karl Barnes's presets are in the Equipment Presets menu. Our hardware presets guide shows how to load, save and compare them.
- Watch the Drive meter while you set your send level. The plugin shows the hardware's real meters. How hard you hit the 542 from your DAW is part of the sound.
- Use the plugin's Mix for what Blend can't do. The hardware Blend ignores Silk. The plugin's Mix control blends the whole unit, Silk included, against your dry signal.
- Compare on the same pass. The Analog Matrix holds two chains, so you can A/B 15 IPS against 30 IPS, or Silk Red against Blue.
- Automate if the song needs it. The hardware controls are plugin parameters, so your DAW can ride Saturation into a chorus.
- Print, and keep the settings. They are saved with your session, so recall is exact.

The 542 is included in the Elite tier of the Access Analog Subscription, and plans start at $9.98 a month. Not subscribed? You can reserve a session on the unit or use credits, and every new account gets 12 free credits to try it.
What Mistakes Should You Avoid?
Judging it louder. Saturation compensates its own level, but Trim does not, and Silk changes the tonal balance. Match levels against bypass before you decide.
Maxing Saturation and Texture together. They are two separate colors. Stacked at full, they smear. Set the tape tone first, then add Silk in small amounts.
Expecting Blend to tame Silk. It won't. Turn Texture down.
Cranking Saturation for low end. The head bump is largest at low Saturation. More drive gives you density, not more bump.
15 IPS on a mix that is already heavy at 60 Hz. Switch to 30 IPS, or back Blend off.
Using it on everything at the same setting. Robjohns, who liked the 542, also said you probably won't end up using it on every source. Tape color adds up fast, so give each source its own amount.
It Needs to Feel Like It Went Through Some Iron
The 542 doesn't pretend to be a tape machine, and it is better for it. It takes the parts of tape that engineers actually reach for (harmonic density, a head bump, softened transients) and puts each one on a control. Saturation sets the color. The IPS switch sets the weight. Blend decides how much you keep. Silk adds a second flavor on top.
When a source is technically fine but emotionally flat, that is often all it needs.
Run your own mix through the real 542, push Saturation until it sounds like a record, and then back it off a notch.
FAQs
What is the Rupert Neve Designs 542?
The Rupert Neve Designs 542 is a single-channel, all-analog tape emulator in the 500 Series format, released in 2013 and derived from the Portico 5042. It drives a custom transformer as a "record head" and recovers the signal through a tape-style EQ stage, with a soft clip, a Blend control, two tape-speed responses and the Silk Red and Blue circuit.
Is there real tape inside the Rupert Neve Designs 542?
No. The 542 contains no tape and no moving parts. It recreates the saturation, head bump and softened transients of tape with a transformer and analog electronics, so it does not produce wow, flutter or tape hiss.
What is the difference between 15 IPS and 30 IPS on the 542?
The 15 IPS setting has a head bump centred at 60 Hz and a rolled-off high end, for a thicker, more vintage tone. The 30 IPS setting is flatter, with a smaller bump around 120 Hz and an extended top. In both modes the head bump gets smaller as Saturation is turned up.
What do Silk Red and Silk Blue do on the 542?
Silk adds harmonics by saturating the 542's output transformer, and the Texture knob sets the amount. Silk Red emphasizes the highs and high-mids for presence. Silk Blue emphasizes the lows and low-mids for weight. Silk is separate from the tape circuit, works with Tape Effect out, and is not affected by the Blend control.
Can the Rupert Neve Designs 542 be used in stereo?
Yes. The 542 is a mono module, so stereo takes a pair with both units set identically. Access Analog racks a pair, and the Analog Matrix plugin's Link L/R keeps the two matched.
Is the 542 the same as a real tape machine or a tape plugin?
No. The 542 is real analog hardware that saturates a transformer to evoke tape. A tape machine such as the Telefunken M15 records onto magnetic tape, with bias and transport movement the 542 does not have. A tape plugin is a software model of one or the other.
How can I use a Rupert Neve Designs 542 without owning one?
Access Analog racks a real pair of 542 modules that you control from your DAW through the Analog Matrix plugin, with every setting saved in your session. The 542 is included in the Elite tier of the Access Analog Subscription, and you can also reserve sessions or use credits. New accounts get 12 free credits.
Hear what real analog gear does to your own mix, before you buy a single piece of it.
Run real outboard hardware from your DAW. New accounts get 12 free credits.
Connect todayMore in Gear Guides
All posts →