How to Use Auto Balance in Analog Matrix: Even Out Left and Right in One Click
Two channels of real analog gear never match exactly. Auto Balance measures the difference and evens it out, in one click.
Run the same tone through a matched pair of vintage units, and left and right come out a fraction of a decibel apart. We keep our gear in top shape, but that's the nature of real components, some of them decades old. Now and then someone asks us to tweak one side of a pair. Auto Balance in the Analog Matrix plugin is our answer: one button that puts your stereo image back where your source had it.
In this guide, Dr. Dan walks through it: how to balance a dual mono pair, how to balance every device in a chain, how to keep the balance when you ride the level, and the one rule that makes it work.
Key Takeaways
- Balance cancels what the device adds. It measures the left/right balance going into a device and coming out. The difference is the device's own imbalance.
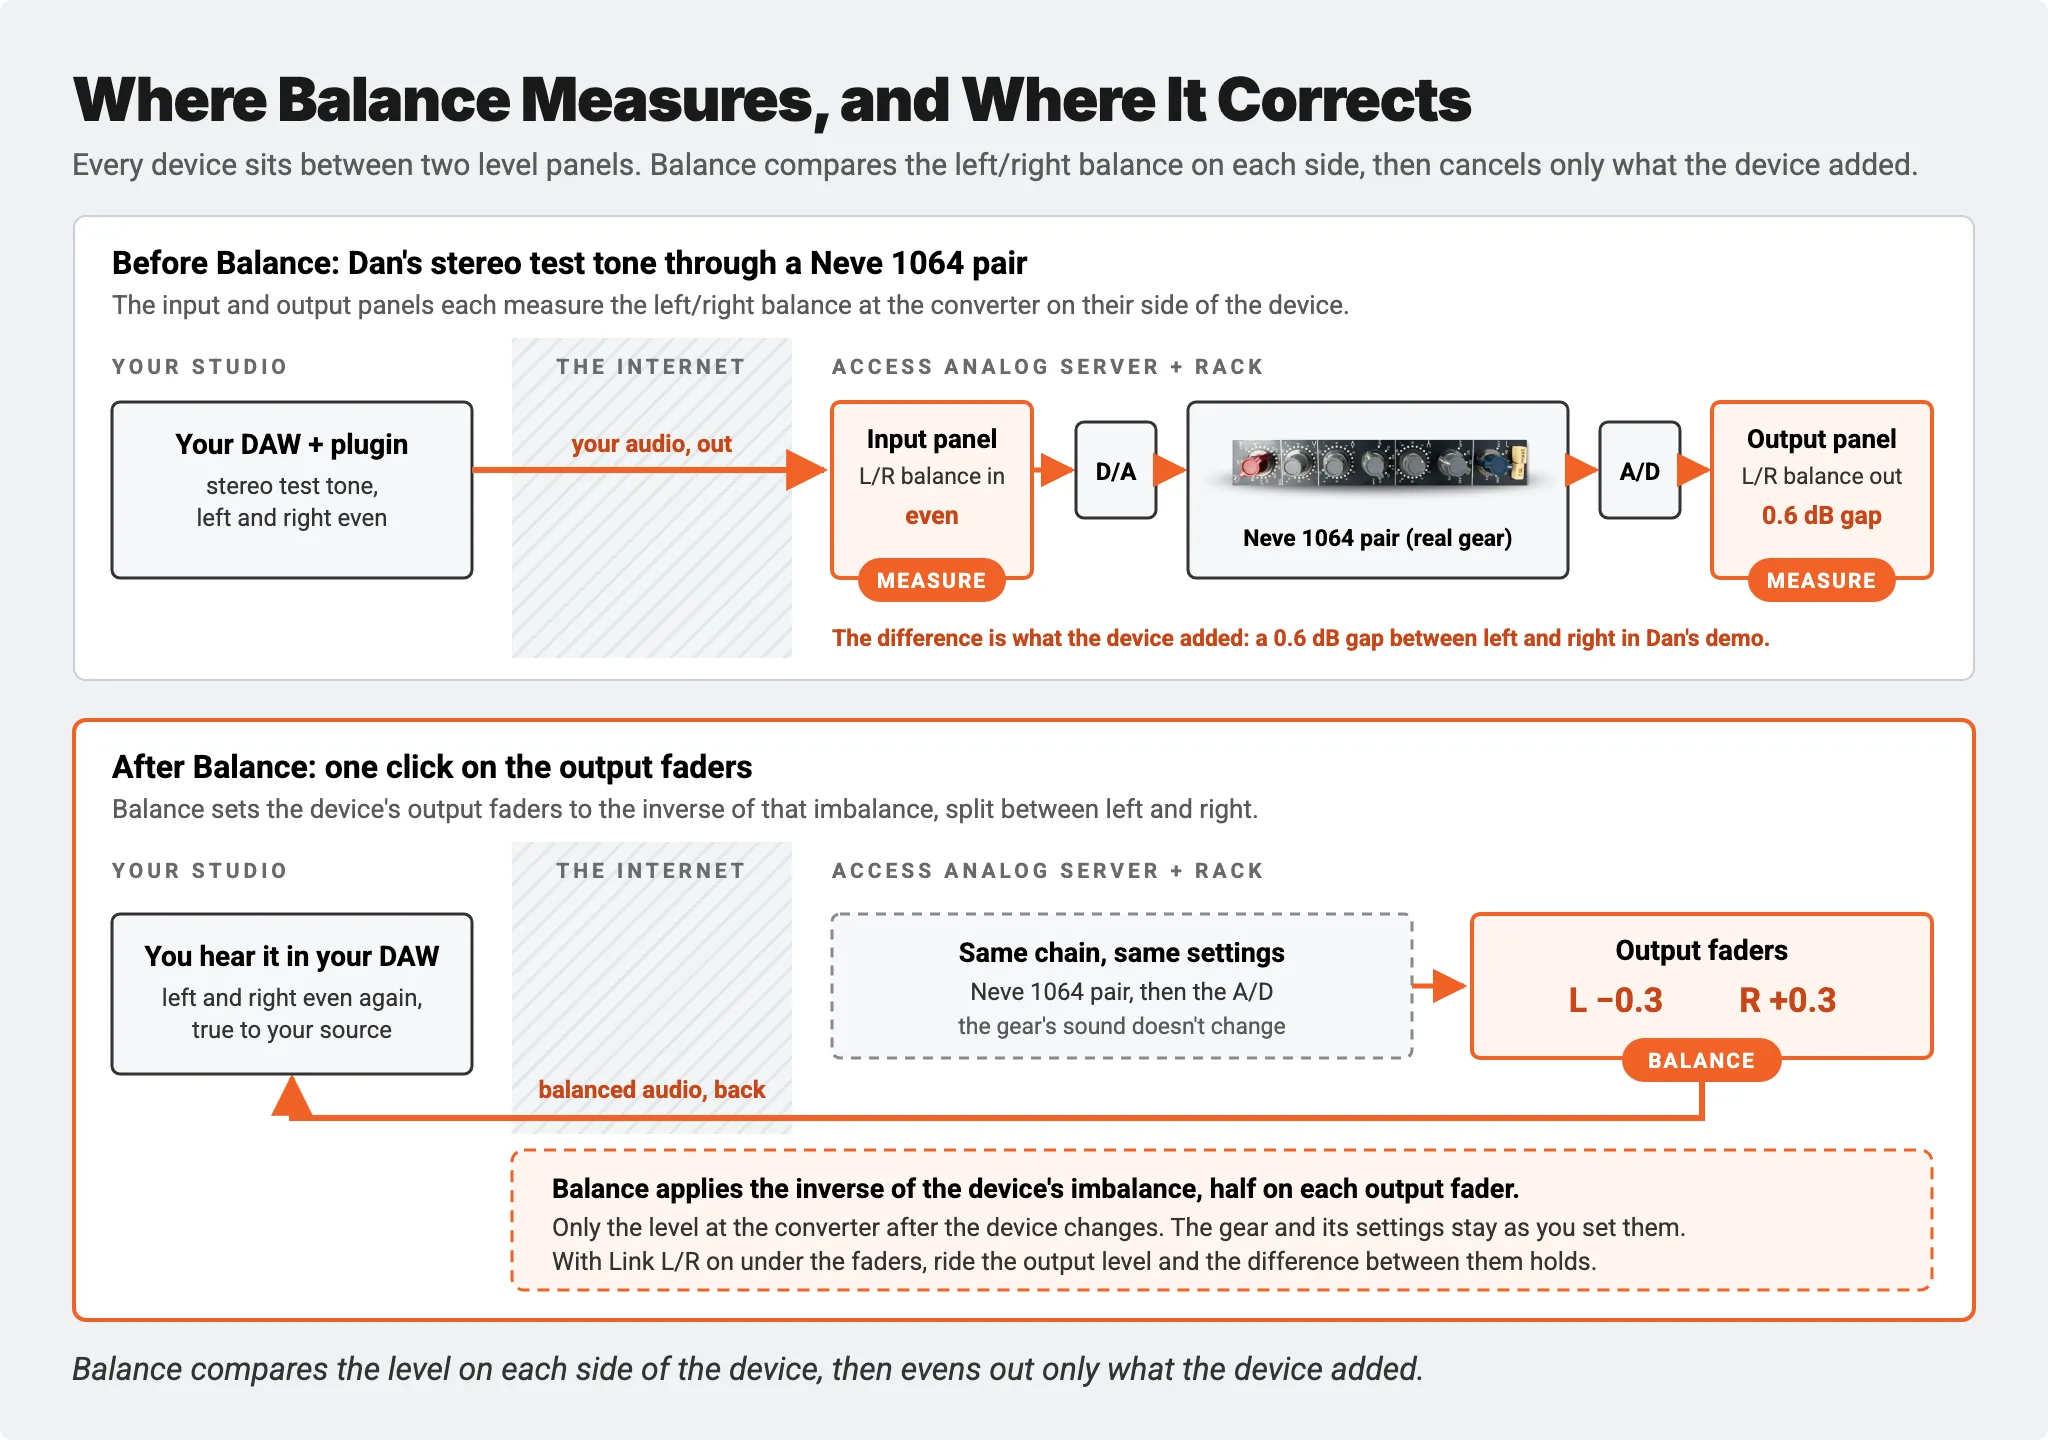
- One click, split both ways. Balance sets the output faders to the inverse, half on each side: in Dan's demo, a 0.6 dB gap became −0.3 and 0.3.
- Press play first. Balance measures real signal, so it needs audio running.
- Balance each device on its own. Every device in a chain has its own Balance button.
- Link the faders to keep it. With Link L/R on, you can ride the output level and the balance holds.
- One rule: Link L/R on Absolute and Mid/Side on Disabled. Balance isn't available on an Analog hop.
What Auto Balance Does
Every device in your Analog Matrix chain sits between two level panels: one shows the audio going into the device, the other the audio coming out. The Balance button, under the output faders, uses both. It measures the left/right balance going into the device and the balance at its output. The difference is the imbalance the device itself added.
Balance then sets the device's output faders to apply the inverse of that imbalance, split between left and right. The result is a stereo field that stays true to your source audio. The gear's sound doesn't change: only the level at the converter after the device is evened out.
Step-by-Step: Balance a Dual Mono Pair
Dan's demo plays a stereo test tone, so left and right going in are exactly the same. That makes the device's imbalance easy to see.
Step 1: Add a Dual Mono Pair
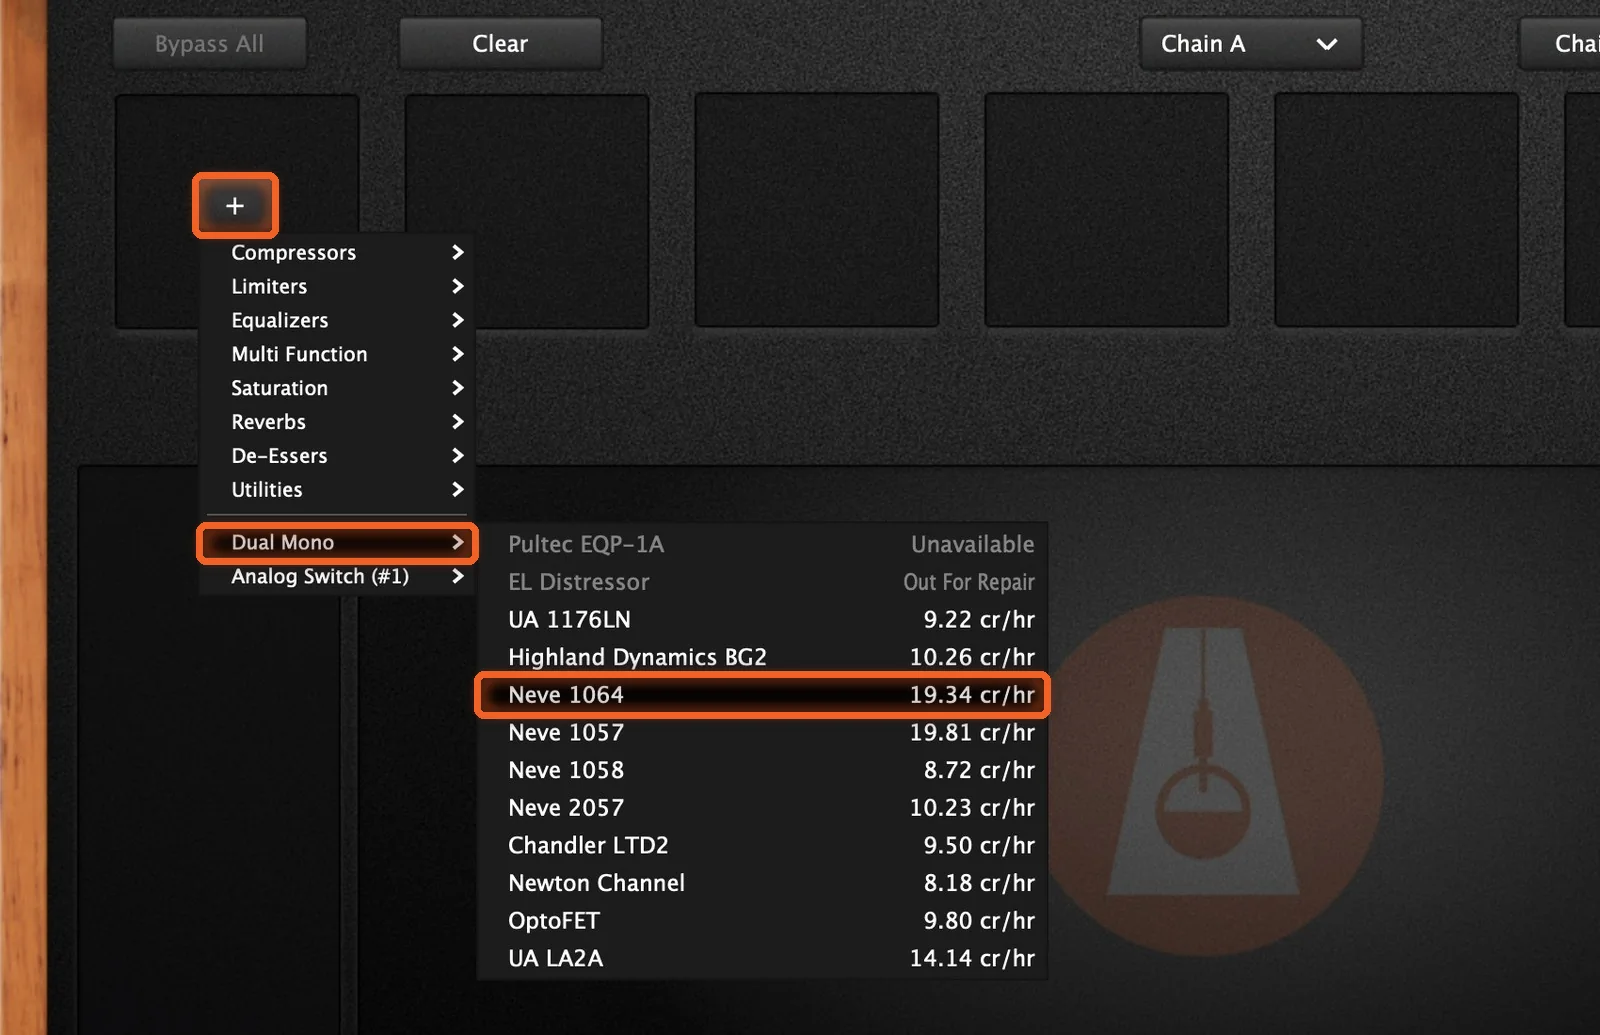
On the Equipment tab, click + in an empty slot, open the Dual Mono submenu and pick a unit. Here it's a Neve 1064. We keep two of most mono units, so the pair works as one stereo device. Reserving instead of working on demand? Book both units for the same time slot on the website.
Step 2: Press Play
Balance measures real signal, so press play in your DAW first. The panel on the right shows the pair's output meters and faders, with Link L/R and Balance underneath.
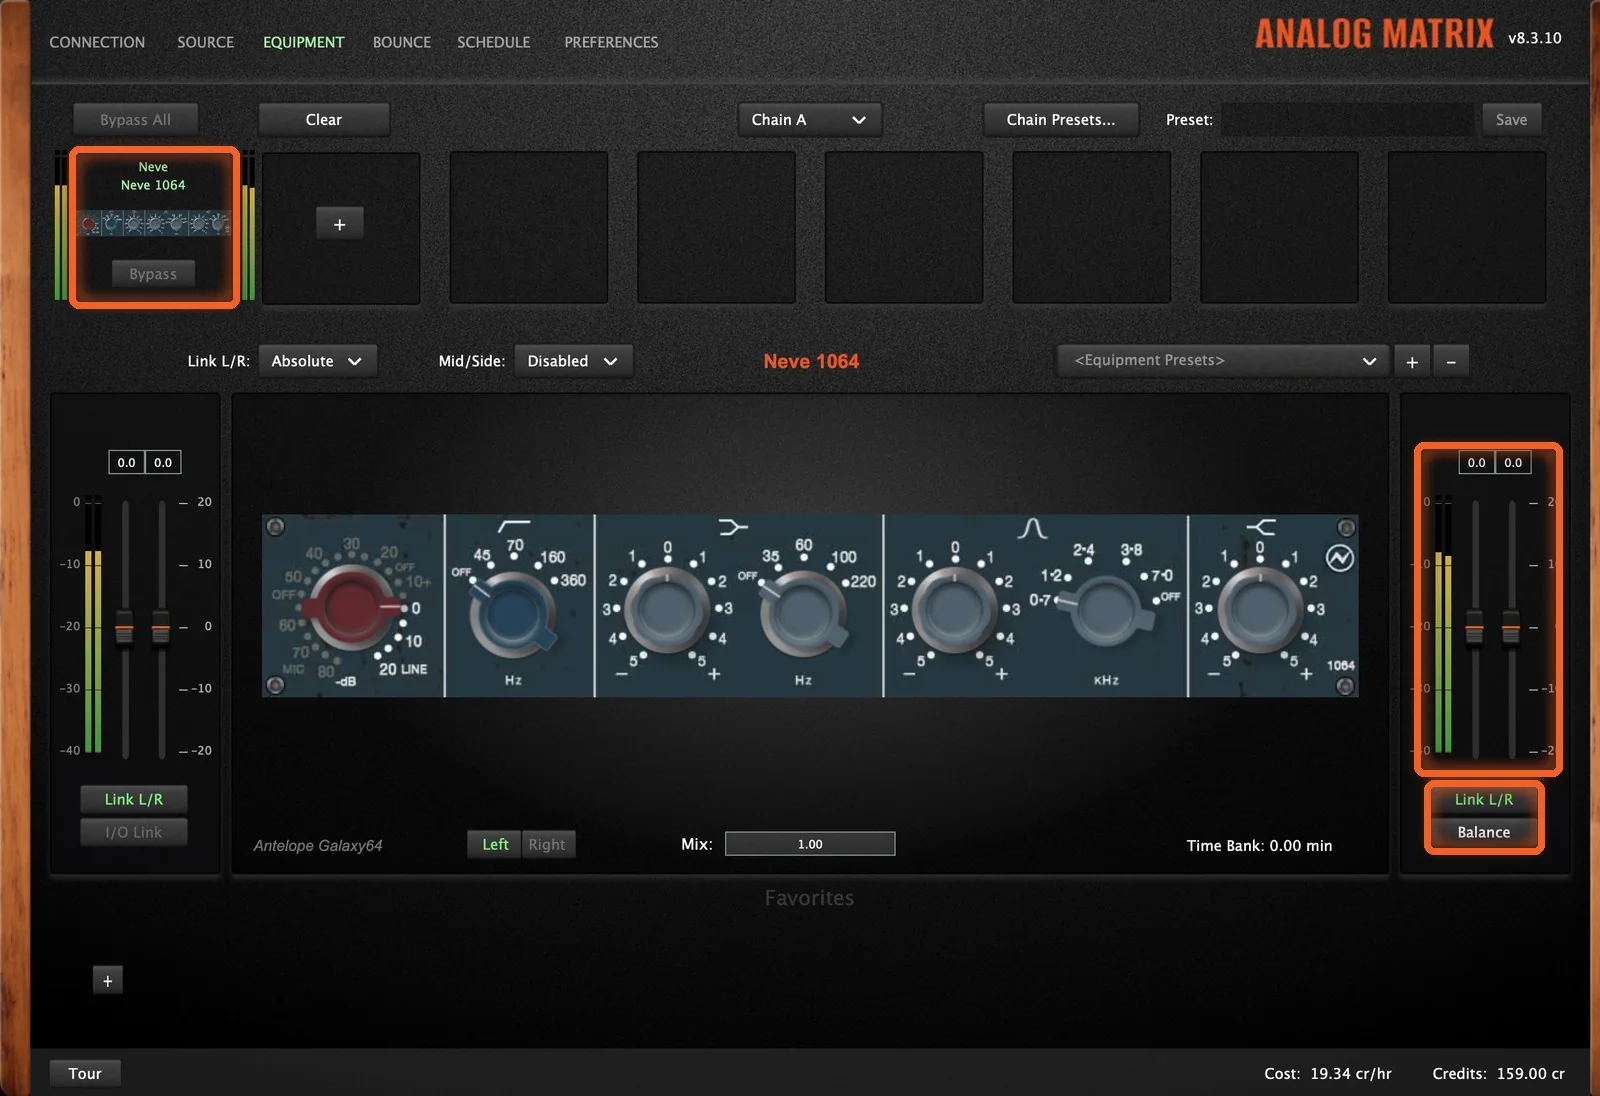
Step 3: Click Balance
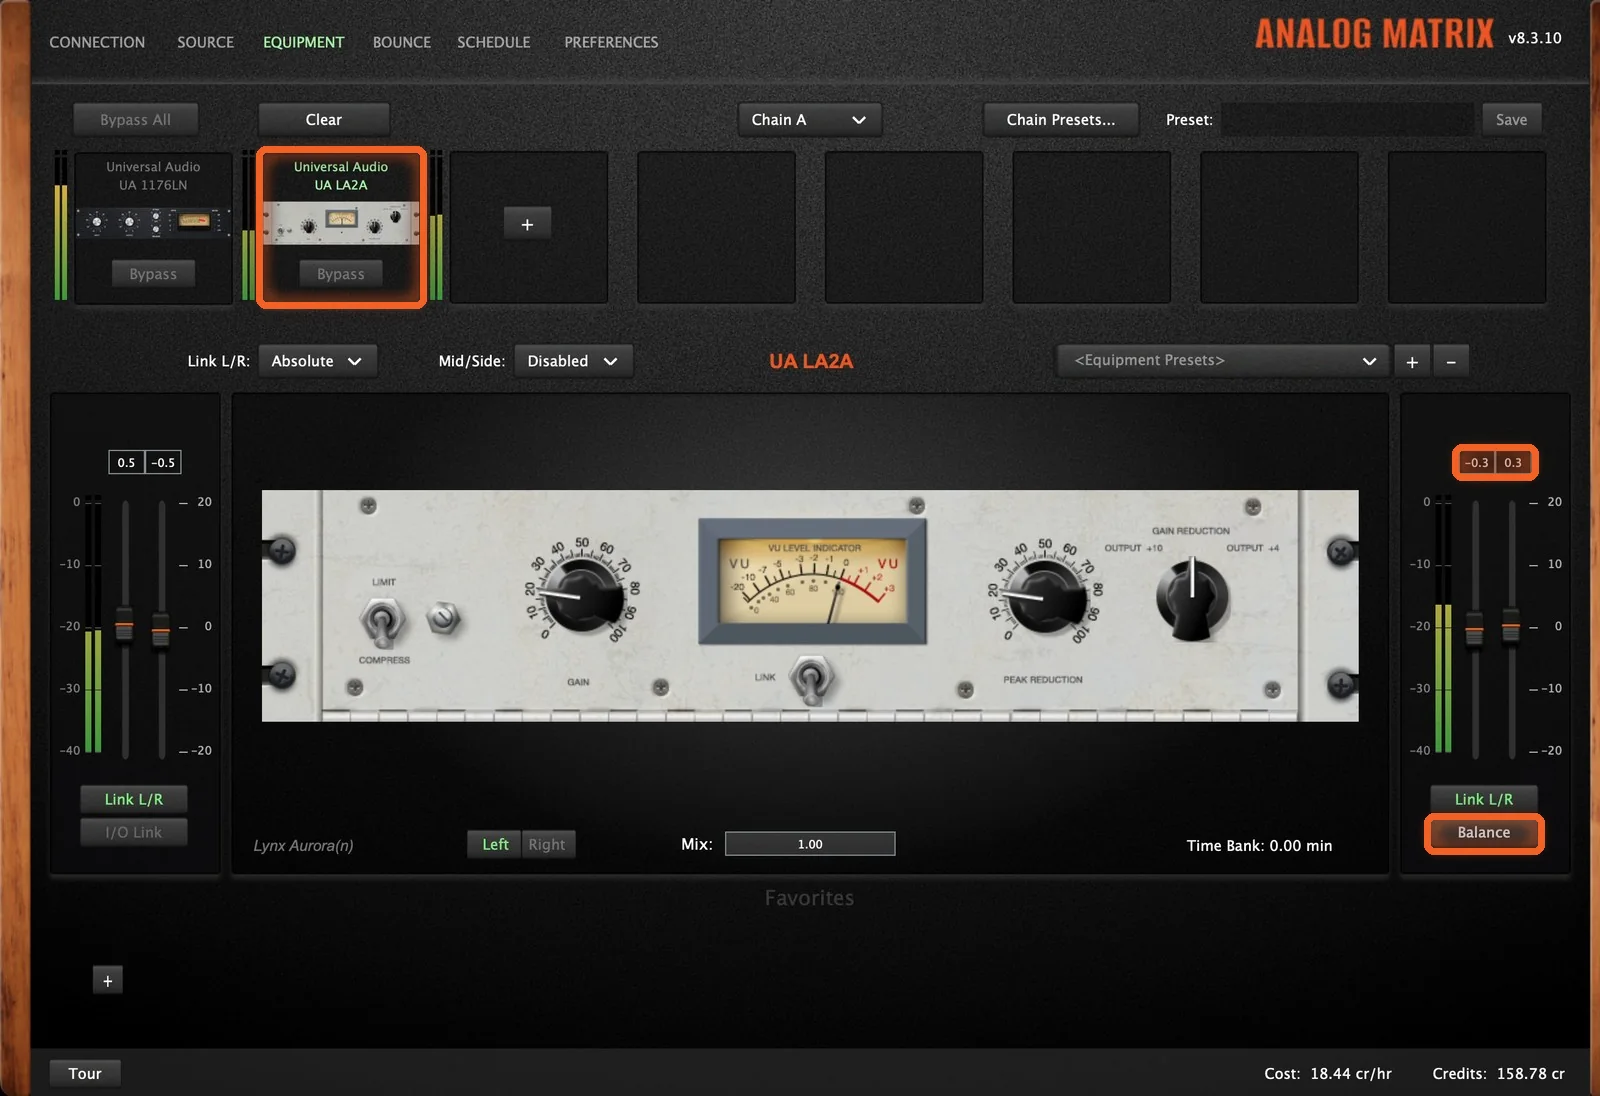
Click Balance. In Dan's demo the gap between left and right was 0.6 dB, so the plugin split it: the left output fader went to −0.3 and the right to +0.3.
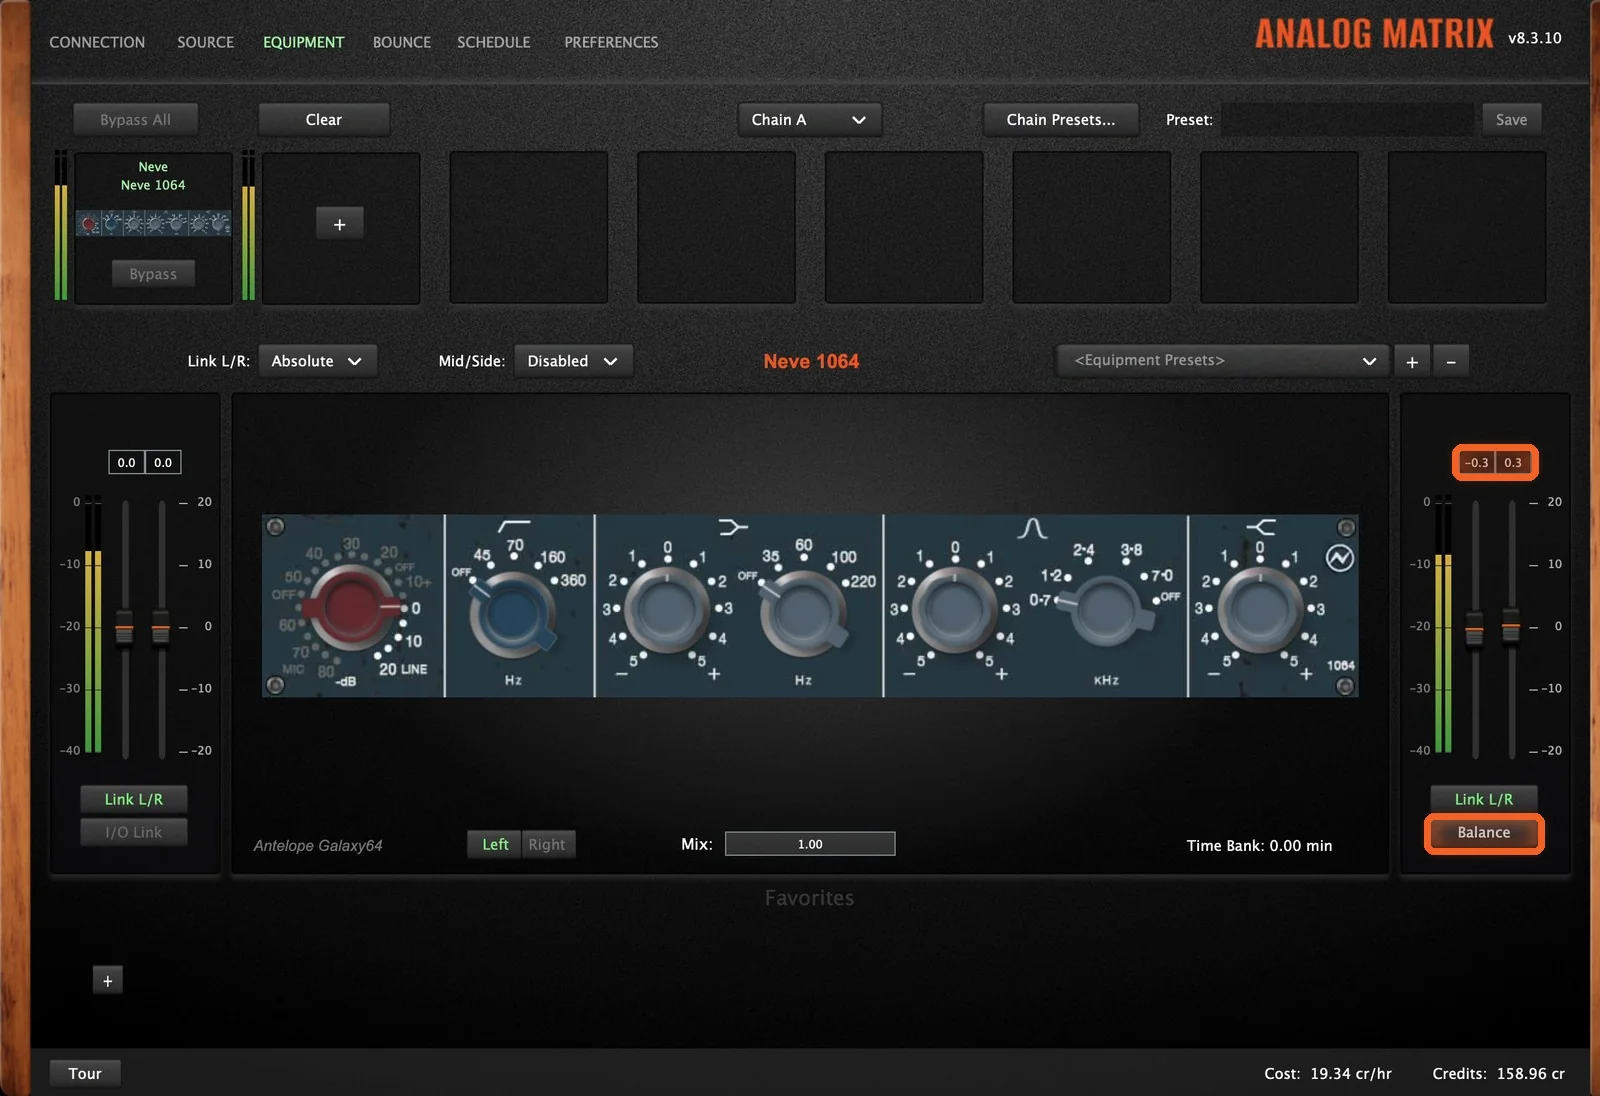
Read the New Fader Values
The readout above the output faders shows the new values, −0.3 on the left and 0.3 on the right, and the pair is in balance.
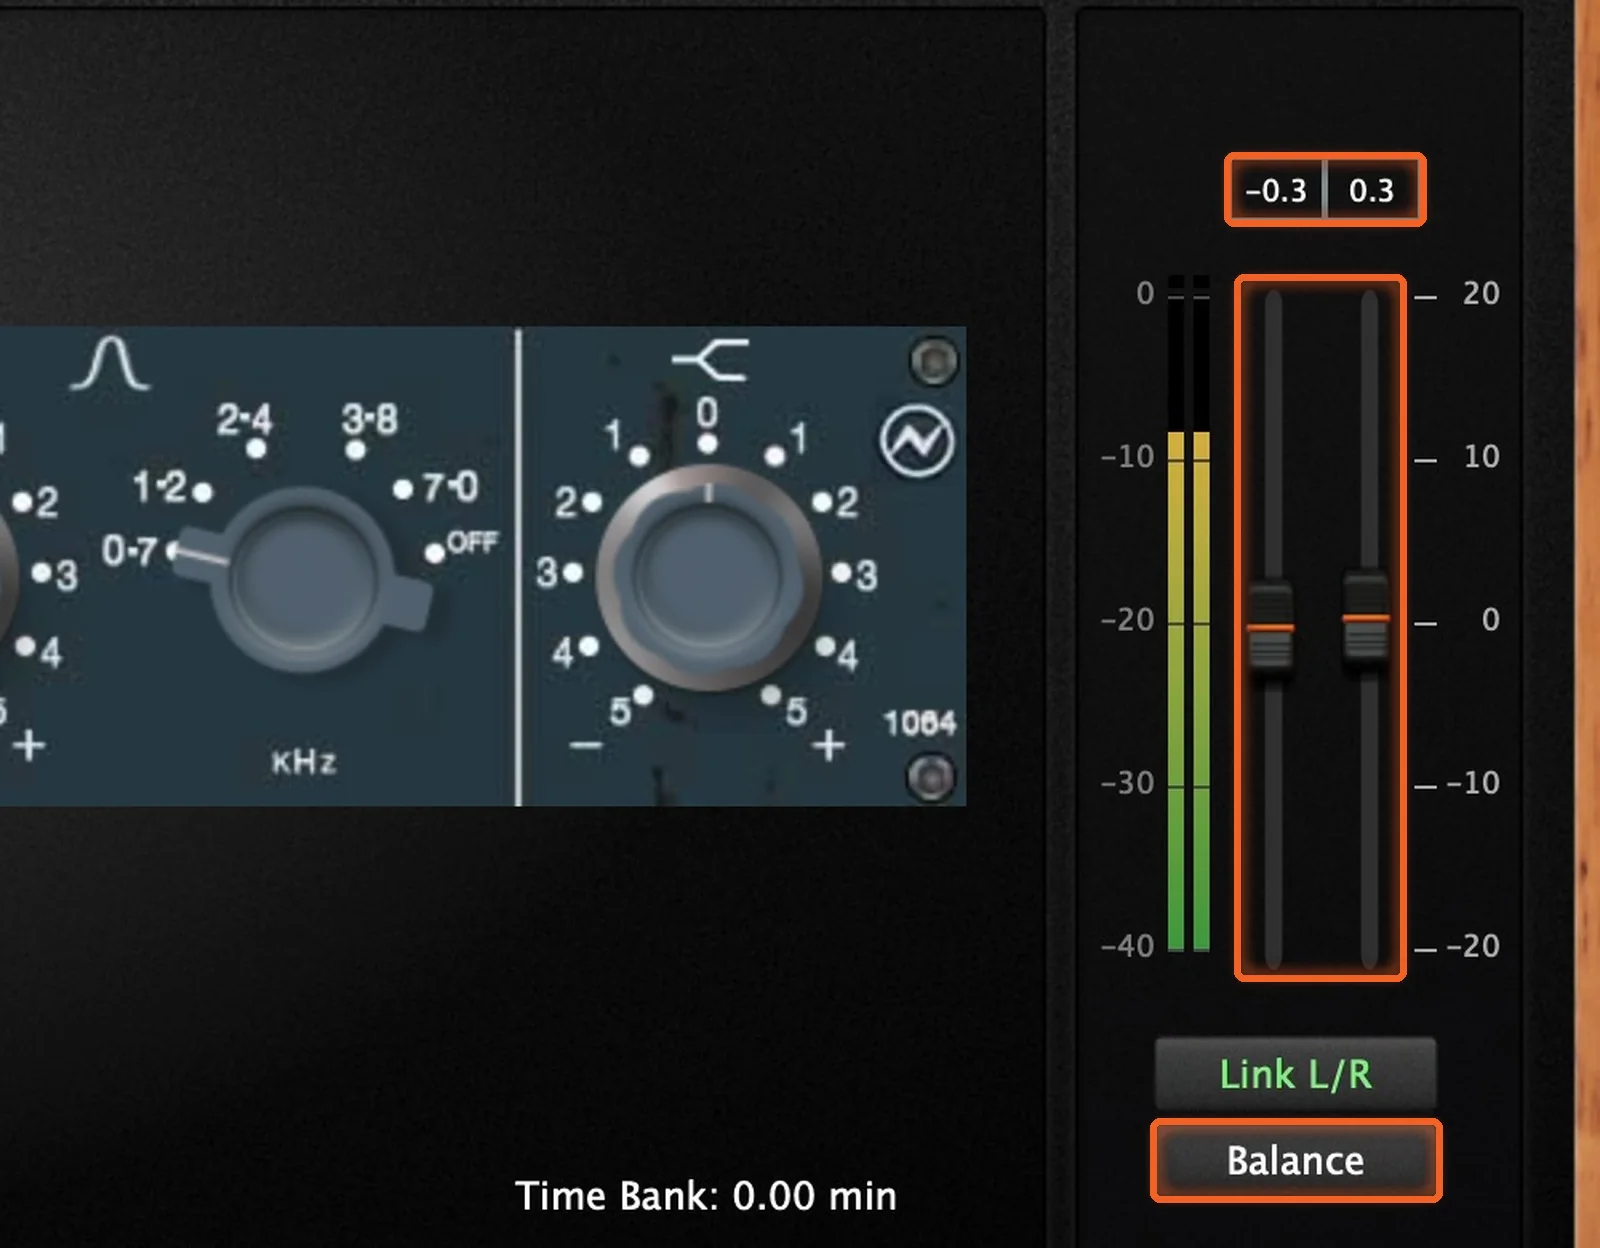
Some gear has its own fix. The Rupert Neve Designs Master Bus Converter, for one, has a left/right link of its own that brings it back into line. For gear without one, there's Balance.
Balance Every Device in Your Chain
Every device in your chain has its own Balance button, because each one adds its own imbalance. Dan builds a chain of a Universal Audio 1176LN into an LA-2A, both dual mono, then balances them one at a time:
- Click the device in the rack to show its panel.
- With audio playing, click Balance.
- Move on to the next device.
Each device is measured on its own, so the whole chain stays true to your source.
The 1176LN
In the demo, the 1176LN came out at +0.5 on the left and −0.5 on the right.
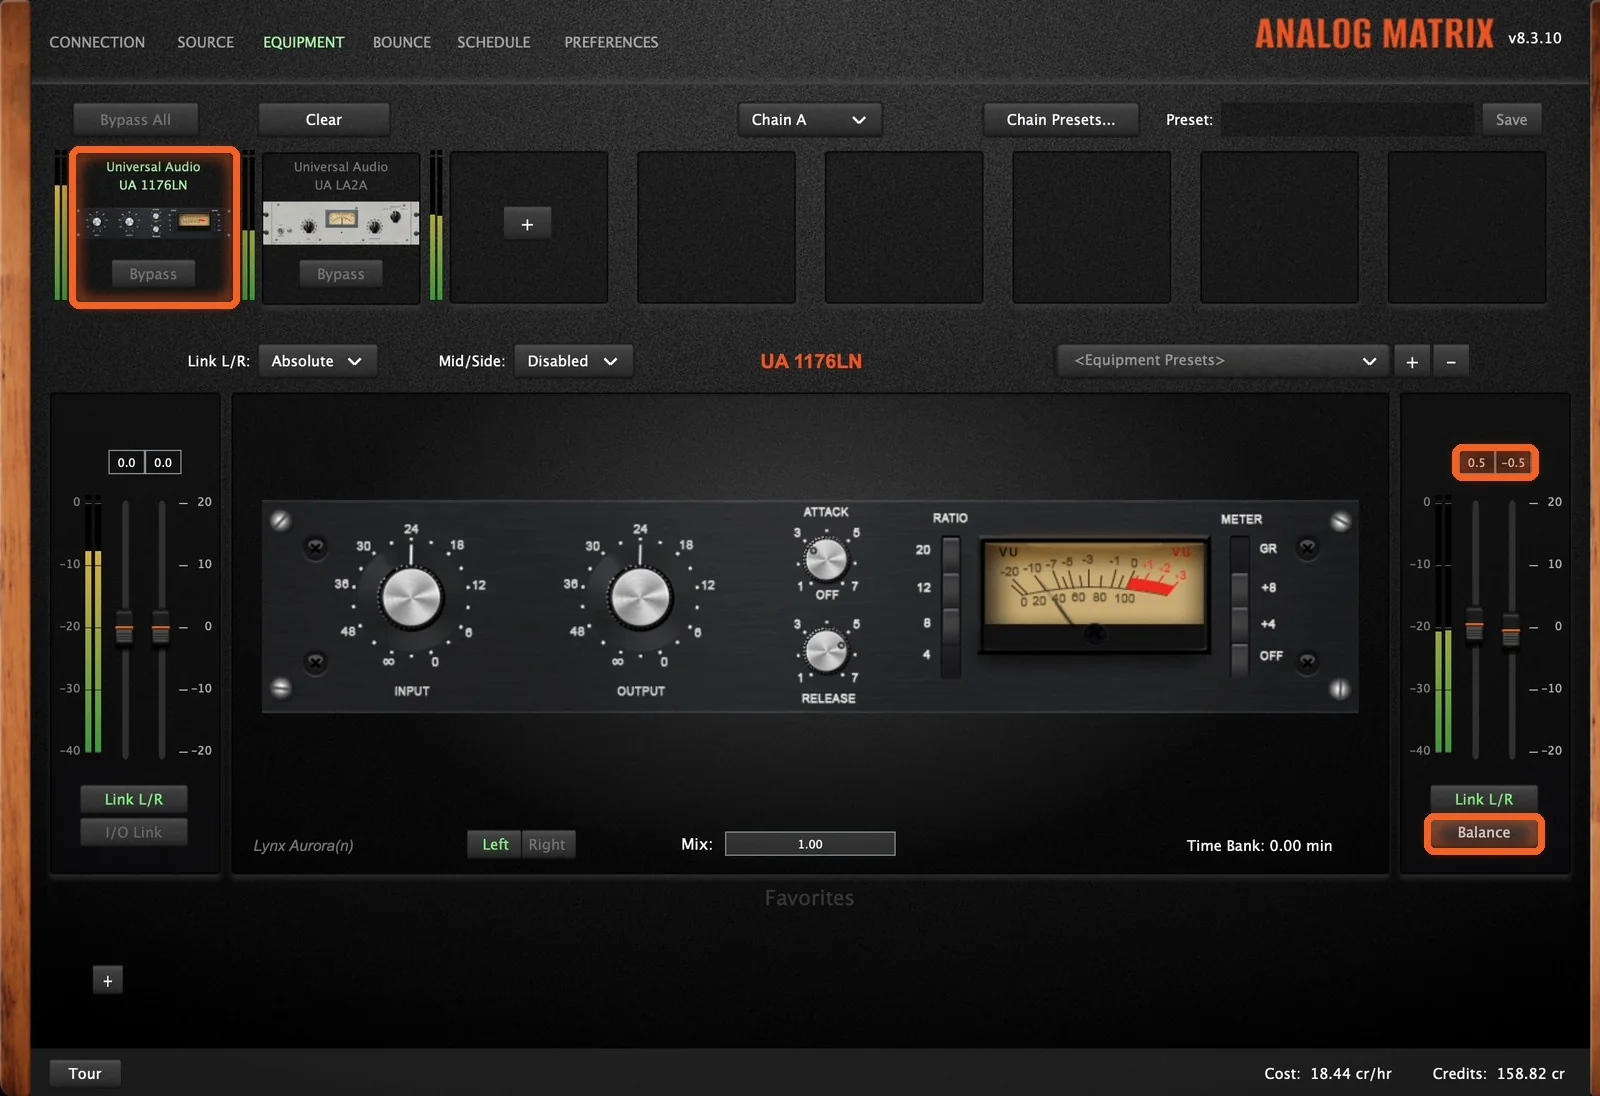
The LA-2A
Then the LA-2A, balanced on its own: −0.3 on the left and +0.3 on the right.
Keep the Balance When You Ride the Level
The Link L/R button just above Balance links the two output faders (it's separate from the Link L/R menu above the device). Move one, and both move together while the difference between them stays the same. So once a device is balanced, you can still ride its output level up or down without losing the balance.
The One Rule: Absolute and Disabled
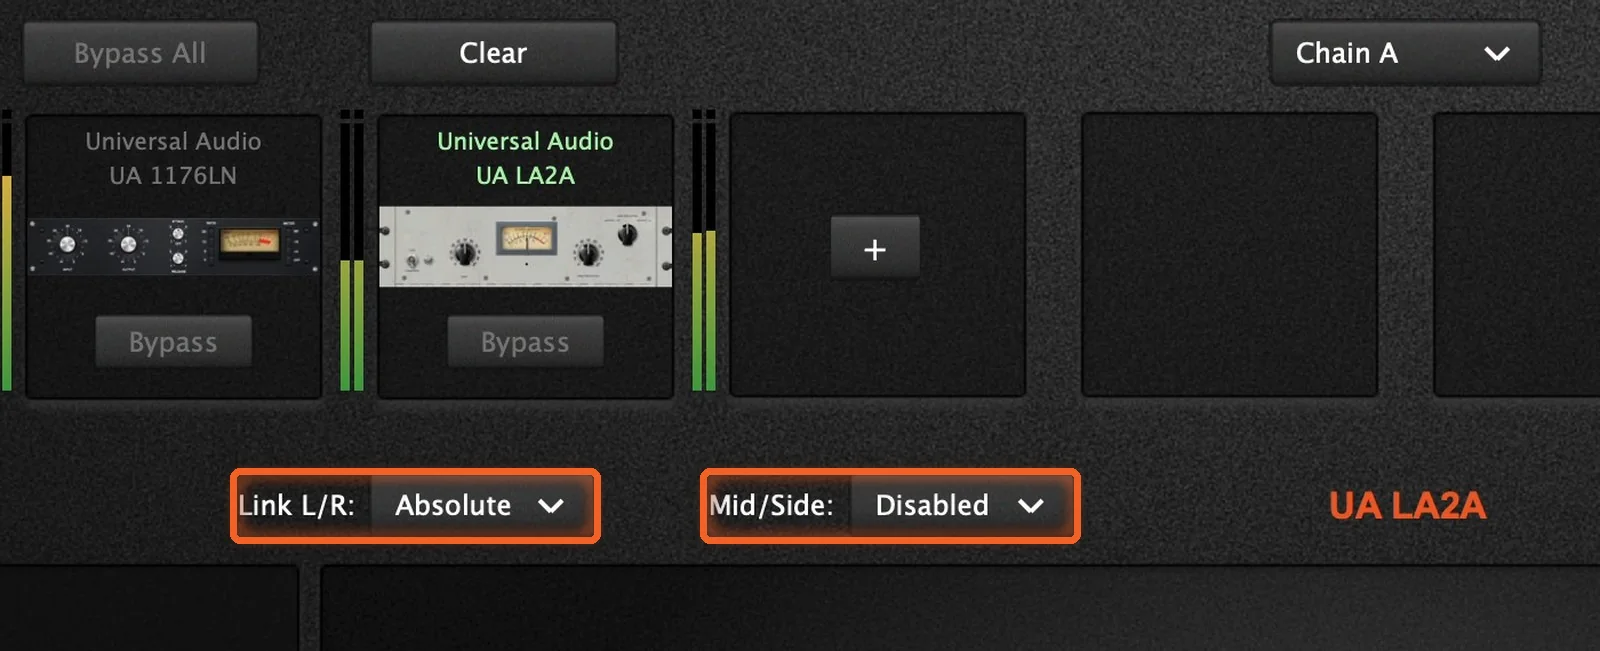
Balance only works when the two settings above the device are set like this:
- Link L/R: Absolute. The robotics turn the left and right controls to the same position as you move the left one.
- Mid/Side: Disabled. The left channel processes left, and the right processes right.
On Relative or None, your left and right controls can sit at different settings. With Mid/Side on, one channel processes the middle and the other the sides (more on mid/side). Either way, a difference between left and right is part of your sound, not something to fix. So leave them on Absolute and Disabled, and balance all you want.
One More Case: Analog Switching
With Analog Switching, an Analog hop wires one unit straight into the next, with no converter in between. Those linked units give up the plugin's fader gain, mix, bypass, mid/side, auto-balance and metering. We recommend gain-staging in Standard first, then switching to Analog to print.
How Do I Get Started?
Download the Analog Matrix. One free download from our downloads page installs the plugins (VST, VST3, AU and AAX) and the standalone app, for Mac and Windows. It is not an emulation: every knob you move turns a real control on real hardware in our racks.
Try Balance for free. A new account starts with 12 free credits, roughly an hour on an average device. The Iron Age LH95 EQ and the AudioScape Buss Compressor never use credits, so they're a free place to try Balance before you load anything else.
Pick how you pay for gear time. Buy credits on demand, reserve a unit for a set time, or move to the Access Analog Subscription (Essential, Pro or Elite) for the best rate.
Add, Play, Balance
Add your gear, press play, click Balance. Left and right are back in step, true to your source, on real analog gear in our racks.
Put a balanced pair of real Neve, Universal Audio and more on your own tracks.
FAQs
What is Auto Balance in Analog Matrix?
It's the Balance button under each device's output faders. It measures the left/right balance going into the device and coming out, then sets the output faders to cancel the imbalance the device added, split between left and right.
Why don't left and right match on analog gear?
Every analog channel has component tolerances, so even a matched pair of vintage units comes out a fraction of a decibel apart. We keep our gear in top shape, and Balance takes care of the rest.
Do I need audio playing to use Balance?
Yes. Balance measures the signal going into and coming out of the device, so press play in your DAW before you click it.
Does Balance change how the gear sounds?
No. It only moves the device's output faders, which set the level at the converter after the device.
Can I balance every device in a chain?
Yes. Every device has its own Balance button. Click each one in the rack and balance it on its own.
Why does Link L/R have to be on Absolute?
On Relative or None, the left and right controls can be set differently on purpose, and with Mid/Side on, the two channels process different parts of the signal. A difference between left and right is then part of your sound, so there's nothing to balance.
Does Auto Balance work with Analog Switching?
Not on an Analog hop. Units linked by an Analog connection give up the plugin's fader gain, mix, bypass, mid/side, auto-balance and metering. Standard connections keep all of them.
What is Dual Mono?
Two of the same mono unit used as a stereo pair, from the Dual Mono submenu on the Equipment tab. Set Link L/R to Absolute, and the right unit follows the left.
Hear what real analog gear does to your own mix, before you buy a single piece of it.
Run real outboard hardware from your DAW. New accounts get 12 free credits.
Connect todayMore in Getting Started
All posts →