
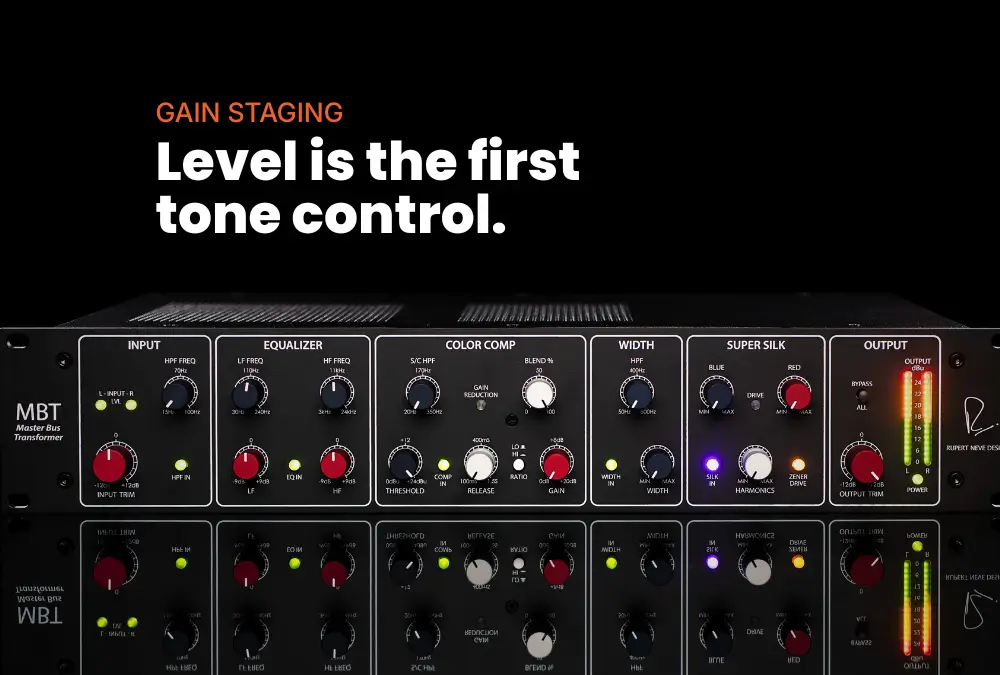
Level is not housekeeping. On real hardware, level is the first tone control in the chain.
Every engineer has heard the advice: leave 6 dB of headroom, keep tracks at −18 dBFS, hit a LUFS target before mastering. Most of it was correct in 1998, on a console, into fixed-point converters. Some of it is now folklore.
The short answer. Gain staging is essential, but not for the reason it is usually taught. In a modern floating-point DAW it has almost nothing to do with avoiding clipping. It matters in three places: the fixed-point render, plugins that deliberately model level-dependent circuits, and the instant your signal touches real analog hardware. Two of those three you can still fix after the mix.
Gain staging is setting the gain at each point in a signal path so that no stage overloads the stage after it. Bobby Owsinski, in The Mixing Engineer's Handbook, puts it in console terms: the input gain must not overload the equalizer, whose gain must not overload the inserted outboard device, which must not overload the fader buffer, which must not overload the master bus. That is why pre-fader and after-fader listen exist on a console, so you can audit each stage and find where it is breaking.
That definition is about overload between stages, and it assumes every stage has a fixed ceiling and a fixed noise floor. On an analog console that is exactly true. Every amplifier clips somewhere, every stage hisses, and the window between them is your headroom.
Three things ride on it, and they get collapsed constantly:
Level. Whether anything overloads. On analog this is a hard ceiling. In floating-point digital it effectively is not.
Noise. How far above the noise floor you sit. This is why engineers ran tape and consoles hot: at −20 VU into a console with a −30 VU noise floor you had 10 dB of margin, and at 0 VU you had 30 dB.
Non-linearity. How hard you drive circuits whose behavior changes with level. This one survives into a modern workflow, and it is almost never discussed.
Inside your DAW's mixer, careful gain staging buys you very little. Worth being blunt about that rather than repeating advice the audience has outgrown.
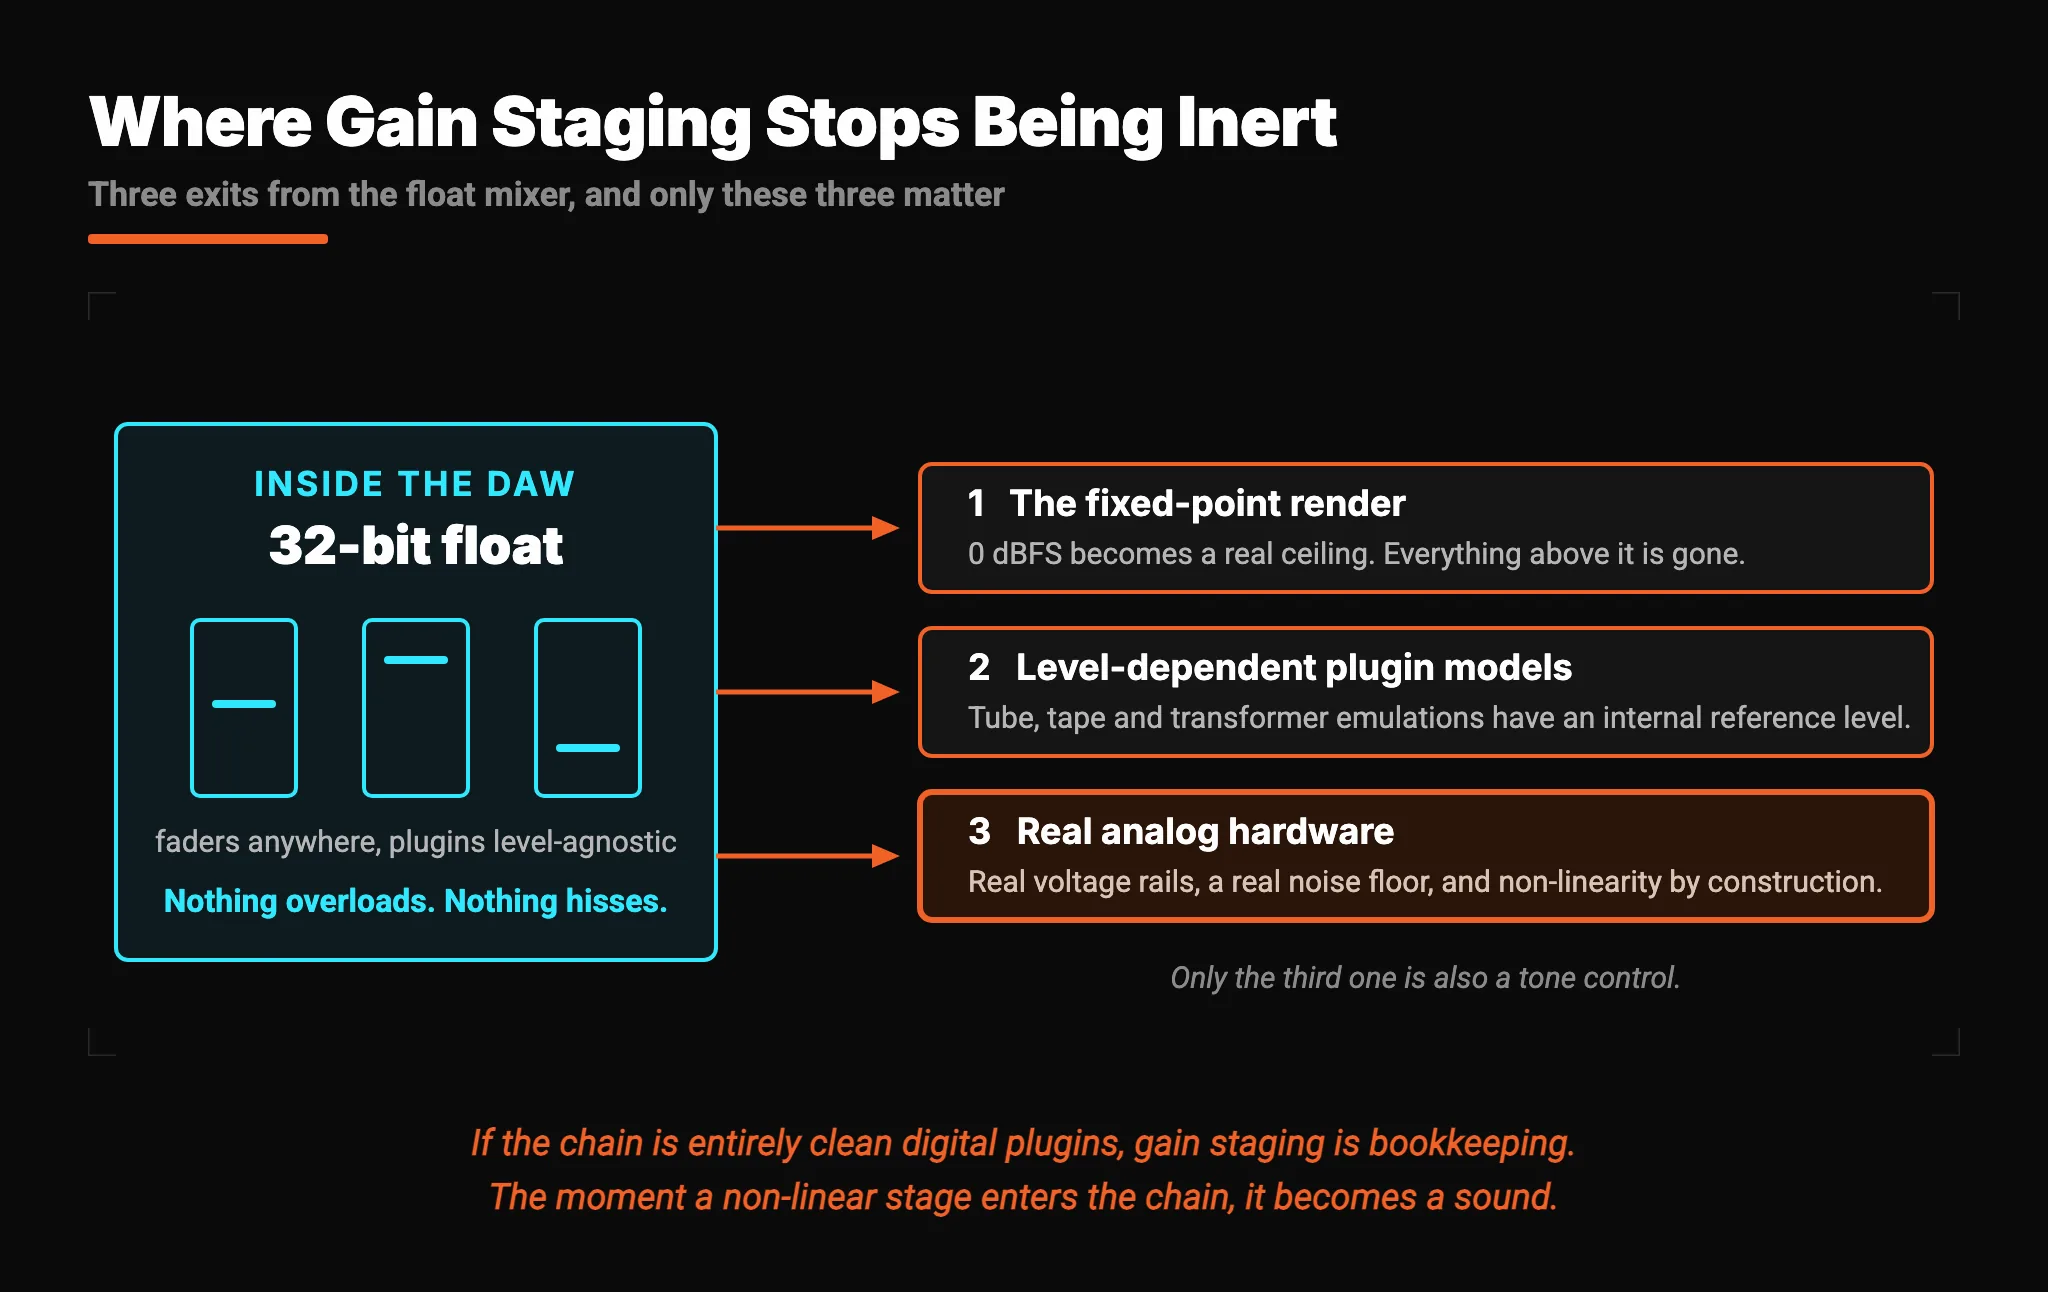
Modern DAW mixers sum in 32-bit float. The dynamic range is so large that the summing bus cannot practically be clipped, and there is no meaningful noise penalty for working quiet. Pull a channel from −3 dBFS to −24 dBFS, push it back up on the bus, and you get the same numbers back. The internal signal path does not care.
That is why "set every track to −18 dBFS" is not a rule. It is the residue of a converter calibration convention, which is a different thing entirely.
Gain staging inside the box stops being inert at exactly three points:
The render. The moment you bounce to a fixed-point file, 24-bit or 16-bit, 0 dBFS becomes a real ceiling and everything above it is gone. Float tolerance ends at the file.
Plugins that model level-dependent circuits. A well-built emulation of a tube stage, a transformer, or a tape machine is deliberately non-linear, and it has an internal reference level. Drive it at −24 dBFS and it behaves like a clean gain stage. Drive it at −6 dBFS and it does what it was modelled to do. Most other plugins, an EQ or a delay, are genuinely level-agnostic.
Hardware inserts. Real gear has real voltage rails and a real noise floor. Everything from the console era applies again, in full.
If your chain is entirely clean digital plugins, gain staging is bookkeeping. The moment a non-linear stage enters the chain, it becomes a sound.
Two facts explain most of the confusion, and both are worth stating precisely.
Analog gear is referenced in dBu. Your DAW is referenced in dBFS. Nothing universal connects them.
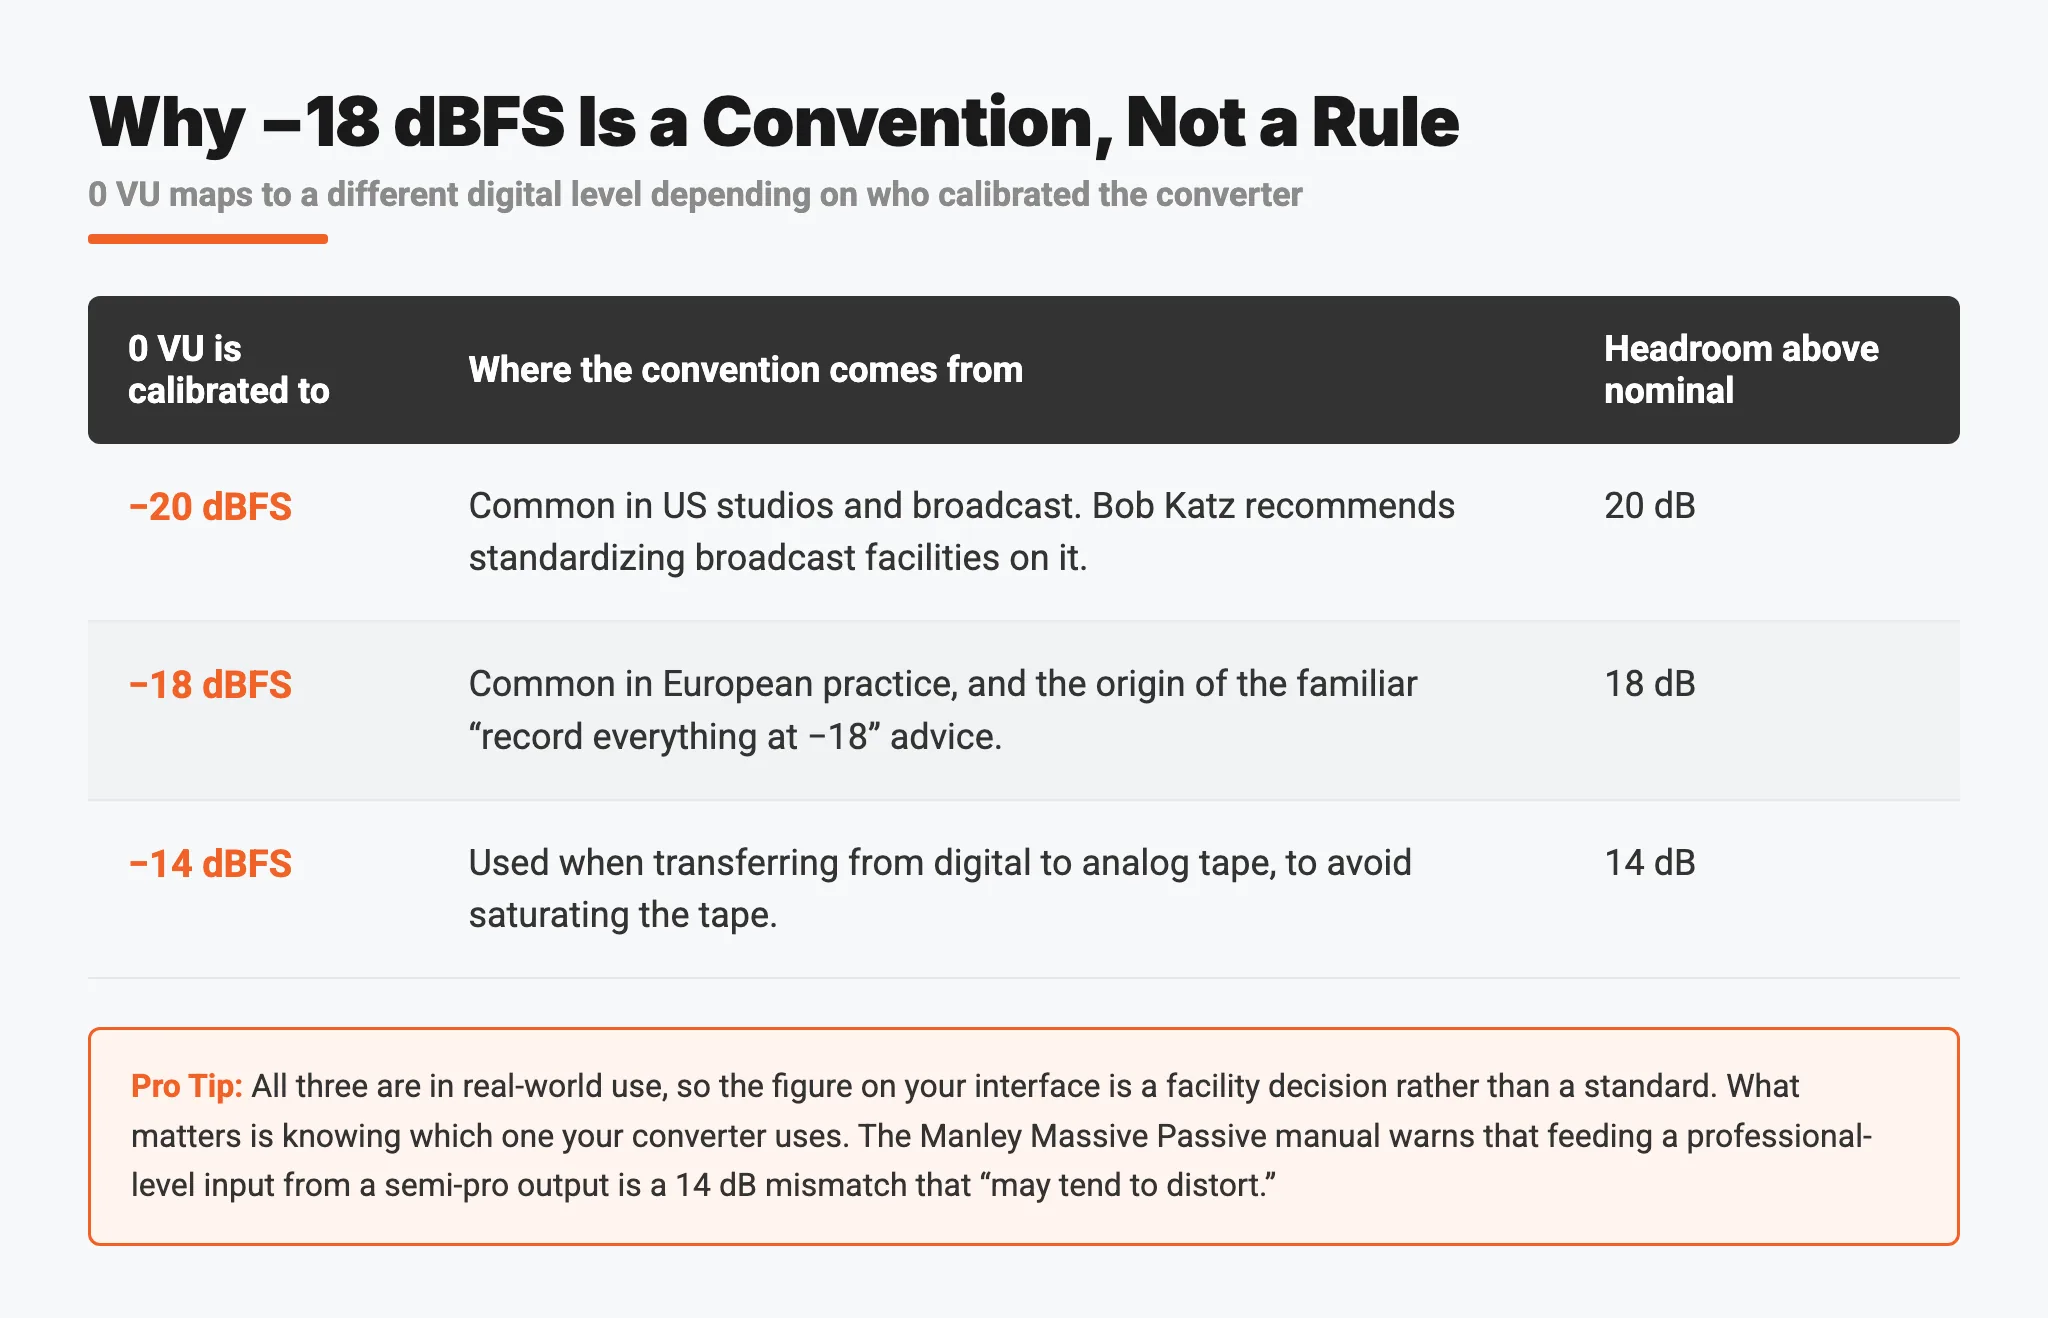
The link is your converter's calibration, and there is no single industry answer. Bob Katz, in Mastering Audio, describes standardizing broadcast facilities on −20 dBFS as the equivalent of 0 VU, and notes that −20, −18 and −14 dBFS are all used as the 0 VU reference in different contexts. The familiar "−18 dBFS" figure comes from one such convention, not from physics. It is a facility decision.
That mismatch is a real failure mode, not a theoretical one. The Manley Massive Passive manual has a troubleshooting entry for it: Manley builds to the professional standard, and a lot of semi-pro gear uses a −10 reference instead. The manual notes that the resulting difference "will certainly look goofy and may tend to distort." A gain-staging error at an interface between two devices is one of the few ways you can still genuinely wreck a signal path.
Distortion and noise both change with level, in opposite directions.
The Rupert Neve Designs MBT's published specifications make this unusually visible. THD+N measures better than 0.004% at 0 dBu, and better than 0.002% at +20 dBu. The higher level measures cleaner. That is not a typo and it is not magic: at low levels the measurement is dominated by the noise floor, and as level rises the signal pulls away from the noise faster than harmonic distortion rises to meet it. Push far enough past that and distortion takes over.
Every level-dependent box has a window like this. It is why "as low as possible" is not a strategy and neither is "as hot as possible."
There is no universally correct level. There is a correct level for a specific device, and the device usually tells you where it is.
Most mixes described as having a gain-staging problem have something else. Here are the four common symptoms with their real mechanisms.
"The stereo bus clips but no clip light comes on." This is almost always inter-sample peaks. Sample-peak meters read the samples; the reconstructed analog waveform between those samples can be higher. A file that measures −0.1 dBFS can reconstruct above 0 dBTP and clip in a converter or a codec. Ian Shepherd's home mastering guide makes the related point that lossy encoding raises peak levels, because the encoder throws away most of the information and the decoded waveform no longer matches, which is why he recommends holding true peaks to −1 dBTP. Measure with a true-peak meter, not a sample-peak meter.
"It sounds harsh and overcooked." Usually limiter artifact, not level. A limiter working hard flattens transients and pumps, and the ear reads that as brittleness. Turning the master down afterwards does not remove it, because the damage is in the waveform, not the gain.
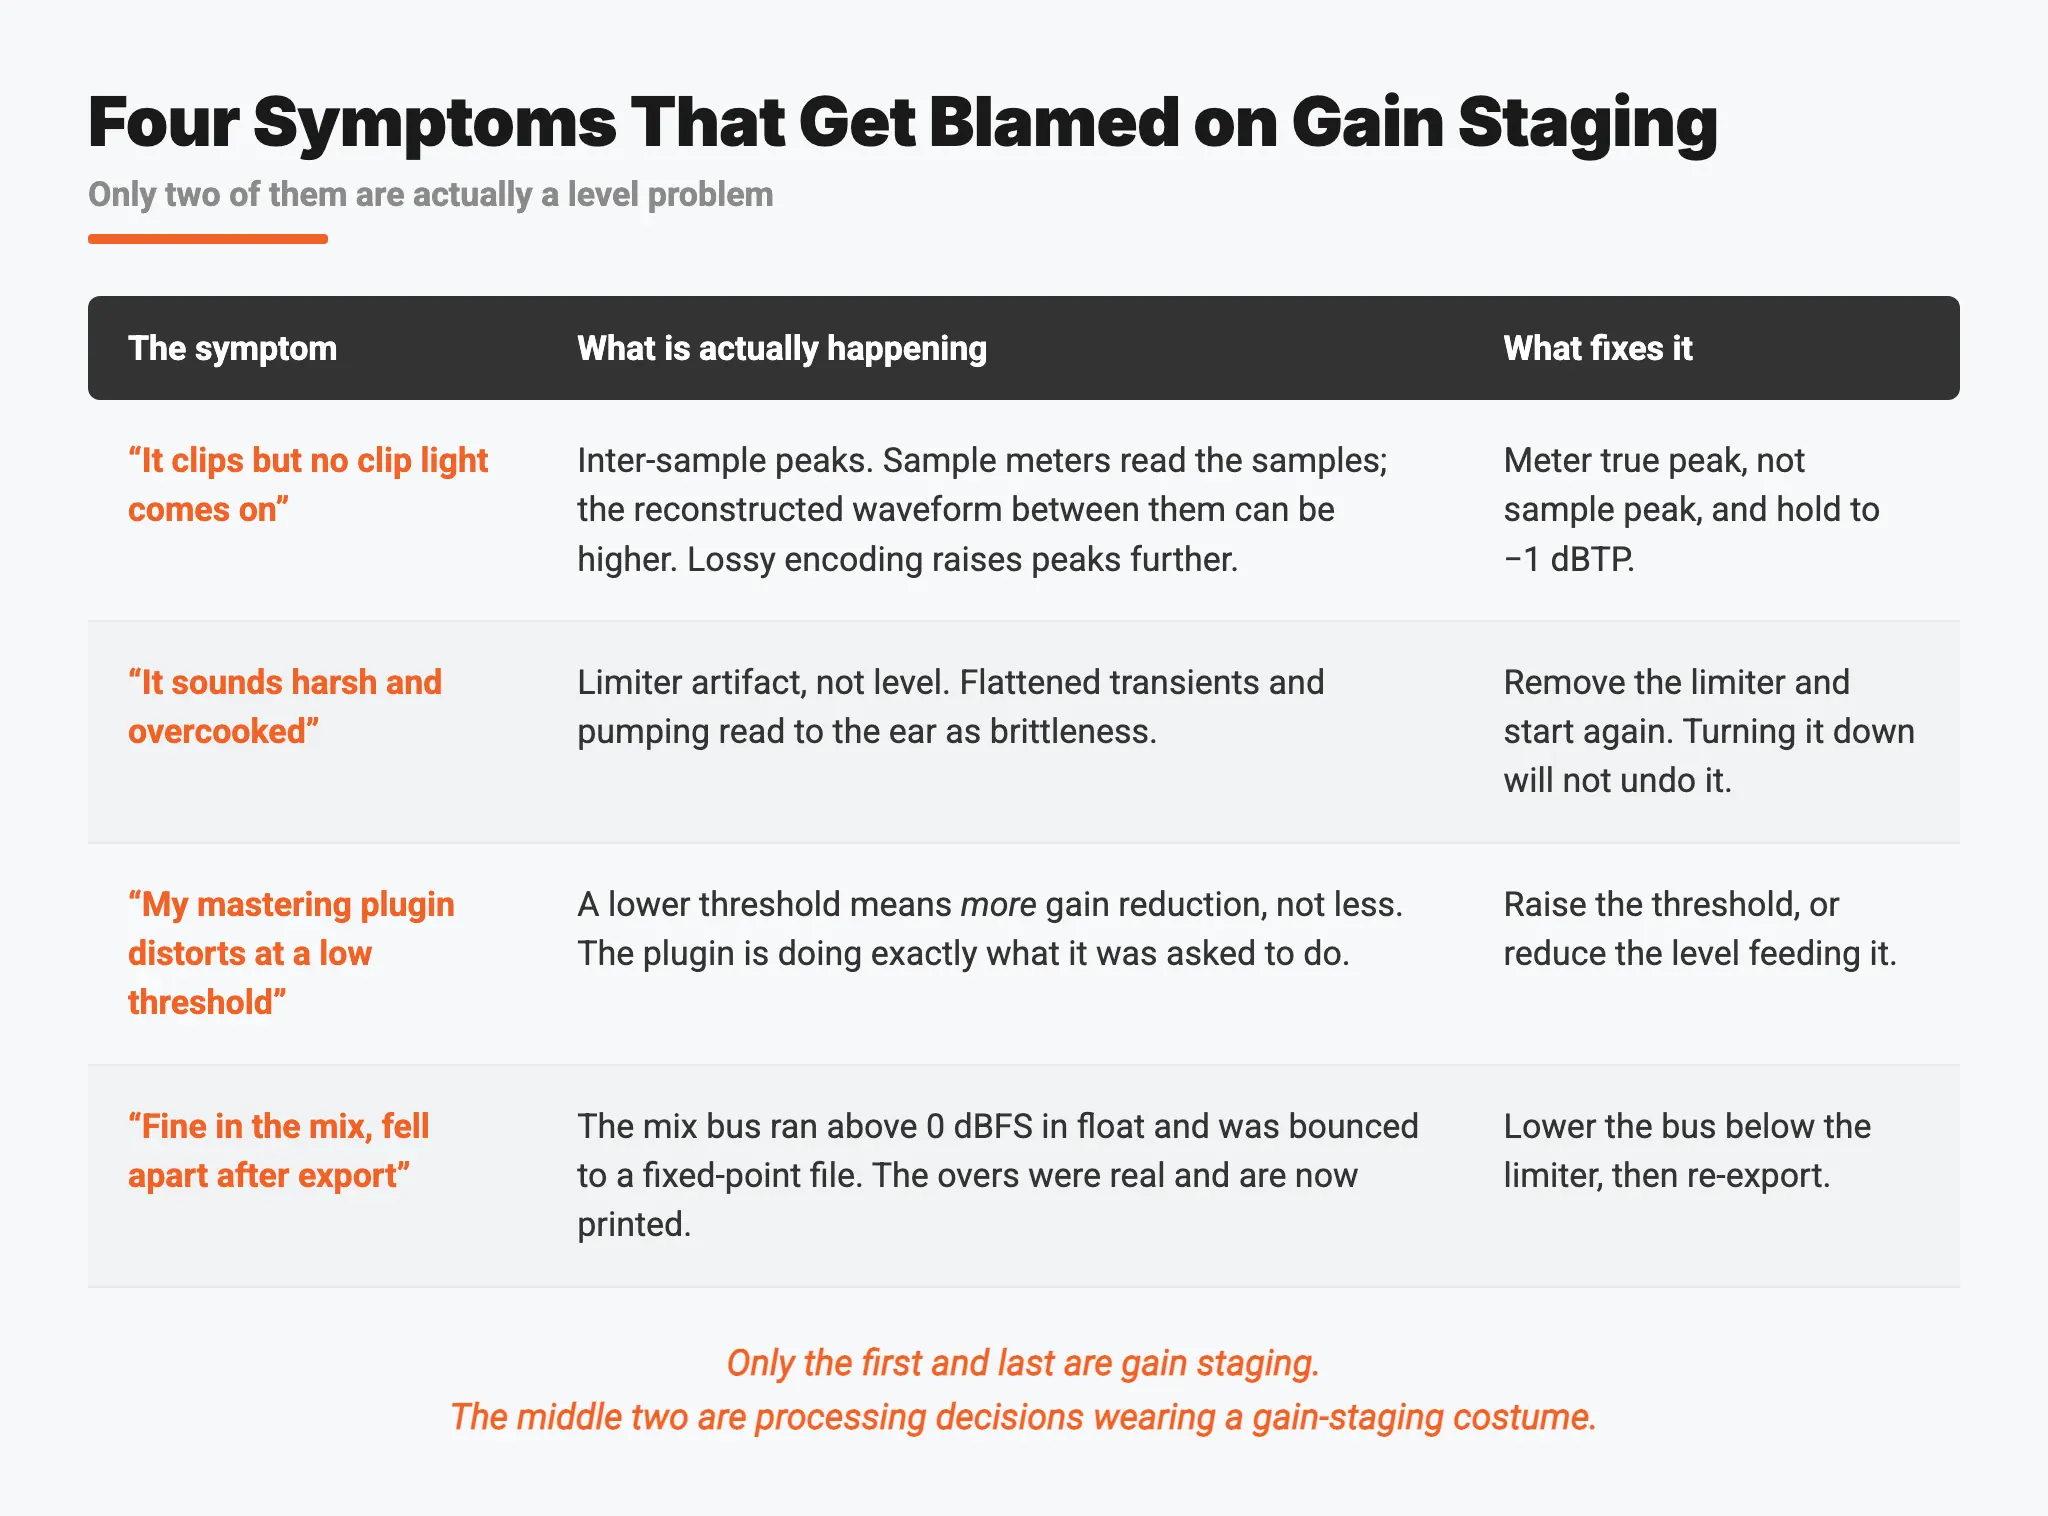
"My mastering plugin distorts even at a low threshold." A low threshold means more gain reduction, not less. This is generally the plugin doing precisely what it was asked to.
"It was fine in the mix and fell apart after export." Check the render. If the mix bus was running above 0 dBFS in float and you bounced to fixed point, the overs were real and they are now printed.
Yes, but what "after the mix" means changes the answer completely. This is the distinction most advice skips.
Scenario one: you still have the session. Then this is not a post-mix repair, it is a re-bounce. Pull the mix bus down, bypass or remove the mix bus limiter, and export again. Nothing is lost, because the mix itself was never the problem. Note that if you had a limiter or clipper on the bus and you simply lower the fader after it, you keep the artifacts and lose the level. Take the processing out, then set the level.
Scenario two: you have stems. Almost as good. You can rebalance, re-gain, and re-render, and you can drive a hardware chain properly. What you cannot fix is anything that was already printed into an individual stem, and you have lost the ability to fix relationships inside a stem.
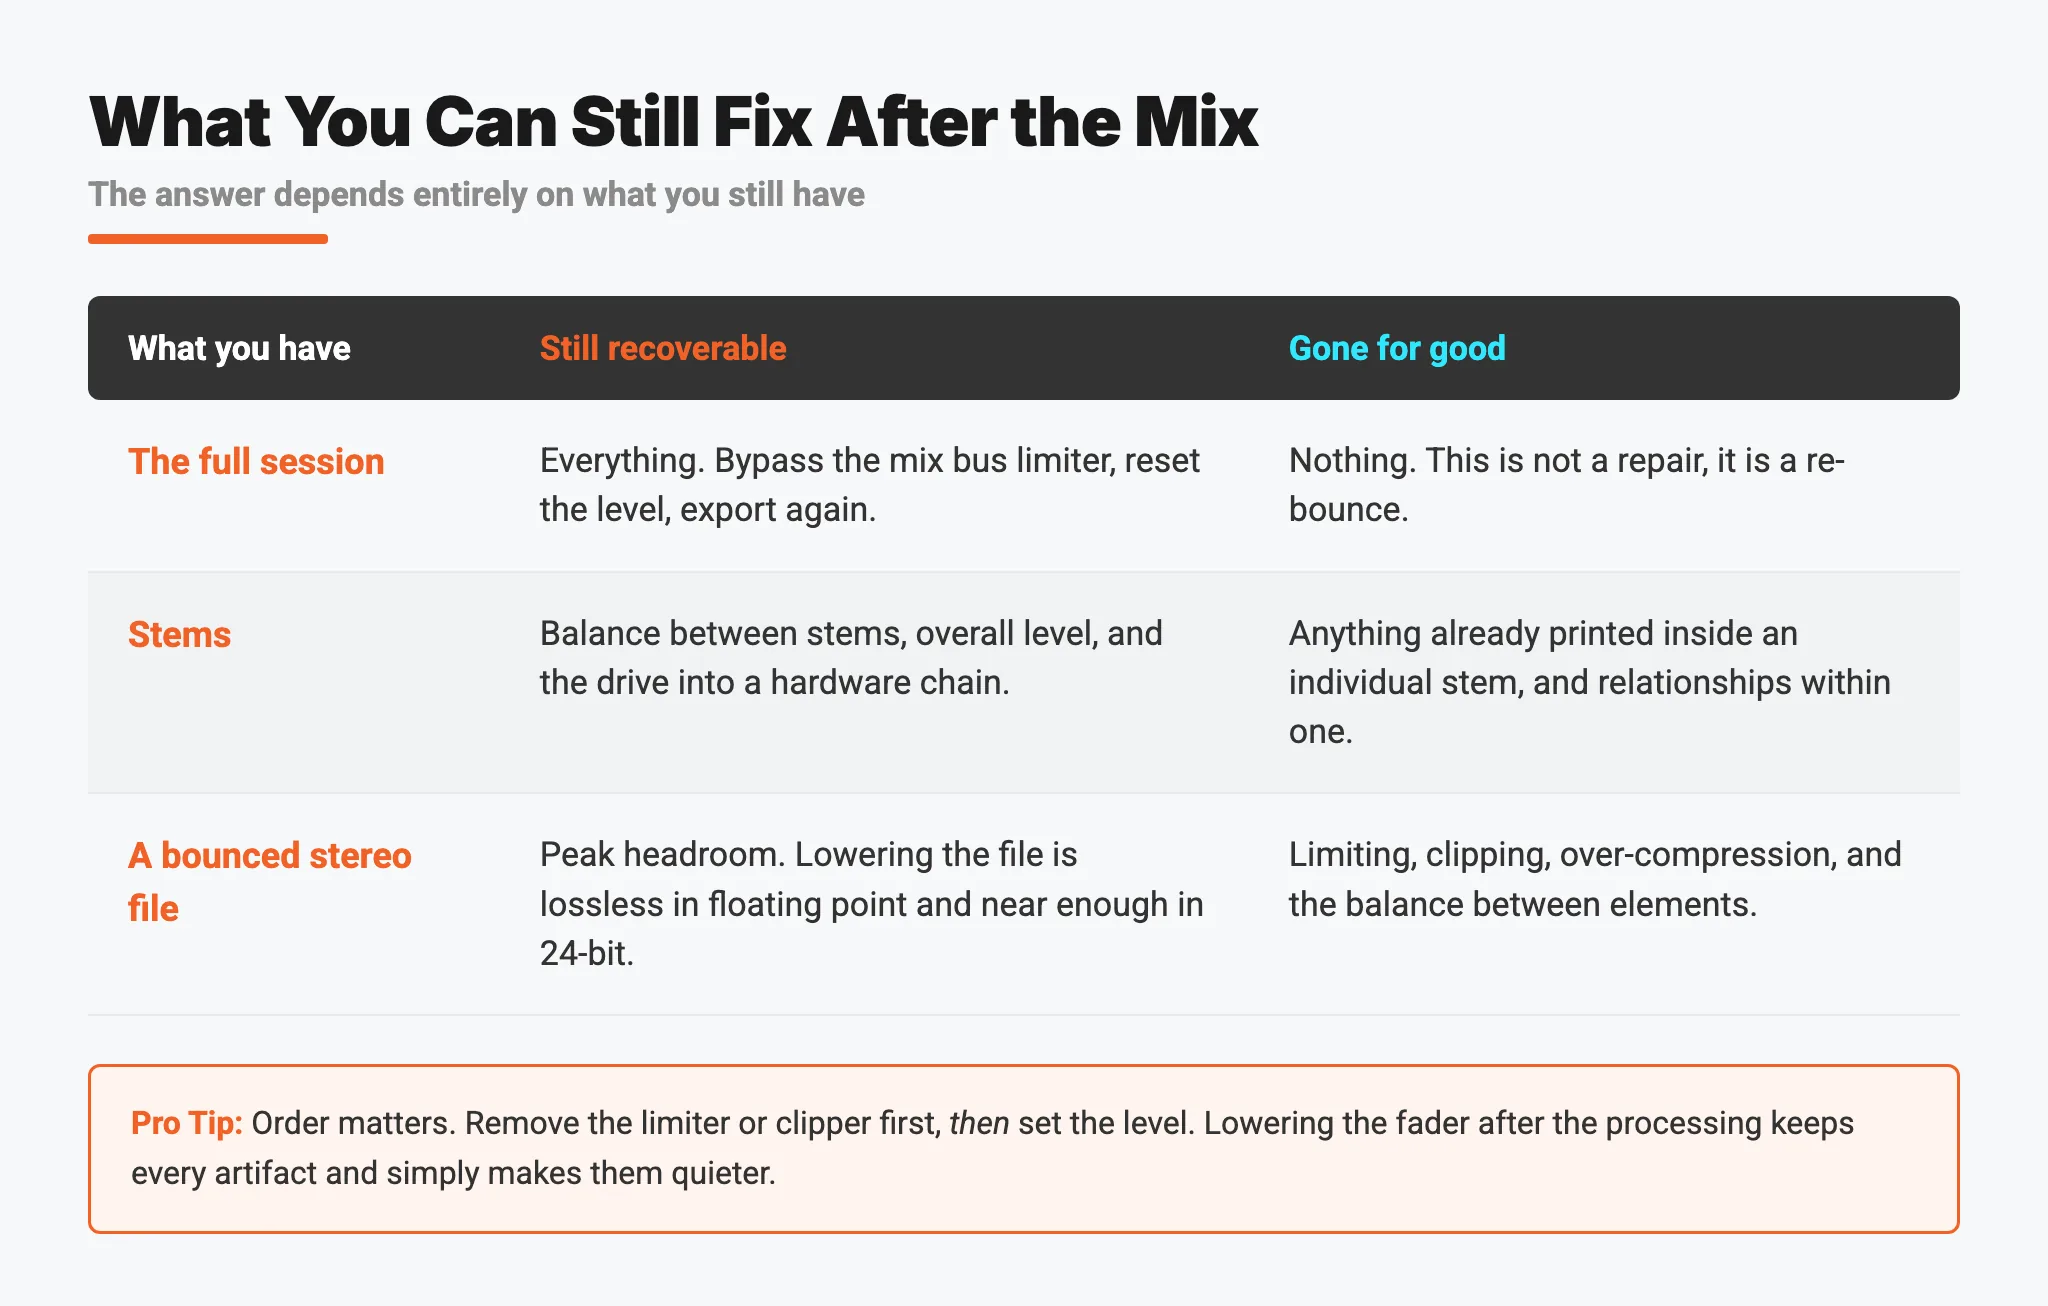
Scenario three: you have a bounced stereo file and nothing else. Here the honest answer splits in two.
Recoverable: peak headroom. Lowering a file by 6 dB is a lossless operation in floating point and near enough in 24-bit. If a mastering engineer asked for more headroom, you can simply give it to them.
Not recoverable: anything already baked in. Limiting, clipping, over-compression, and distortion printed into the render are part of the waveform. Turning the file down moves the whole thing, artifacts included. Balance between elements is likewise fixed.
Level is a number and you can always change a number. Everything a limiter did on the way to that number is now the recording.
Normalizing moves a file so its peak lands on a target. It changes the number and nothing else. Bob Katz makes the underlying point directly: the material has already been quantized, so its signal-to-noise ratio is already determined and raising the level cannot improve it.
Normalizing to −6 dBFS does not create headroom. It moves the peak. If the mix is squashed you now have a squashed mix with a lower peak. Real headroom is dynamic range that still exists in the file, and no gain change creates it.
Two related traps. Clipping to gain loudness and then turning down leaves the clipping and removes the loudness. And chasing a LUFS number before mastering solves a problem you do not have.
There is no such thing as a pre-master LUFS target. The published figures are streaming playback normalization levels: roughly −14 LUFS for Spotify, YouTube Music and Tidal, and −16 LUFS for Apple Music, with −16 also used for podcasts and games and −24 LUFS (−23 LKFS internationally) for broadcast television. Those services normalize on playback regardless of what you deliver. None of them describes what a mix should measure on its way to a mastering engineer, and mastering engineers do not ask for one. They ask for peak headroom and no limiter, a point we go into further in mastering with analog gear.
This is where gain staging goes from bookkeeping to a creative control, and it is the part of the workflow that Access Analog changes most directly.
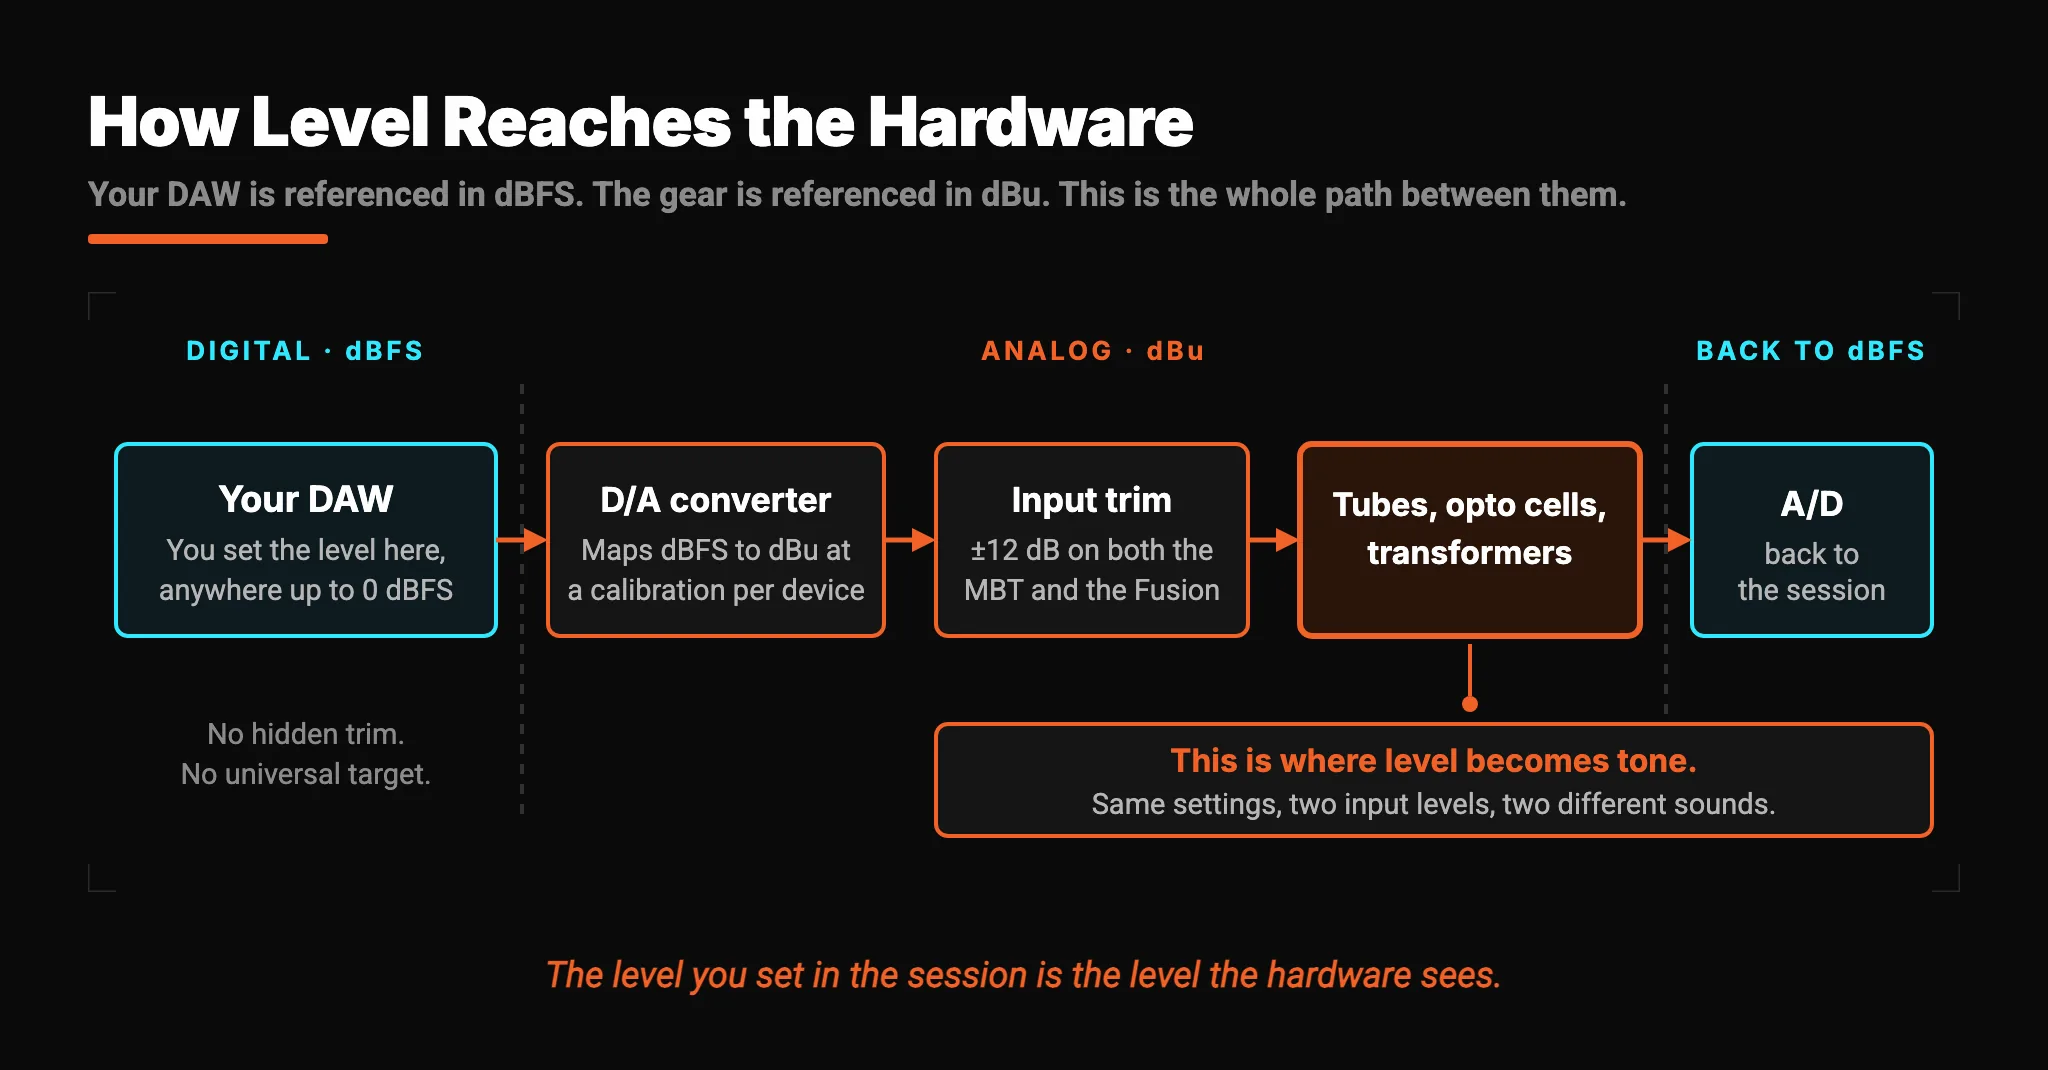
Running hardware through Access Analog, you set the level in the digital domain, anywhere up to 0 dBFS, and the converter translates that to dBu at a calibration appropriate for the device on the other end. There is no hidden trim and no universal target number. The level you set in your DAW is the level the hardware sees. We covered the same principle from the tracking side in how to improve vocal sound quality, and it is worth repeating because it inverts the usual advice: this is a setting to audition, not a box to tick.
Optical cells, tube stages and transformers are non-linear by construction, and non-linear means level-dependent. The same unit with identical settings at −20 dBFS and at −6 dBFS gives you two different harmonic signatures, two different effective knees, two different sounds. That is not a side effect to be managed. It is a control.
Where a unit wants a specific drive, it tells you. The MBT's input LEDs light green when the signal reaches −20 dBu and red at +23 dBu, both measured after the input trim, and its Super Silk section has a dedicated DRIVE LED that lights when the signal reaches the optimal range for transformer harmonics. That is a manufacturer marking its own sweet spot on the front panel.
And you are not required to land it perfectly from the DAW. The MBT and the SSL Fusion both carry ±12 dB of input trim, which is a 24 dB window of adjustment at the unit itself.
Send it at a level that sounds right, then use the unit's own trim to find the tone. Two controls, one decision.
Every unit here is level-dependent by design. That is the reason each one is on this list.
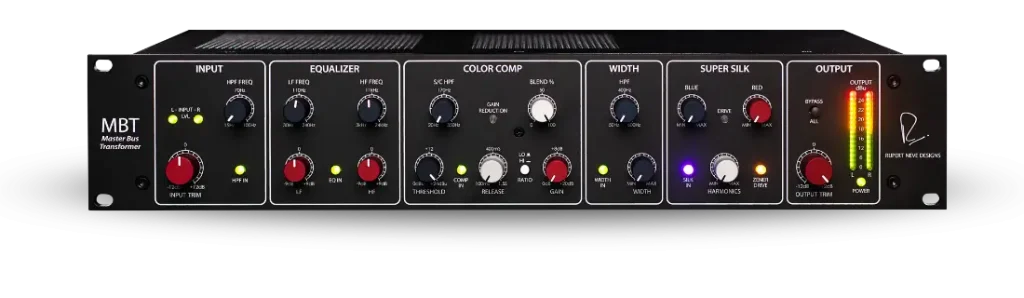
The Master Bus Transformer's input trim sets the level feeding every stage after it, which makes it the most consequential control on the box.
The Rupert Neve Designs MBT combines a two-band shelving EQ, an optical Color Comp compressor, a Width section and an upgraded Super Silk transformer stage. The ±12 dB input trim sits ahead of all of it, so raising it drives the EQ and compressor harder, reaches the Color Comp threshold sooner, pushes the Super Silk transformers further, and brings on Zener clipping earlier. Its variable input high-pass filter runs from 15 Hz to 100 Hz at roughly 6 dB per octave, which stops subsonic energy from consuming headroom in every stage downstream. Maximum input level is +25.5 dBu. One knob, and every colour decision on the unit moves with it.
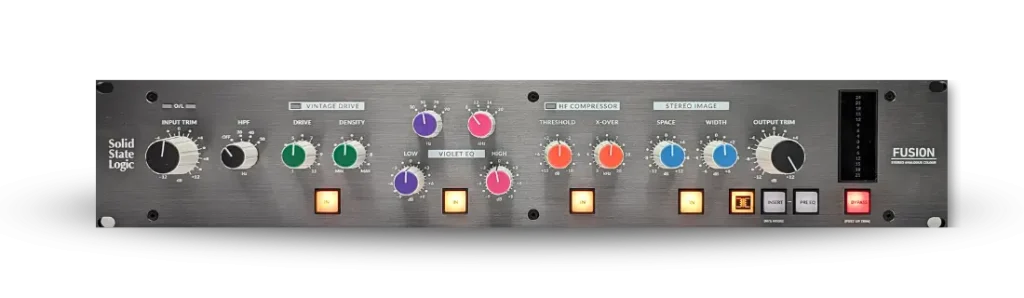
The Fusion's five colour stages are level-dependent, so its input trim is really the drive control for the whole unit.
The SSL Fusion stacks Vintage Drive, the Violet EQ, an HF Compressor, an M/S Stereo Image section and a transformer output stage into one 2U box. Vintage Drive is a non-linear harmonic circuit, which means how hard you feed the Fusion determines how much saturation you get before you touch a single control. Its ±12 dB input trim is the lever for that, and the matching output trim exists so you can match processed and bypassed loudness and feed the next device sensibly. The front-end third-order high-pass filter offers 30, 40 and 50 Hz settings to keep very low frequency energy from driving the colour stages on its own. Set the drive with the trim, then rebalance with the output. The knobs in between behave completely differently depending on what you did first.
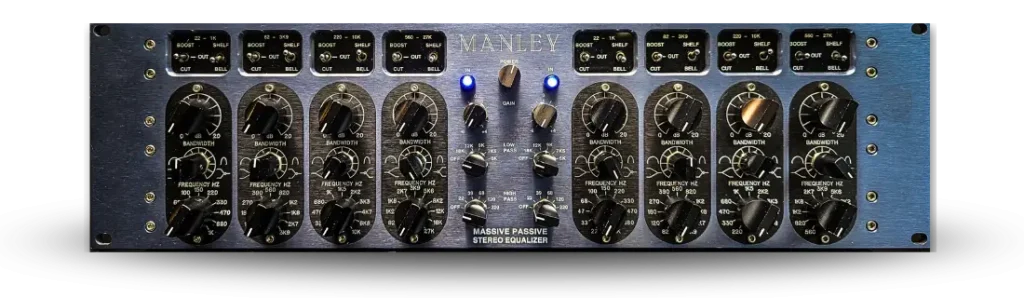
A passive EQ network loses a great deal of level by design, and the tube amplifiers that make it back are part of the sound.
The Manley Massive Passive uses a parallel passive topology rather than the conventional series design, which Manley chose specifically to keep losses reasonable. Even so the network gives up around 50 dB, and two tube amplifier stages per channel restore it. That structure is why the EQ sounds the way it does, and it is also why level is not incidental to it. The unit's Gain Trims exist for a related reason: they let you match levels between bypass and EQ-in so the comparison is honest. Anyone who has preferred a setting purely because it was louder knows why that control matters. A level-matched A/B is the only A/B worth trusting.
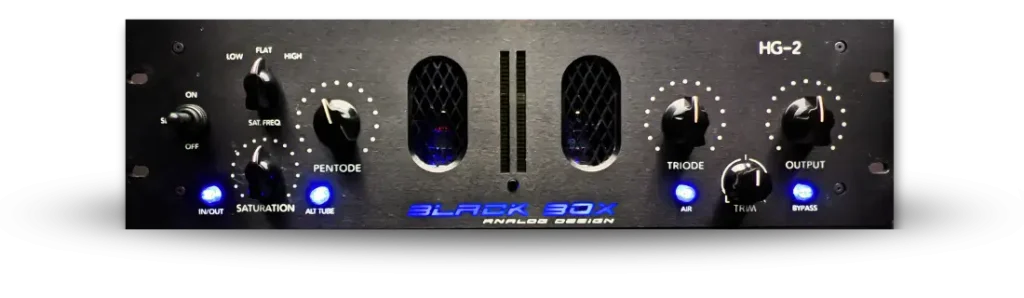
The HG-2 is built to saturate, so the level you feed it changes what every knob on the front does.
The Black Box Analog Design HG-2 runs a main path through 6U8A Pentode and Triode tube stages with a parallel 12AX7 saturation circuit blended in alongside. Its manual is unusually direct about level: the unit is designed to saturate, so how hard you drive into it affects the settings, and if a track arrives very hot or very quiet you adjust the signal feeding the input rather than compensating on the front panel. Worth being precise about what it does, because this is widely misstated: driving the tubes into saturation raises RMS and perceived level while holding the peaks, which is the mechanism, not a side effect. We go through the controls in detail in our complete guide to the HG-2. Treat the send level as the first knob on the unit, because functionally that is what it is.
Here is the corrected version of the workflow this post exists to fix. A pop mix comes back fatiguing, with the bus limiter working far too hard.
Step one: remove, then reduce. Bypass the mix bus limiter or clipper first. Then set the level. Doing it in the other order keeps every artifact and just makes them quieter.
Step two: check true peak, not LUFS. Use a true-peak meter and confirm you are comfortably clear of 0 dBTP. Do not chase an integrated loudness figure. There is no pre-master LUFS spec to hit.
Step three: drive the hardware deliberately. Into a chain like the MBT followed by the Fusion, the send level is a tone decision. Set it by ear, watching the MBT's input LEDs and its Super Silk DRIVE indicator, then refine with the unit's own input trim.
Step four: mind the overlap. The MBT has a Width section and the Fusion has an M/S Stereo Image section. Two width controls in series will happily over-widen a mix and hollow out the centre. Pick one to do the work.
Step five: A/B level-matched. Use the output trims to match bypassed and processed loudness before deciding anything. Louder always wins a careless comparison. Then check against a reference track, in context.
Set the render ceiling once and forget it. True peak, not sample peak, with real margin. This is the only place in a digital chain where 0 dBFS is a genuine wall.
A limiter you can hear is not a headroom problem. Adding headroom afterwards will not remove it. Take the limiter off and start again.
Match levels before you judge anything. The Massive Passive ships with Gain Trims specifically so an EQ comparison is fair. Every other comparison deserves the same discipline.
Filter subsonics before the drive stage, not after. The MBT's 15 Hz to 100 Hz input filter and the Fusion's 30/40/50 Hz high-pass both exist because inaudible low-frequency energy consumes headroom in every following stage and skews how the unit saturates.
Treat the send level into hardware as a setting worth auditioning. Try the same chain 6 dB hotter and 6 dB quieter before you accept the first result. On level-dependent gear those are three different sounds, not three volumes.
Gain staging is essential, and the version of it worth learning is not the version most people were taught. Avoiding clipping is a solved problem in a floating-point session, right up until you render or until you leave the box. What remains is more interesting: every non-linear device in your chain behaves differently depending on how hard you feed it, and that behavior is available to you as a decision.
Can you fix it after the mix? You can restore headroom, you can re-render, and you can drive real hardware properly at any point. You cannot un-limit or un-clip a file, and no amount of gain will undo processing that has already been printed. That is the line, and it is worth knowing which side of it you are on before you start.
Access Analog gives you 70+ pieces of real analog hardware, remotely, with full recall and the level you set in your DAW landing on the actual device. Every new account starts with 12 free credits, which is enough to hear what a mix does at three different drive levels through a real transformer.
Send it hot, send it quiet, and listen to the difference. That difference is the whole reason the hardware is there.
Is gain staging essential?
Yes, though not for the reason it is usually given. In a modern 32-bit floating-point DAW you cannot practically clip the internal summing bus, so careful gain staging between plugins buys you very little on its own. It becomes essential at three points: when you render to a fixed-point file, when a plugin deliberately models a level-dependent circuit, and whenever the signal reaches real analog hardware.
Can you fix gain staging after mixing?
Partly, and the answer depends on what you still have. If you have the session or stems, you can re-gain and re-render with nothing lost. If you only have a bounced file, you can recover peak headroom by lowering the level, but any limiting, clipping or over-compression already printed into that file is permanent. Turning the file down moves the artifacts along with the audio.
What happens if you skip gain staging entirely?
Inside a floating-point DAW, often nothing at all. The failure shows up at the boundaries: overs printed into a fixed-point render, a hardware input driven far from where the manufacturer intended, or an interface mismatch between a professional-level device and a semi-pro one, a difference the Manley Massive Passive manual puts at 14 dB and warns "may tend to distort."
How much headroom should you leave before mastering?
Peaks somewhere around −6 to −3 dBFS with no limiter on the mix bus is a common request, and mastering engineers ask for it because limiting is not reversible, not because 6 dB is a magic figure. Give them a mix that sounds right with the peaks left intact. The exact number matters far less than the absence of a limiter.
How do you regain headroom in a finished mix?
If the mix bus had a limiter or clipper, bypass it and re-export. That is the only real fix. If you only have a bounced file, lowering the level restores peak headroom but not dynamic range, since dynamic range that was compressed away is not in the file any more.
Does gain staging matter in a 32-bit float DAW?
Between clean digital plugins, barely. The float mixer has enormous dynamic range and most plugins are level-agnostic. It matters again for analog-modelled plugins, which have an internal reference level and change character with input level, and it matters completely for hardware inserts.
What level should you send to Access Analog?
There is no single target. You set the level in the digital domain, anywhere up to 0 dBFS, and the converter maps it to dBu at a calibration suited to the device. Because the hardware is real and non-linear, that level is a tone decision rather than a technical requirement. Send it where it sounds right, then refine with the unit's own input trim.