
Most engineers reading this already run half of these on instinct. The value here isn't the list. It's the reasoning underneath it, and what changes when the last third of the chain is real hardware instead of a model of it.

The vocal is the one track nobody forgives. A kick can be approximate and a guitar can be a texture, but a lead vocal is the thing a listener is actually looking at. Every decision upstream of the fader shows up in it.
This guide walks ten decisions in the order you actually make them, from the room to the final tone stage, and ends with three complete vocal chains you can run on real hardware from inside your DAW using Access Analog.
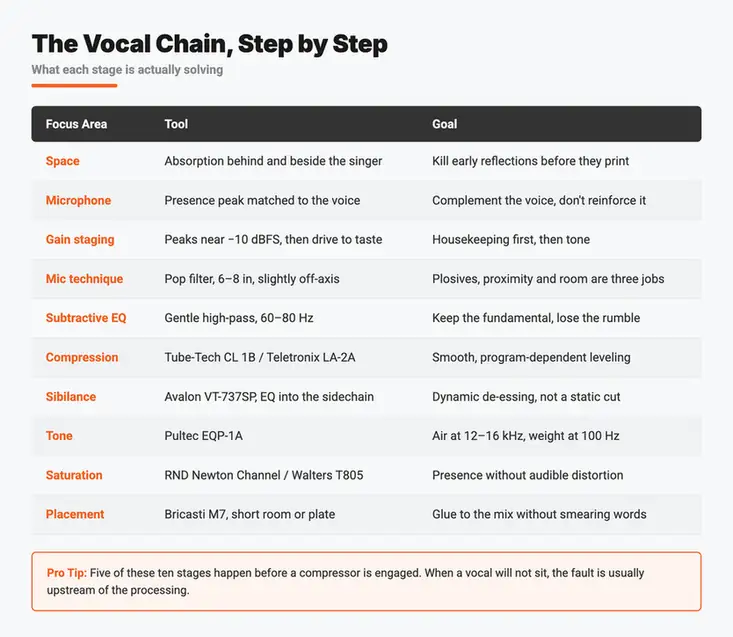
A microphone does not hear a voice. It hears a voice plus everything that voice does to the room, arriving a few milliseconds later.
That delay is the whole problem. A reflection off a desk or a nearby wall returns within a handful of milliseconds and combines with the direct sound, producing comb filtering: a series of regular notches and peaks across the spectrum. It reads as boxiness, as a nasal quality, as a vocal that will not sit no matter how you EQ it. And it cannot be undone, because you are not fighting a tonal curve. You are fighting a summed copy of the signal.
Small rooms are worse than large ones for the same reason a short delay is worse than a long one. The reflections come back sooner, so the notches land lower in the spectrum, right where the voice lives.
Absorption goes behind and beside the singer first, not behind the microphone, because the strongest early reflections come off the surfaces the voice is aimed at. Heavy blankets on stands work. A clothes rail packed with coats works. If you have nothing, angle the singer so the mic's null points at the nearest hard surface, and get closer to the mic so the direct-to-reflected ratio climbs.
You cannot EQ a reflection out of a vocal, because the problem is arithmetic, not tone.
"Condenser for clarity, dynamic for warmth" is the most repeated piece of vocal advice that does not survive contact with a spec sheet. Neither category has a tone. What they have is different physics, and the physics is what you are choosing between.
Diaphragm mass and transient behavior. A condenser's diaphragm is light and follows fast transients closely. A moving-coil dynamic drags a voice coil along with it, so it responds more slowly and rounds the leading edge of consonants. That is not warmth. It is a slower transient response, which sometimes reads as warmth and sometimes reads as dull.
The presence peak is the actual variable. Most vocal microphones have a deliberate rise somewhere between 2 kHz and 10 kHz. Where that rise sits, and how wide it is, does more to the perceived character of a voice than the transducer type. A singer who already has a hard 3 kHz edge does not need a mic that peaks at 3 kHz, whatever it costs.
Then the constraints. Self-noise matters on an intimate performance, SPL handling matters on a belter, and polar pattern determines how much room you are printing, which loops straight back to the first tip.
Choose the microphone that is missing what the voice has too much of.
The first decision is housekeeping. While tracking, aim for peaks around −10 dBFS. At 24-bit there is no meaningful noise penalty for leaving headroom, and a converter running near full scale gives you nothing except a smaller margin for the take where the singer finally commits.
The second decision is the one that gets skipped, and it is the interesting one: how hard you drive the analog stage.
Inside a plugin chain, gain staging is close to inert. The mixer is 32-bit float and most plugins are level-agnostic unless the model deliberately is not. Nothing downstream cares whether you arrived at −20 or −6.
Real hardware always cares. Optical cells, tube stages, and transformers are non-linear by construction, and non-linear means level-dependent. Drive the same unit with the same settings at two different levels and you get two different harmonic signatures, two different effective knees, two different sounds. That is not a side effect to be managed. It is a control.
Running through Access Analog, you set the level in the digital domain, anywhere up to 0 dBFS, and the converter translates it to dBu at a calibration appropriate for the device on the other end. No hidden trim, no universal target number. The level you set is the level the hardware sees.
Where a unit wants a specific drive, it will tell you. On the Walters Audio T805 the meter is explicit: subtle enhancement to about −6 VU, significant coloration around 0 VU, and the Tape Element saturating around +6 VU. For tape generally, mixing and mastering engineer Karl Barnes starts low, pushes to failure, then comes back, a method he walks through in Getting a Great Tape Sound.
Audition drive level the way you audition a setting, because on real hardware that is exactly what it is.
These get collapsed into one tip constantly, and they solve three unrelated problems.
The pop filter stops plosives. A "p" or "b" launches a slug of moving air that hits the diaphragm as a huge low-frequency transient. The filter breaks up that airflow. It does nothing about tone.
Distance sets proximity effect. Every directional microphone boosts low frequencies as the source gets closer. Six to eight inches is a sane starting point, not a rule. Move in for intimacy and weight, out when the low end is already crowding the mix.
Axis sets brightness and reduces the room. Rotating the mic a few degrees off the mouth pulls the high end down slightly and moves the singer out of the direct blast path, which helps with sibilance and plosives before any processing is involved.
Use all three deliberately and you arrive at the compressor needing less work. The cheapest de-esser in the building is fifteen degrees of rotation.
Cutting is where the tonal work should start, and the standard advice to high-pass at 80 to 100 Hz is too aggressive to apply blindly. A baritone's fundamental sits around 85 to 110 Hz. An 80 Hz filter with a steep slope eats the note and leaves the harmonics, which is why a heavily filtered male vocal can sound thin and honky at once.
Start around 60 to 80 Hz with a gentle slope, and set it against the singer's lowest sung note rather than a number you read somewhere. The Avalon VT-737SP sweeps its high-pass filter from 30 Hz to 140 Hz, and the Rupert Neve Designs Newton Channel from 20 Hz to 250 Hz. Those ranges exist because the correct answer is per-voice.
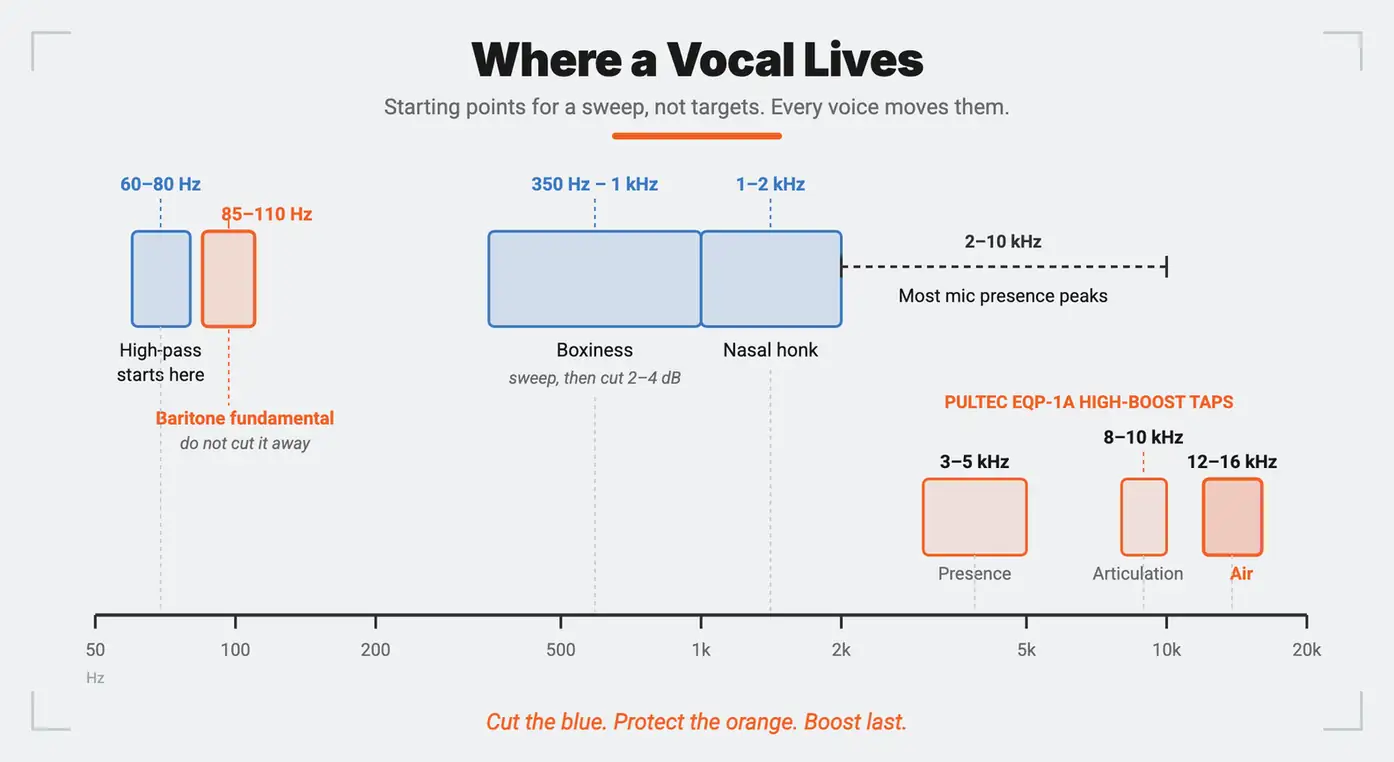
Then hunt the resonance. Every voice in every room has one or two narrow frequencies that ring. Sweep a narrow boost until something jumps out unpleasantly, then cut it by 2 to 4 dB. Start looking for boxiness somewhere between 350 Hz and 1 kHz, and for nasal honk between 1 kHz and 2 kHz. Those are places to begin a sweep, not targets. Removing what is wrong is a smaller change than adding what is missing, and it survives the mix better.
Ten decibels of gain reduction from one compressor sounds like a compressor. Ten decibels split across two, with different time constants, sounds like a record.
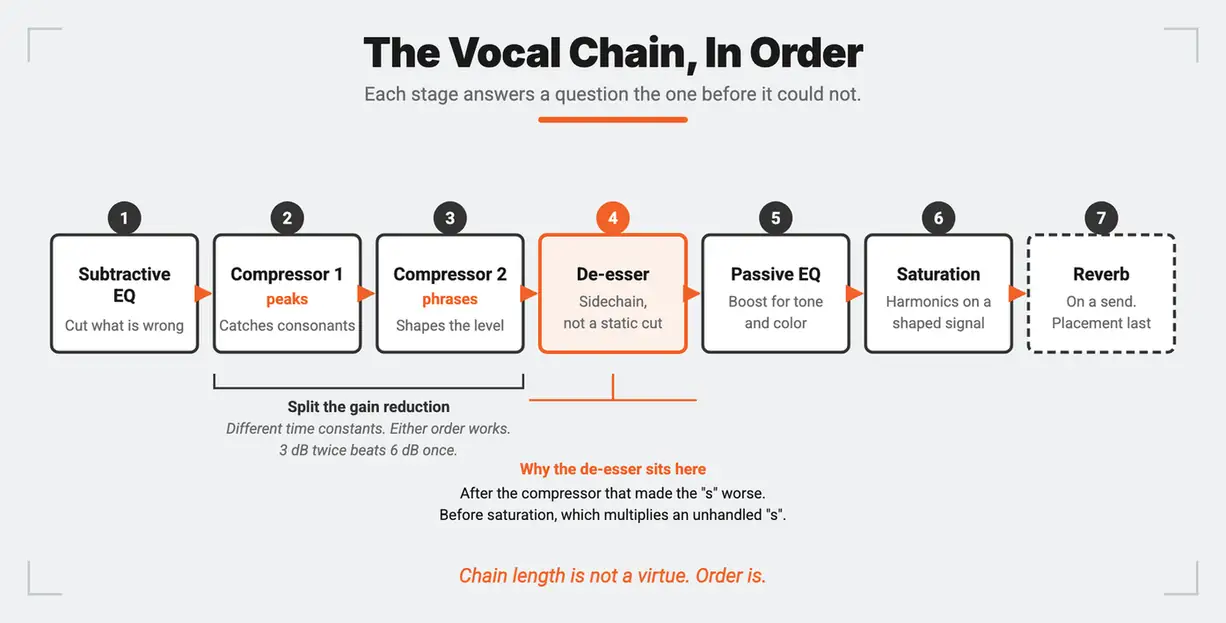
The reason is that a single unit has one detector behaving one way. Split the work and the fast stage handles consonants and peaks while the slow stage handles the shape of phrases. Neither has to work hard enough to become the sound.
One distinction worth drawing, because "transparent" gets used to mean two different things. The Tube-Tech CL 1B and the Teletronix LA-2A are genuinely clear. They stay clean and unforced even under heavy gain reduction, they do not smear or pump, and that reliability is exactly why engineers trust them on a lead vocal.
What they are not is neutral. Both are optical and tube-based, and the gain cell responds differently depending on what you feed it, so the compression arrives with a character of its own. Clear and neutral are two separate claims, and treating them as one is how a chain ends up with the wrong box in it. The CL 1B gives you ratio continuously from 2:1 to 10:1, threshold from +20 dBu down to −40 dBu, and in Manual mode an attack from 0.5 ms to 300 ms with a release from 0.05 to 10 seconds. Its Fixed mode is 1 ms and 50 ms. Reach for either unit when you want compression that flatters. If you want gain control that leaves no fingerprint at all, a clean VCA is the better tool.
For a full comparison of the two dominant vocal topologies, see 1176 vs. LA-2A on Vocals and our deep dive on the CL 1B.
Two compressors at 3 dB each will always beat one compressor at 6 dB, because neither one has to announce itself.
A static high-shelf cut fixes the "s" and ruins everything else, because sibilance is intermittent and a shelf is not. What you want is a compressor that only reacts when the offending band is present.
This is where a channel strip with a routable sidechain becomes genuinely useful rather than merely convenient. The Avalon VT-737SP lets you route its sweepable midrange bands into the compressor's own sidechain, which turns the unit into a frequency-sensitive compressor and a de-esser. The high and low bands stay in the audio path while that is engaged, so you keep your tonal shaping.
Two placement notes that matter more than the settings. De-ess before heavy saturation, because harmonic generators multiply what you feed them and an unhandled "s" comes back brighter and harsher. And de-ess after the main compressor if the compressor is making it worse: a slow attack lets sibilance through while ducking everything around it, which raises the "s" in relative terms.
Sibilance is a dynamics problem wearing an EQ costume.
Boosts are where passive designs earn their reputation. A passive equalizer has no gain of its own. It attenuates everything except the region you are asking for, then a makeup amplifier restores the level, and that amplifier contributes its own harmonic character on the way. The curve and the color arrive together.
The Pultec EQP-1A is the reference case. Its high-frequency boost taps are 3, 4, 5, 8, 10, 12, and 16 kHz. As Hugh Robjohns lays out in Sound On Sound's review of the Pulse Techniques reissue, presence lives around 3 to 5 kHz, articulation around 8 to 10 kHz, and air at 12 to 16 kHz.
The control people forget is Bandwidth. It does not merely widen the curve, it changes the effective maximum boost. A wide setting at 12 or 16 kHz gives you a gentle lift across the whole top octave, which is what "air" actually means on a vocal. A narrow setting at the same frequency gives you a much more pointed, and much less flattering, emphasis.
And the famous move still works. The low-frequency Boost and Atten controls operate simultaneously with different turnover points, so the attenuation curve begins higher than the boost curve. Boost and attenuate together at 100 Hz and you get weight underneath with the mud above it pulled back. The original manual advised against it. Everybody does it anyway, because it does something no single shelf can.
On a passive EQ the tone and the color are the same circuit, which is why a boost sounds like a decision rather than a correction.
Saturation on a vocal is a presence tool, not an effect. The goal is added harmonic content that makes the voice read as louder and closer without moving the fader.
The distinction between harmonics and distortion is mostly order and amount. Even-order harmonics (2nd, 4th) are octave-related and read as fullness. Odd-order harmonics (3rd, 5th) sit at intervals that read as edge. Hugh Robjohns's Analogue Warmth remains the clearest account of why a chain of small non-linearities sounds like a quality nobody can quite point at.
Three approaches, all doing different things:
If you can hear it as an effect, it is doing too much. Back it off until you only notice when you bypass it.
Reverb is the final placement decision, and on vocals the mistake is almost always length rather than amount.
A short room or plate glues the voice to the arrangement without smearing consonants. Long tails push the voice backward, which is the opposite of what a lead vocal usually needs.
Pre-delay is the control that protects intelligibility, and the instinct to keep it short is backwards. As David Gibson puts it in The Art of Mixing, short pre-delays let the reverb mush up the dry sound almost immediately, while longer ones keep a vocal clean and clear even with a generous amount of reverb. Set it by ear against the tempo, and high-pass the reverb return so the low mids do not silt up. The Bricasti M7 is the reference for this, and we covered its approach to depth in a dedicated guide.
Then the question nobody enjoys: what do you commit to? Printing the analog chain forces the decision while you still have the context that produced it. Keeping it recallable protects you from a client note three weeks later. Running hardware through Access Analog means the settings live in your session, so the honest answer is usually to print a version and keep the recall as insurance. Commit to the take. Keep the option on the tone.
Three chains, three jobs. Every unit named here is racked and available.
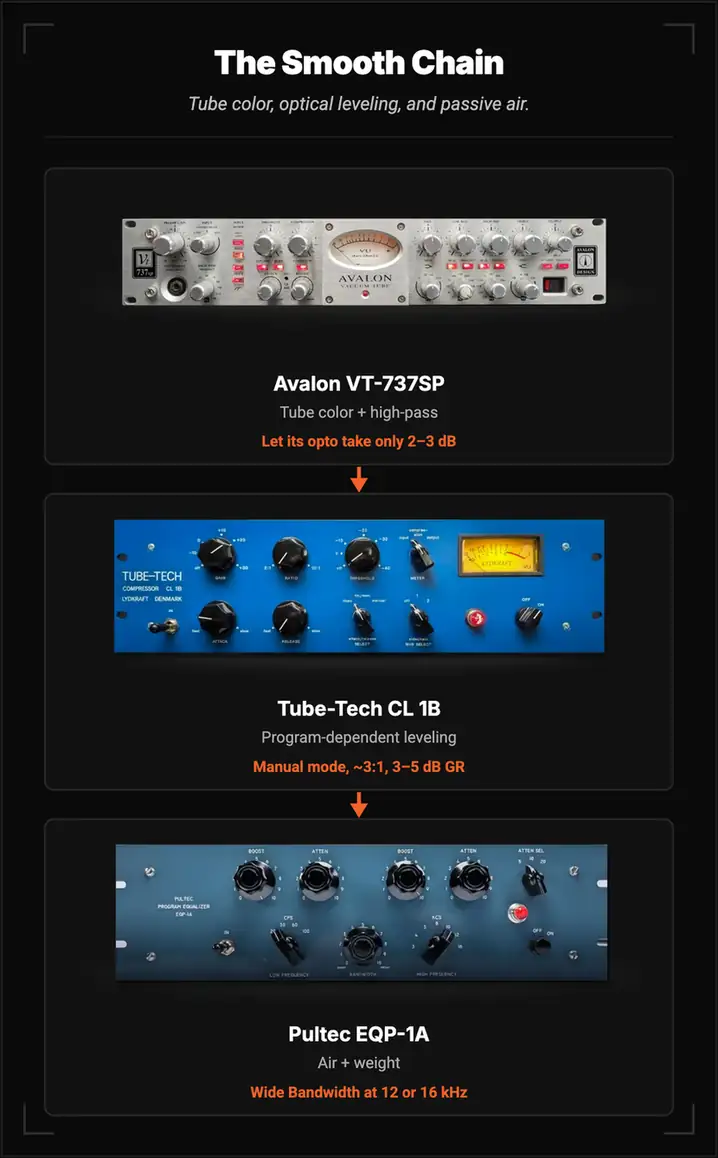
Avalon VT-737SP → Tube-Tech CL 1B → Pultec EQP-1A
For pop, R&B, and singer-songwriter material where the voice should sound composed and costly.
The 737SP runs two cascaded dual-triode tube stages, so it colors on the way through even at line level. Use its high-pass filter, let its optical compressor take only 2 to 3 dB, and leave the heavy lifting to the CL 1B in Manual mode at around 3:1 with 3 to 5 dB of gain reduction. Finish with the EQP-1A: a wide Bandwidth boost at 12 or 16 kHz for air, and the Boost/Atten pair at 100 Hz for weight without mud.
Two optical stages might look redundant. It is deliberate. This is staged gain reduction with two different sets of time constants, and it is the reason the result sounds leveled rather than compressed.
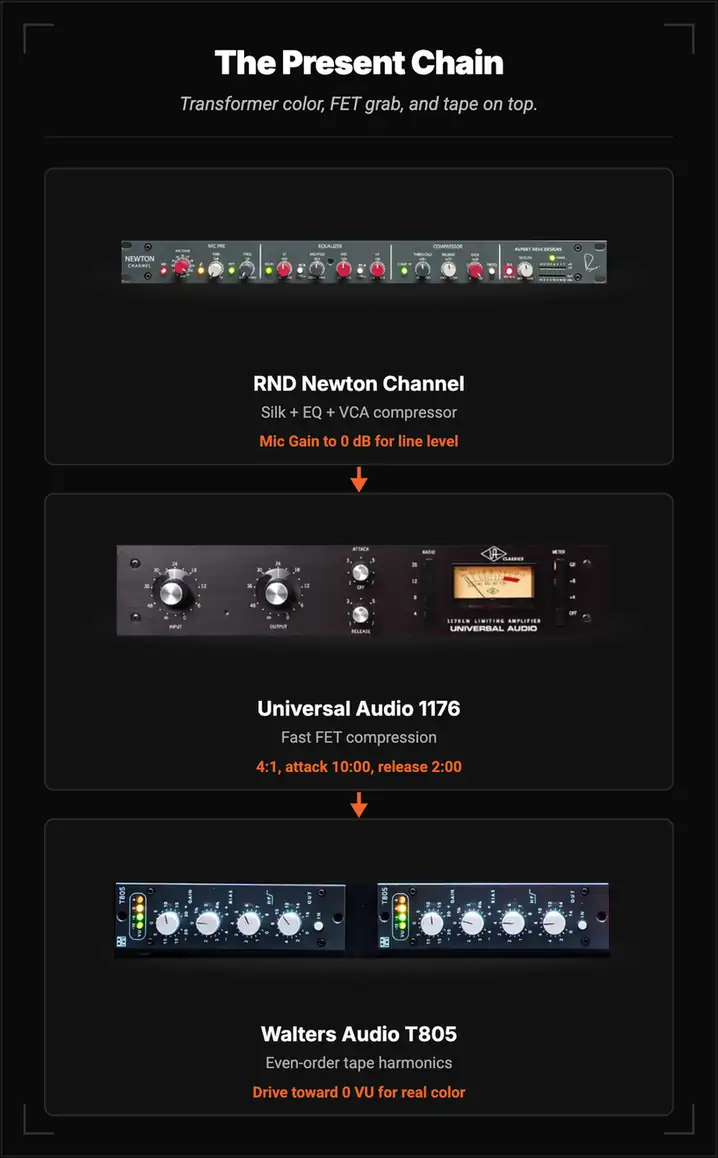
RND Newton Channel → UA 1176 → Walters Audio T805
For rock, hip-hop, and anything that has to cut through a dense arrangement.
Set the Newton Channel's Mic Gain to 0 dB for line input, high-pass to taste anywhere from 20 to 250 Hz, pull any honk with the midrange band between 220 Hz and 7 kHz, and dial in SILK for transformer harmonics. The PRE EQ switch puts that EQ ahead of the compressor if you would rather shape before you squeeze.
Then the UA 1176 does what only a FET can: attack from 20 to 800 microseconds, release from 50 to 1100 ms. Reviewing it for Sound On Sound, Hugh Robjohns called it unsurpassed as a vocal compressor, surprisingly transparent at 4:1 and equally happy with the raunchiest hard compression. Start at 4:1 with the classic "Dr. Pepper" positions, attack around 10 o'clock and release around 2 o'clock, for 3 to 6 dB of gain reduction. Remember that the 1176's attack and release knobs run backwards. Clockwise is faster. There is no threshold control either; the Input knob sets it.
The T805 lands last, rounding the FET's top end with even-order harmonics. Aim near 0 VU for real coloration.
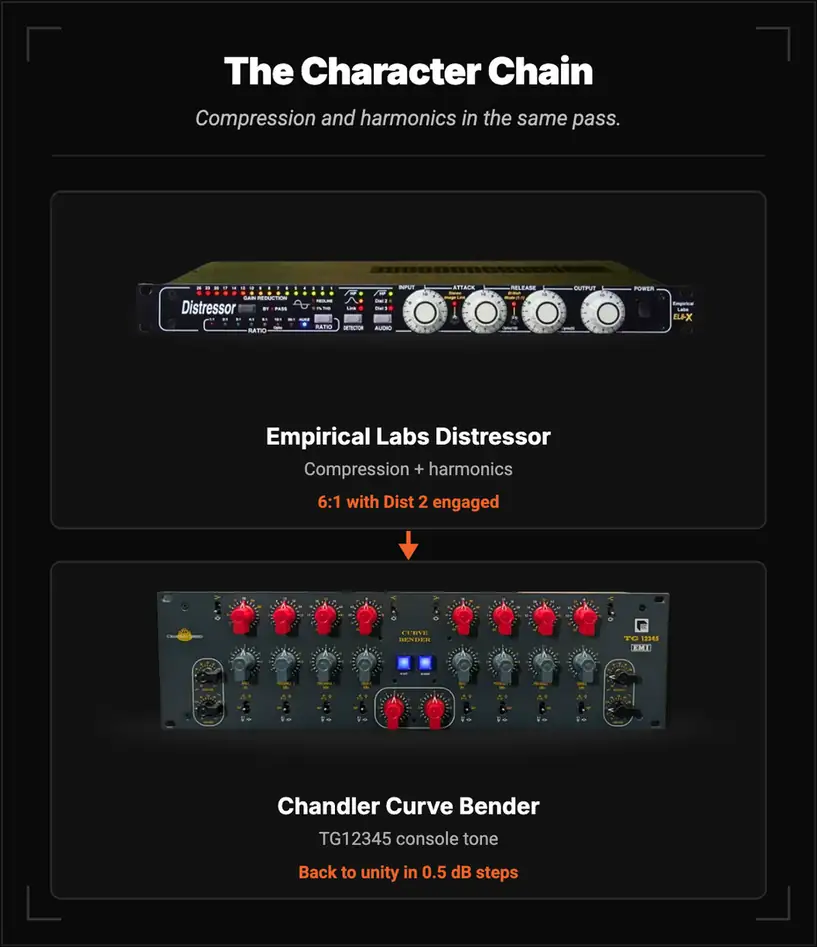
Empirical Labs Distressor → Chandler Curve Bender
For indie, alternative, ad-libs, and any vocal that should sound handled rather than polished.
The Empirical Labs Distressor manual is unusually direct about this: the 6:1 curve is "very useful for vocals," with an easy slope until the knee and then an increasing ratio that limits peaks musically. Add Dist 2 for emphasized 2nd harmonic, or Dist 3 for third-harmonic content that behaves more like tape. Watch the 1% and Redline (3%) indicators rather than the meter.
Then the Chandler Curve Bender, built on the EMI TG12345 circuit from the desk behind Abbey Road, for broad tonal shaping with genuine console character. Its stepped output gain adjusts in 0.5 dB increments, so you can return to unity precisely after boosting.
Two units, not three. The Distressor is already doing compression and harmonic generation in the same pass, and a longer chain would only dilute what makes this one work.
Chain length is not a virtue. Every stage should be answering a question you actually asked.
Seven of these ten steps are technique, and technique is free. The room, the mic choice, the level you set, the distance, the subtractive EQ, the sibilance, the reverb: none of it requires anything you do not already own.
Three are different. Program-dependent compression, a passive EQ whose makeup amplifier colors what it restores, and harmonic saturation from real transformers and real tubes are all built on component behavior that changes with level, temperature, and signal history. Modelling captures a great deal of it. What it captures less well is the accumulation, the way four mildly non-linear stages in series produce something none of them produce alone.
That is the gap. It is not the difference between a bad vocal and a good one. It is the difference between a good vocal and one that sounds like it was made somewhere expensive.
Run the chain on the real thing once, on your own voice, and you will stop wondering whether the difference is real.
How do I make my vocals sound professional?
Work in order. Control the room, choose a microphone that complements the voice rather than reinforcing its problems, set a sensible tracking level, cut what is wrong before boosting what is missing, then split compression across two stages instead of one. Most amateur vocals fail somewhere in the first four steps, not in the processing.
What is the best vocal chain?
There is no single answer, because the chain should follow the job. A smooth pop vocal wants a tube channel into an optical compressor into a passive EQ, such as the Avalon VT-737SP, Tube-Tech CL 1B, and Pultec EQP-1A. A vocal that has to cut wants a FET compressor and tape. A character vocal wants a Distressor and a console EQ. Match the topology to the outcome.
Is a condenser or a dynamic microphone better for vocals?
Neither is inherently better, and the common shorthand about clarity and warmth is misleading. Condensers have lighter diaphragms and track transients more closely; moving-coil dynamics respond more slowly and round consonants. What matters more than the category is where the microphone's presence peak sits relative to the frequencies the voice already has too much of.
Are the Tube-Tech CL 1B and LA-2A transparent or colored?
Both, depending on which sense of the word you mean. They are clear: they stay clean and controlled even under heavy gain reduction, without smearing or pumping, which is why they are studio staples for vocals. They are not neutral: both are optical, tube-based designs whose gain cells respond to program material and add harmonic content of their own. Choose them for compression that flatters. For gain control that leaves no fingerprint, a clean VCA or a digital limiter is the better fit.
How do I use real analog hardware if I do not own any?
Access Analog racks the hardware in a facility and gives you control of the actual units from inside your DAW, with settings recalled in your session. You can run a full vocal chain through real Avalon, Tube-Tech, Pultec, Universal Audio, and Rupert Neve Designs units by reserving time or using credits, and hear the difference on your own material before deciding whether it is worth owning.