Mix-Bus Glue Explained: Four Analog Routes to a Cohesive Mix (and the Hardware for Each)
You finish a mix and every part is in the right place. The balance works, the arrangement works, nothing is obviously wrong. And it still sounds like a stack of separate tracks instead of a record.
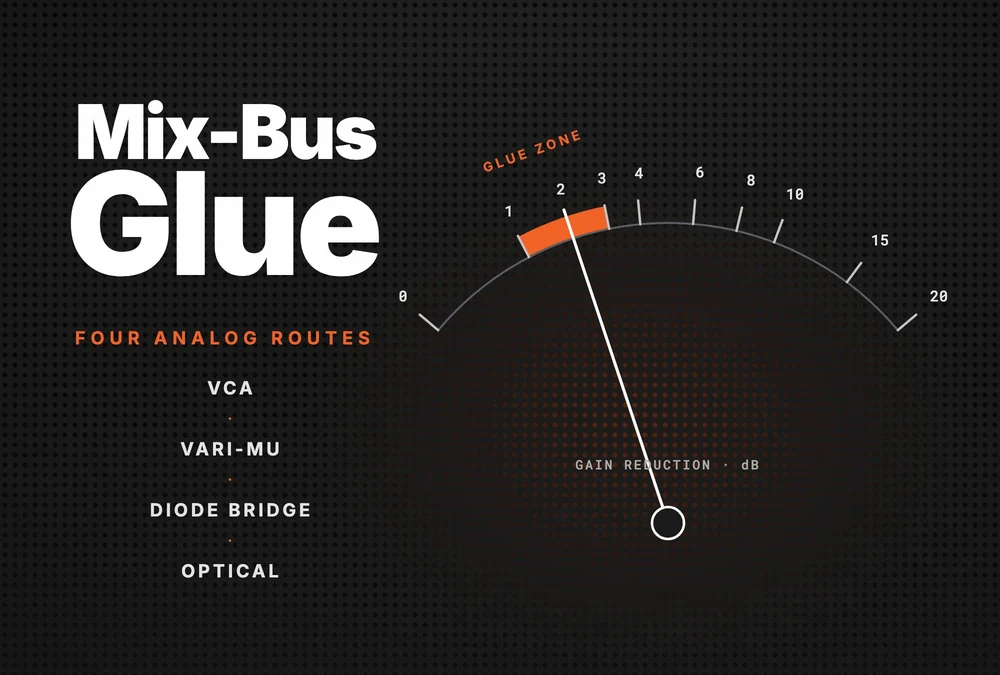
That last gap is what engineers call glue: a small amount of shared processing across the whole mix that makes the parts move as one. This guide covers what glue physically is, the four analog compressor families that produce it, what each one adds besides gain reduction, and the real bus hardware for every route on the Access Analog rack.
Key Takeaways
- Glue is usually 1 to 3 dB of shared gain reduction across the stereo bus. Every element rises and falls together, and the ear hears that as cohesion.
- Four analog circuit families get you there: VCA, vari-mu, diode bridge, and optical. They all reduce gain. What separates them is what else they do to the mix while they work.
- Two light stages often beat one heavy one. A color stage (transformers, tubes, saturation) plus a compressor, each doing a dB or two, is a common finishing move.
Glue isn't a special effect. It's a couple of dB of shared movement, and the circuit you choose decides what comes with it.
What Is Mix-Bus Glue?
Mix-bus glue is gentle compression applied to the whole stereo mix at once, so every element is turned down by the same small amount at the same moment, and the mix starts moving as one piece.
Before it reaches the bus, a mix is dozens of tracks with peaks landing at different moments. The snare cracks here, the bass note lands there, a vocal consonant spikes somewhere else. Each element is on its own schedule.
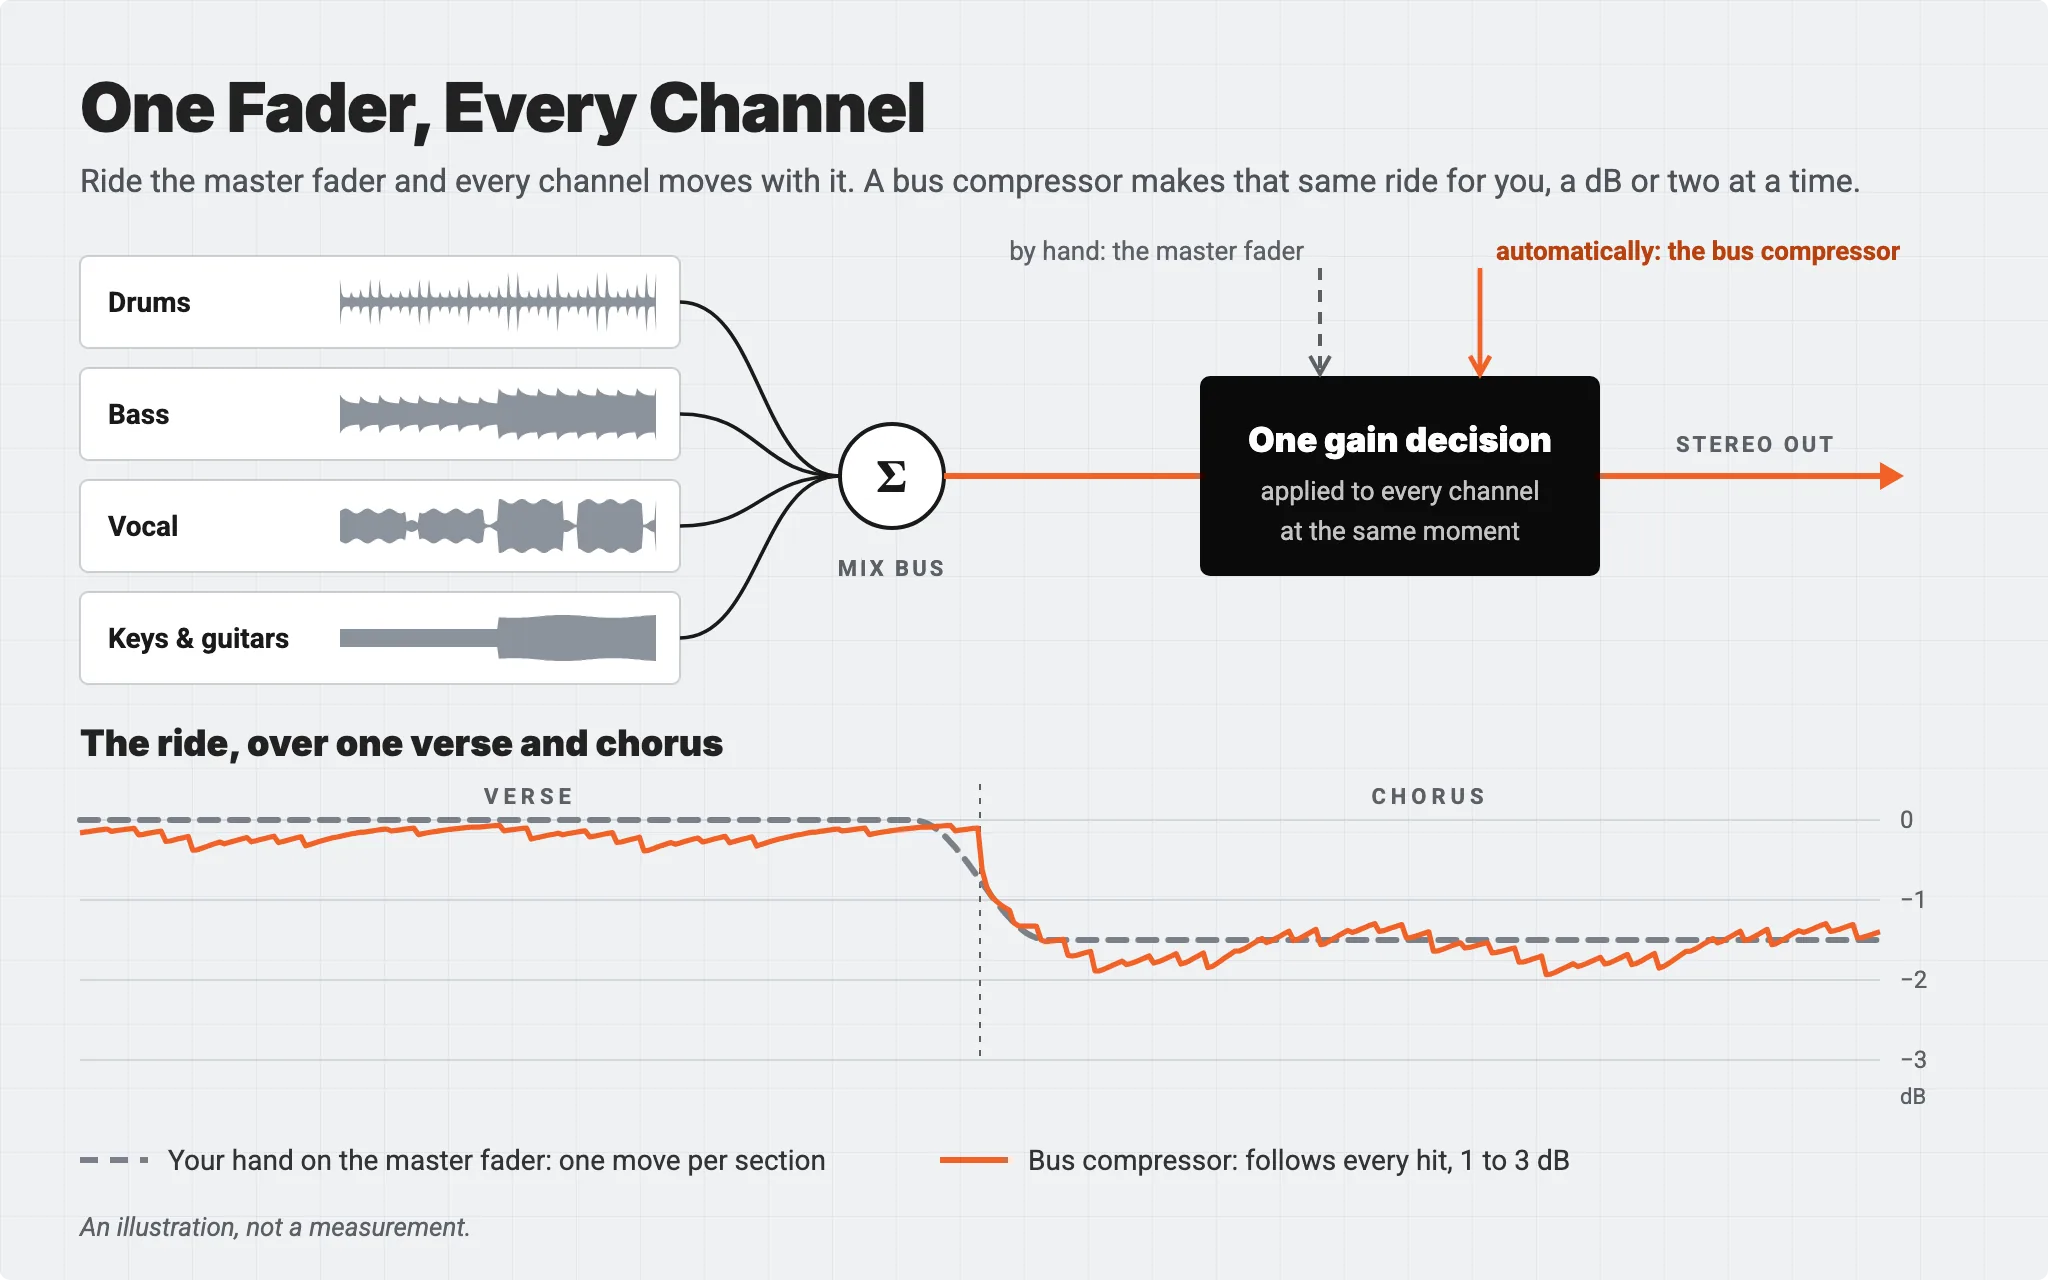
A bus compressor listens to the sum. When the whole mix gets louder, it pulls everything down a little. When the mix drops back, it lets everything come back up. Because one control signal moves every element together, the drums, bass, and vocal stop behaving like separate tracks and start breathing together.
If you've ever ridden the master fader through a song, you've made glue by hand. You ease it down a hair when the chorus lands and bring it back up for the verse, and every channel moves with it because there's only one fader. A bus compressor makes that same ride automatically, faster than any hand and a dB or two at a time: one shared gain decision, applied to everything.
The important word is gentle. Bobby Owsinski makes the point in The Mixing Engineer's Handbook: seasoned mixers use the bus compressor for glue, and that often means only a dB or two of gain reduction on the final mix. Push the same box to 8 or 10 dB and you get a different, audible effect (pumping, a smaller image, flattened transients). Sometimes that's the goal. It isn't glue.
One more thing up front: glue finishes a mix that's already balanced. It doesn't fix one that isn't. If the low end is fighting itself, a bus compressor will just compress the fight. For the full rundown on threshold, ratio, and metering, our ultimate guide to using a bus compressor covers the fundamentals. This guide is about choosing the circuit.
Mix Bus or Master Bus: Where Should Glue Happen?
Glue usually happens on the mix bus, while you're still balancing, and only lightly at mastering, where the engineer is working on a finished stereo file and can no longer move a fader.
The two terms get used interchangeably, but the jobs differ.
On the mix bus, the compressor is part of the mix. You hear it while you balance, so your fader moves account for what it's doing. Owsinski describes two schools: insert it at the start and mix into it, or add it near the end once the balances are mostly set, when it can work more gently because the individual tracks are already compressed. Either works. What matters is that the mix engineer can still fix whatever the compressor reveals.
On the master bus, at mastering, the mix is printed. The engineer can't turn the vocal down if the compressor makes it jump forward. So mastering glue tends to be lighter still: 1 to 2 dB on the loudest passages, often at a lower ratio, closer to leveling than compressing.
There's a practical reason to stay light at the mix stage too. Owsinski warns that a heavily compressed mix leaves the mastering engineer far less room to work. Glue on the mix bus, and leave headroom for the next stage.
What Are the Four Analog Routes to Glue?
Four analog circuit families produce bus glue: VCA, vari-mu, diode bridge, and optical. They differ in how the gain is reduced, and each leaves its own fingerprint on the mix.
Every compressor has a gain-reduction element and a detector that tells it how hard to work. Change the element and you change the timing, the knee, and the harmonic content that comes along with the gain reduction.
VCA (voltage-controlled amplifier). The detector produces a control voltage, and a VCA chip applies exactly that much gain reduction. VCA glue is precise and controlled. Attack and release are set by the detector circuit, not by the element, so you get repeatable, switchable timing and very little color from the gain element itself. This is the route most people picture when they hear "glue."
Vari-mu (variable gain tube). The tube that amplifies the signal is the same tube that reduces the gain. The side-chain changes the bias of a remote cut-off tube, and its gain falls smoothly as the bias increases. The ratio isn't fixed: it rises as gain reduction deepens. Vari-mu glue is smooth, round, and forgiving, which is why it so often sits at the end of a mastering chain.
Diode bridge. Four diodes in a bridge, biased by the side-chain so they act as a variable attenuator. The bridge throws away a lot of level, so it needs serious amplification around it, and Hugh Robjohns notes in Sound On Sound that the topology and its supporting amplifiers contribute density, weight, punch, and a forward midrange. Diode-bridge glue brings color and cohesion together. It descends from Neve's classic dynamics units.
Optical. A light source and a light-dependent resistor. The side-chain changes the brightness, and the photocell's lag gives a soft onset and a program-dependent release. Optical glue is gentle and musical, less clinical about envelopes, and it rarely draws attention to itself.
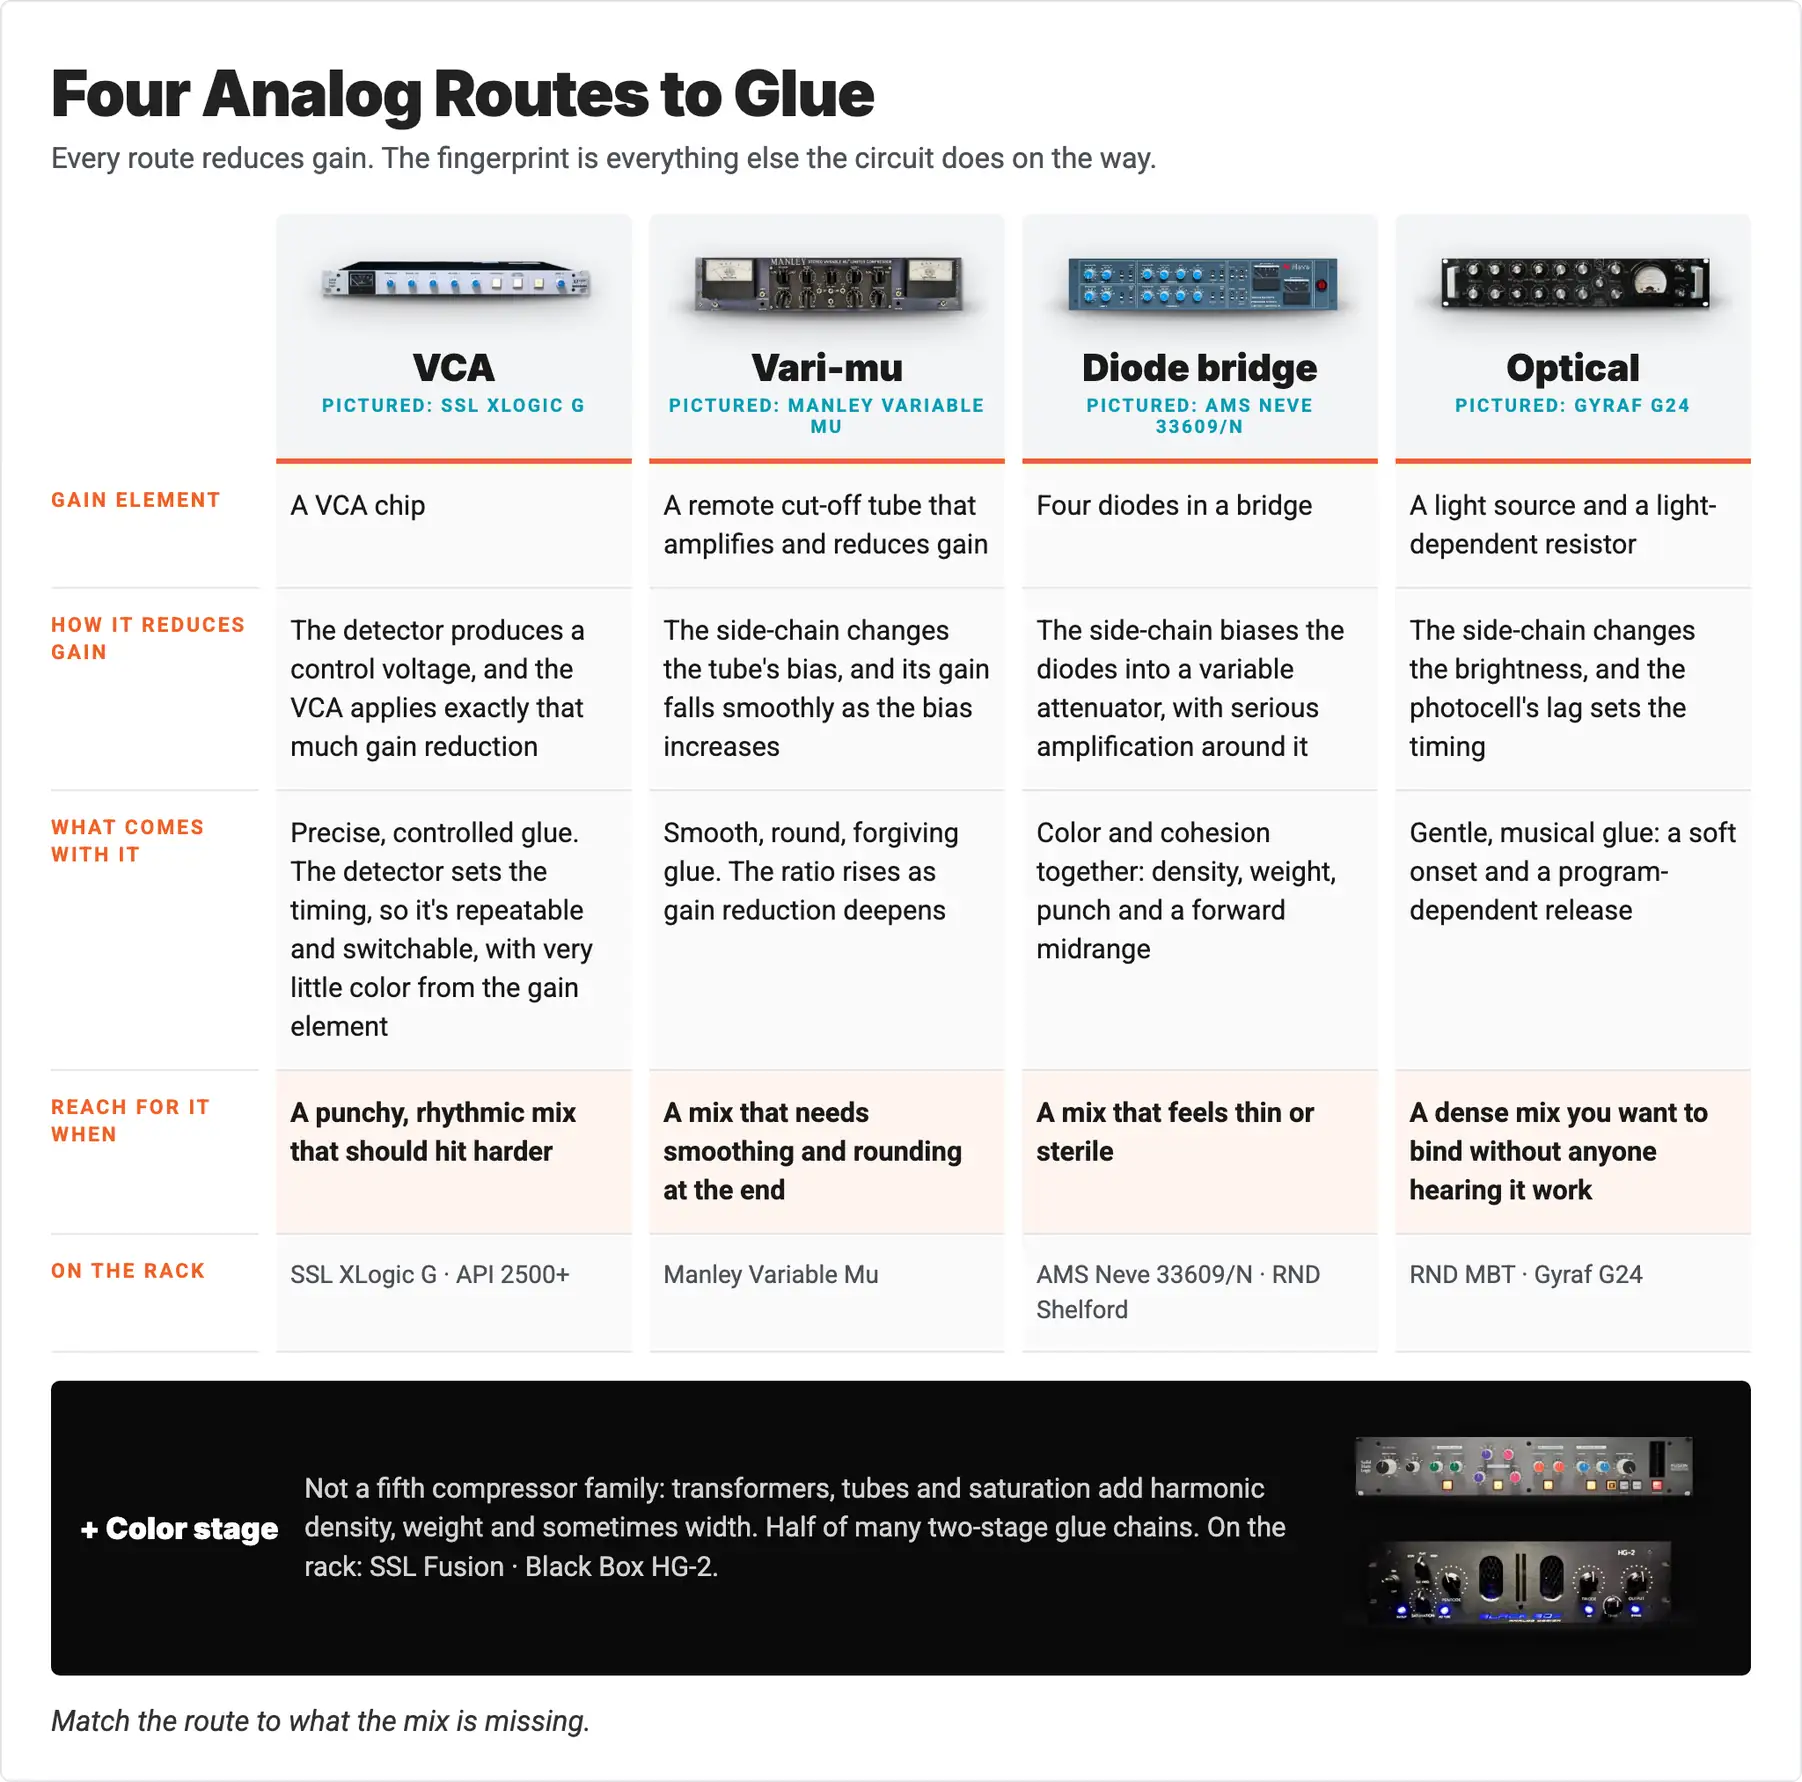
And the color stage. Some finishing boxes do their binding with transformers, tubes, and saturation rather than (or alongside) gain reduction. They add harmonic density, weight, and sometimes width. They aren't a fifth compressor family, but they're half of many two-stage glue chains, so they get their own place on the map below. For tape-style color in that role, see our guide to the Rupert Neve Designs 542.
How do you choose? Match the route to what the mix is missing:
- Punchy, rhythmic mix that should hit harder: VCA. The switchable slow attack keeps the front edge of every hit intact.
- Mix that needs smoothing and rounding at the end: vari-mu. The rising ratio flatters instead of grabbing.
- Mix that feels thin or sterile: diode bridge, or a color stage in front of a VCA. You get harmonic density along with the control.
- Dense mix you want to bind without anyone hearing it work: optical.
Every route reduces gain. The fingerprint is everything else the circuit does on the way.
Which Bus Processors on the Access Analog Rack Fit Each Route?
Access Analog racks real bus processors in all four compressor families plus the color stage.
Here are the defining boxes for each route.
The VCA Route
SSL XLogic G Compressor: the reference for VCA glue
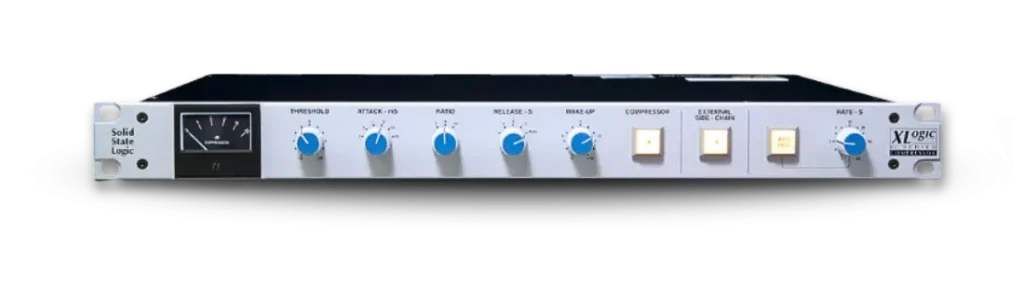
The stereo VCA bus compressor that defined "glue" on a generation of records, in a 1U rack unit.
The SSL G bus compressor began life in the center section of Solid State Logic's 4000-series consoles, and the XLogic G puts that circuit in a rack. The controls are deliberately few: three ratios (2:1, 4:1, 10:1), six attack steps from 0.1 to 30 ms, four release times plus the program-dependent Auto release that does most of the gluing. The classic mix-bus setting is 4:1 (or 2:1), 30 ms attack, Auto release, and 1 to 3 dB on the loudest sections. On Access Analog the Analog Matrix plugin adds a Mix slider the hardware doesn't have.
API 2500+: VCA glue with more punch and more options
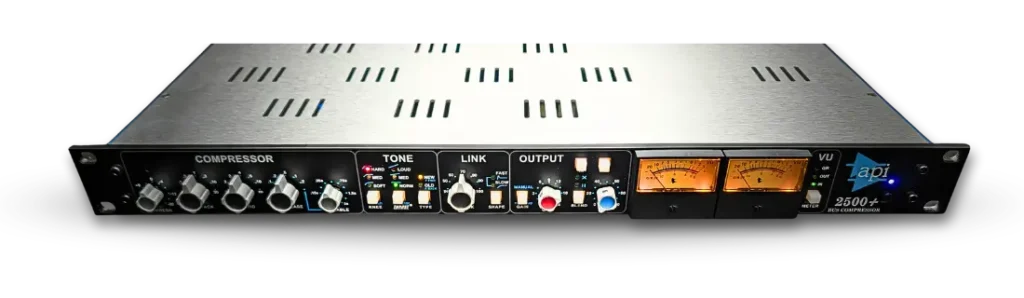
A stereo VCA bus compressor that lets you choose how the detector listens, and that choice is where its punch comes from.
The API 2500+ out-configures the SSL in every direction: seven ratios from 1.5:1 to ∞:1, attack from 0.03 to 30 ms, a switchable Type control (New is feed-forward and harder; Old is feedback and smoother), a variable knee, adjustable stereo link, and API's Thrust side-chain filter, which keeps the low end from driving the compressor. A common bus setting is 4:1, New, Thrust on Loud, release timed to the track. We put the two head to head in SSL G vs API 2500.
The Vari-Mu Route
Manley Variable Mu: smooth tube glue at the end of the chain
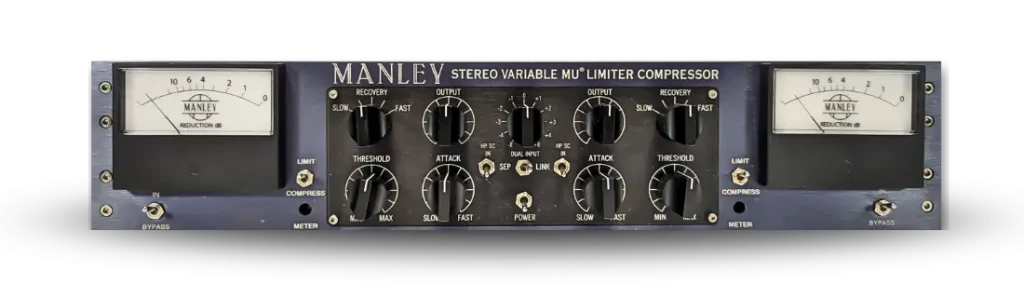
An all-tube, transformer-coupled stereo compressor with no ratio knob, because the tube's curve sets the ratio.
In Compress mode the Manley Variable Mu starts at a soft-knee 1.5:1. Limit mode starts around 4:1 and climbs toward 20:1 as gain reduction deepens. Attack runs from about 25 to 70 ms, and recovery is stepped (0.2, 0.4, 0.6, 4 and 8 seconds). For a bus or mastering pass, 1 to 3 dB of gain reduction, recovery at 0.6 s or slower, and attack around 50 ms is a strong starting point. Access Analog racks two: a v4 with Manley's T-Bar modification and a v9 with the high-pass side-chain filter.
The Diode-Bridge Route
AMS Neve 33609/N: the classic diode-bridge bus compressor
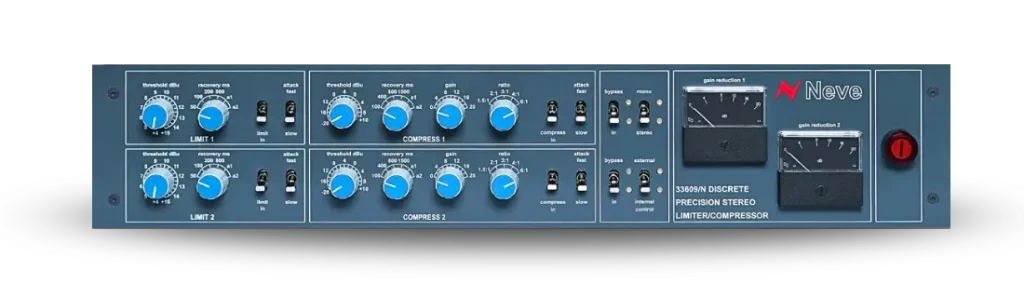
A stereo diode-bridge compressor-limiter, descended from the Neve 2254, that adds weight and density as it binds a mix.
The AMS Neve 33609/N runs one diode bridge per channel, shared by the compressor and limiter, with Marinair-spec transformers on the input, bridge driver, side-chain and output. Every control is stepped: ratio 1.5, 2, 3, 4 or 6:1 with a soft knee, recovery of 100, 400, 800 or 1500 ms, plus two auto-recovery settings. Attack is a switch: fast (about 3 ms) or slow (about 6 ms), and slow also adds a 100 Hz high-pass filter to the side-chain, which is exactly what a bus wants. For glue, start at 1.5:1 or 2:1 on the slow attack and aim for 1 to 3 dB.
Rupert Neve Designs Shelford Diode Bridge Compressor: modern diode-bridge color
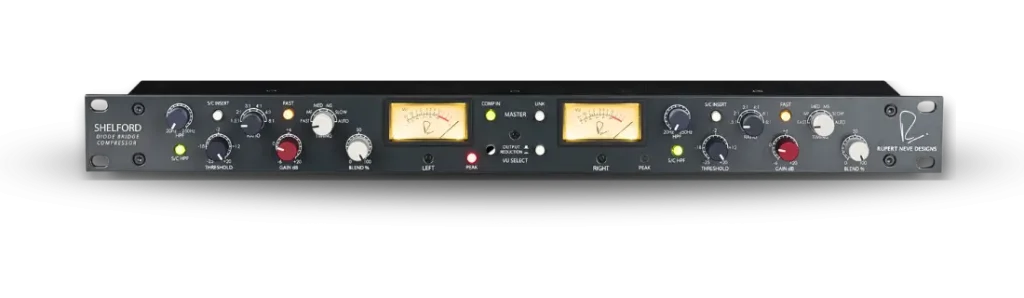
A two-channel diode-bridge compressor that keeps the classic density and adds the timing and blend control the vintage designs never had.
The Rupert Neve Designs Shelford Diode Bridge Compressor launched in 2020 as the 5254 and was renamed in 2024. It packages two channels of the compressor from RND's Shelford Channel with a soft knee, six ratios from 1.5:1 to 8:1, a six-position Timing switch whose Auto setting pairs a 5 to 40 ms attack with a two-stage release, a side-chain high-pass filter from 20 to 250 Hz, and a Blend control for parallel compression. Robjohns found in his Sound On Sound review that changing the ratio changes the timing and harmonic feel too, so audition by ear.
The Optical Route
Rupert Neve Designs Master Bus Transformer (MBT): optical glue with EQ, width, and Silk
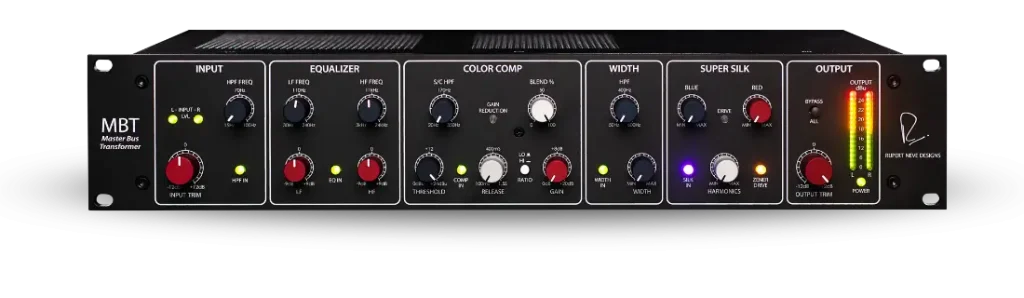
A stereo bus processor that combines an optical compressor with shelving EQ, a width control, and transformer saturation.
The Rupert Neve Designs MBT runs its sections in a fixed order: input high-pass filter, two-band shelving EQ, the Color Comp optical compressor, the Width processor, then Super Silk transformer saturation with optional Zener soft clipping. The compressor is a linked stereo opto with two ratios (2:1 and 5:1), release from 100 ms to 1.5 seconds, a side-chain high-pass filter, and a Blend control. In his Sound On Sound review, Bob Thomas used 2:1 for normal master-bus work and 5:1 when he wanted more weight.
Gyraf G24: passive-path optical glue for mastering
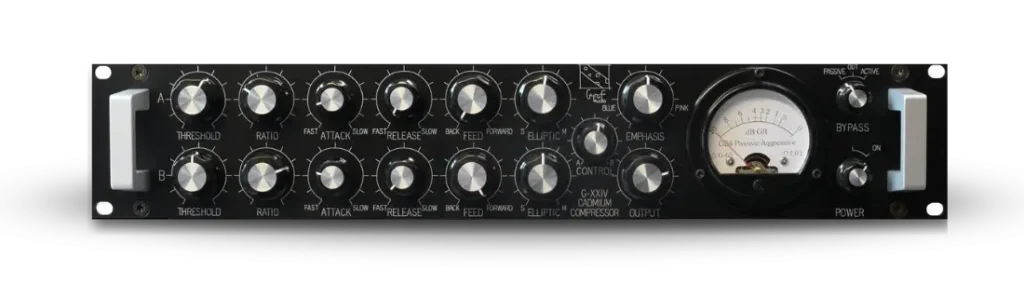
An optical stereo compressor whose audio path is almost entirely passive, built for mix-bus and mastering work.
The Gyraf G24 Passive/Aggressive Compressor reduces gain with cadmium-sulfide photocells. In passive mode the audio meets little more than a resistor, a transformer, an opto cell, and the output control. Internally it's two Mid/Side compressors in one, and a Feed control sets each anywhere from feed-forward to feedback, so one can ride the level slowly while the other catches transients. Hannes Bieger's Sound On Sound review found it capable of both subtle mastering moves and assertive compression.
The Color Stage
SSL Fusion: five color circuits, no bus compressor
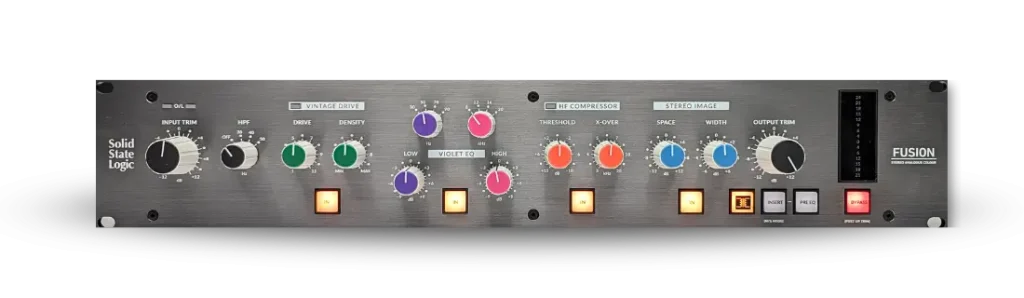
A stereo analog color processor for the mix bus: harmonic drive, EQ, high-frequency control, width, and a transformer stage.
The SSL Fusion has five circuits you can switch in independently: Vintage Drive (nonlinear harmonic density and soft compression), the Violet EQ shelves, an HF Compressor that controls only the top end above a set crossover, Stereo Image (Mid/Side, with Width moving the Side level by about ±6 dB), and a Transformer stage built around a pair of 600-ohm 1:1 transformers. It doesn't have a full-band bus compressor, which is why it pairs so well with one.
Black Box Analog Design HG-2: tube saturation as glue
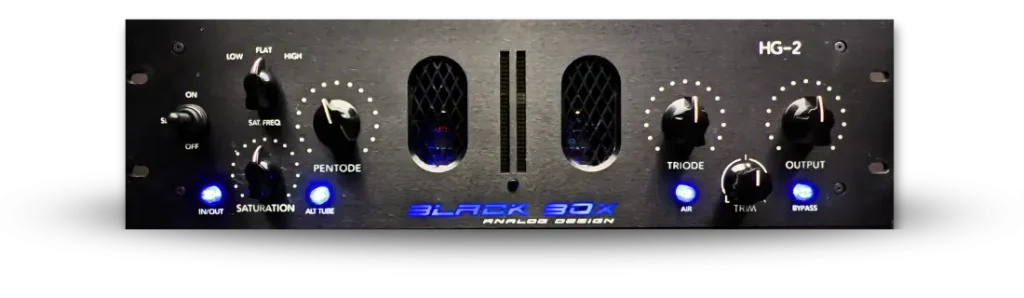
A stereo tube saturation processor that adds density and weight through two parallel tube paths.
The Black Box HG-2 splits the signal after its input transformer. The main path runs through a 6U8A tube's pentode and triode stages. A parallel 12AT7 saturation path, with a selectable low, flat or high band, blends back in ahead of the pentode. An Air switch adds a high-frequency lift from around 10 kHz. On a bus it works as a tonal stage, adding density and perceived loudness rather than doing the job of a limiter.
How Do You Set a Bus Compressor for Glue?
Aim for 1 to 3 dB of gain reduction, let the transients through, let the release follow the music, and judge the result level-matched.
The workflow is the same whichever route you pick.
Start with the mix already right. If you're reaching for the bus compressor to fix a balance problem, stop and fix the balance.
Set the threshold for a couple of dB. Bring it down slowly until the meter just kisses 1 to 3 dB on the loudest sections. That's the glue zone. If you need 6 or 8 dB before you feel anything, the mix probably wants attention, not more compression.
Protect the transients. Where the box offers it, a slower attack lets the front edge of the kick and snare through before gain reduction lands. On the SSL G and API 2500+ that's the 10 or 30 ms position. Not every classic goes that slow: the 33609/N's slow attack is about 6 ms, and the Elysia xmax's attack is fixed at 10 ms. Too fast and the mix goes soft and lifeless even when the meter looks polite.
Let the release follow the music. Where there's an Auto or program-dependent release (the SSL G's Auto, the Shelford's Auto timing, the 33609/N's auto-recovery), start there. It recovers quickly after short peaks and more slowly through sustained loud passages, so the compressor rides the song instead of pumping against it.
Level-match before you judge. Every time. The compressor pulls level down, so bring the make-up gain up until bypassed and engaged sound equally loud. Louder almost always sounds better in a quick A/B, so an unmatched comparison will fool you. Match it, toggle bypass, and ask one question: did the mix get more cohesive, or just louder?
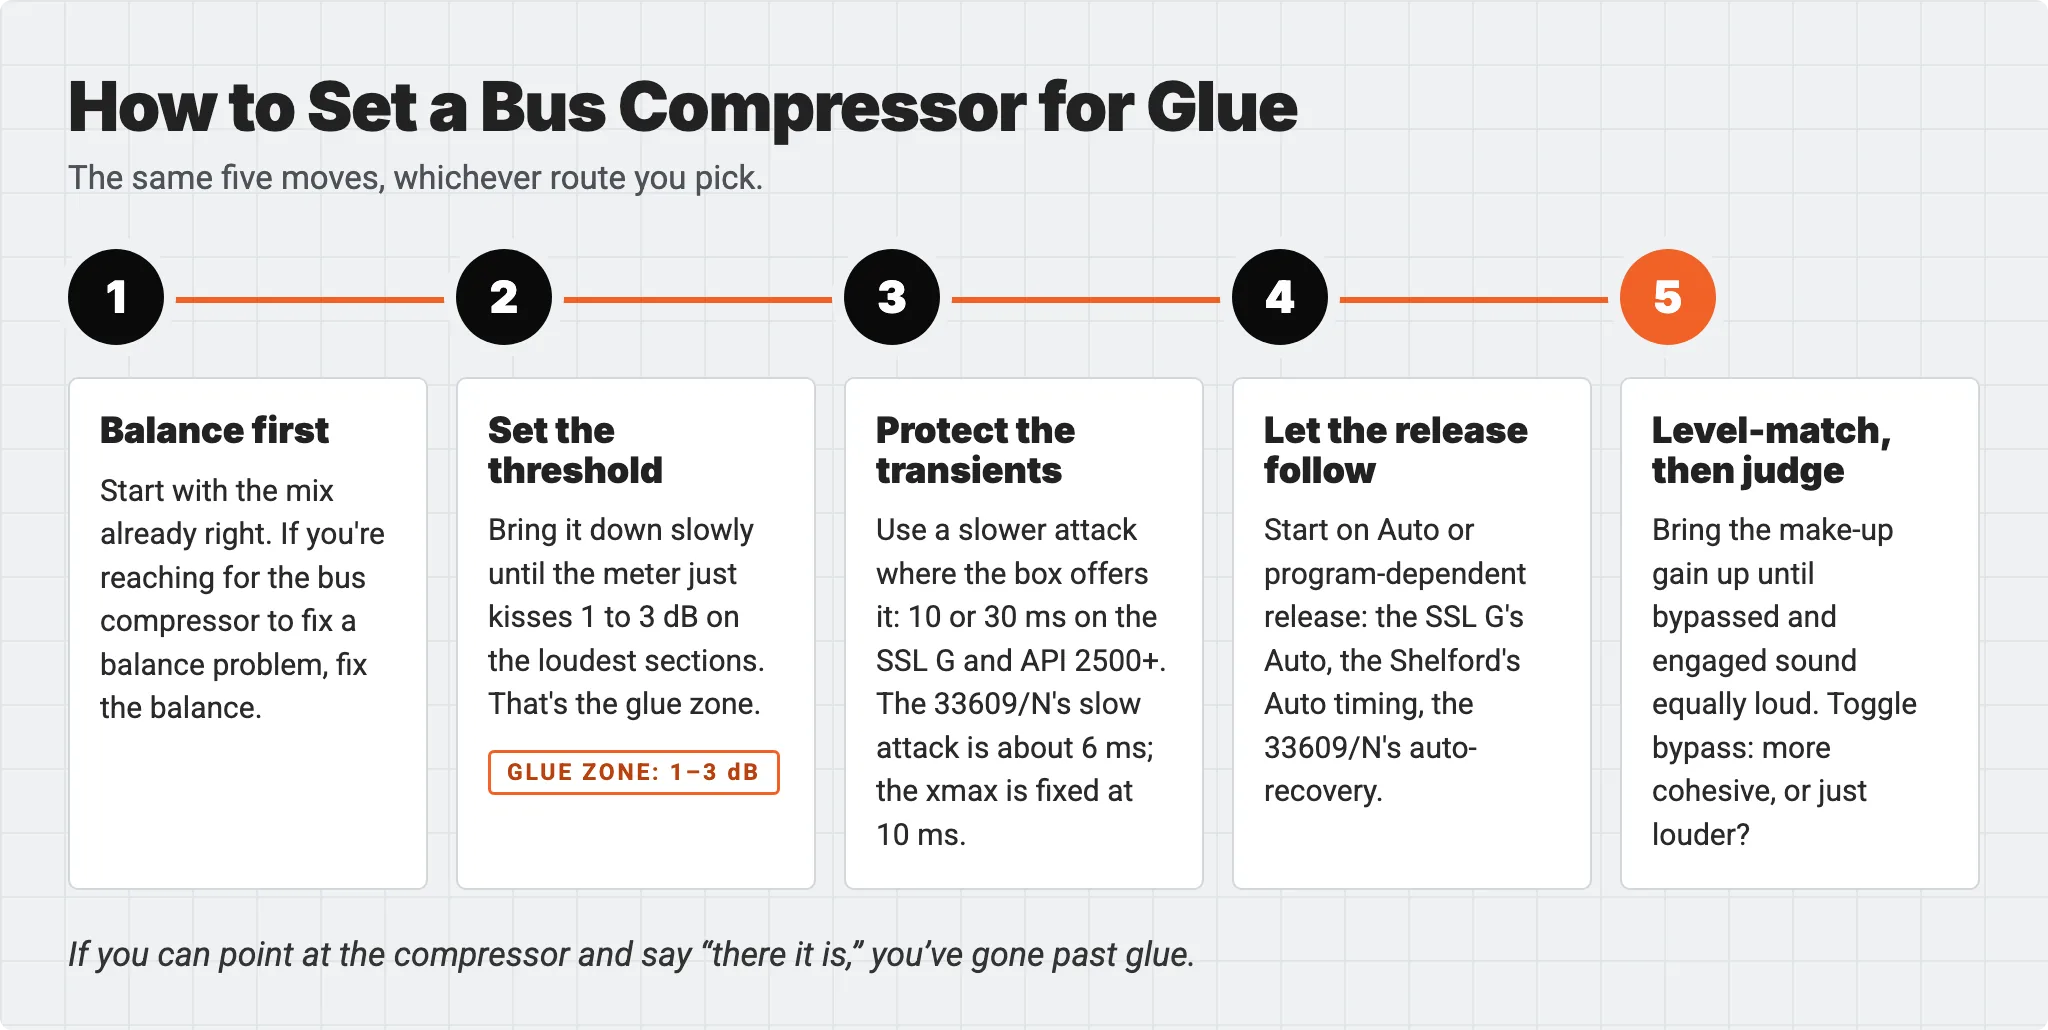
If you can point at the compressor and say "there it is," you've gone past glue.
Should You Use One Bus Processor or Two?
Two light stages usually beat one heavy one: a color stage or a gentle compressor for tone, then a second box for control, each doing a dB or two.
One compressor working at 5 dB is obvious. Two boxes each doing a dB or two, with different circuits, give you more cohesion and less audible compression. The order is a choice, not a rule: color before compression means the compressor reacts to the added harmonics, while compression before color means the saturation sees a steadier level. Try both.
Three two-stage glue chains to start from:
- Color into VCA. SSL Fusion with a little Vintage Drive and the Transformer stage in, into the SSL XLogic G at 4:1, 30 ms, Auto, for 1 to 2 dB. Density from the Fusion, punch and cohesion from the G.
- Diode bridge into vari-mu. RND Shelford at 2:1 on Auto timing, about 1 dB, into a Manley Variable Mu in Compress mode for another 1 to 2 dB. Weight from the diodes, rounding from the tubes.
- Tube color into optical. Black Box HG-2 for harmonic density, into the RND MBT's Color Comp at 2:1 with a slow release. The MBT's shelving EQ sits ahead of its compressor, so you can trim any low-mid build-up from the HG-2 before it drives the opto.
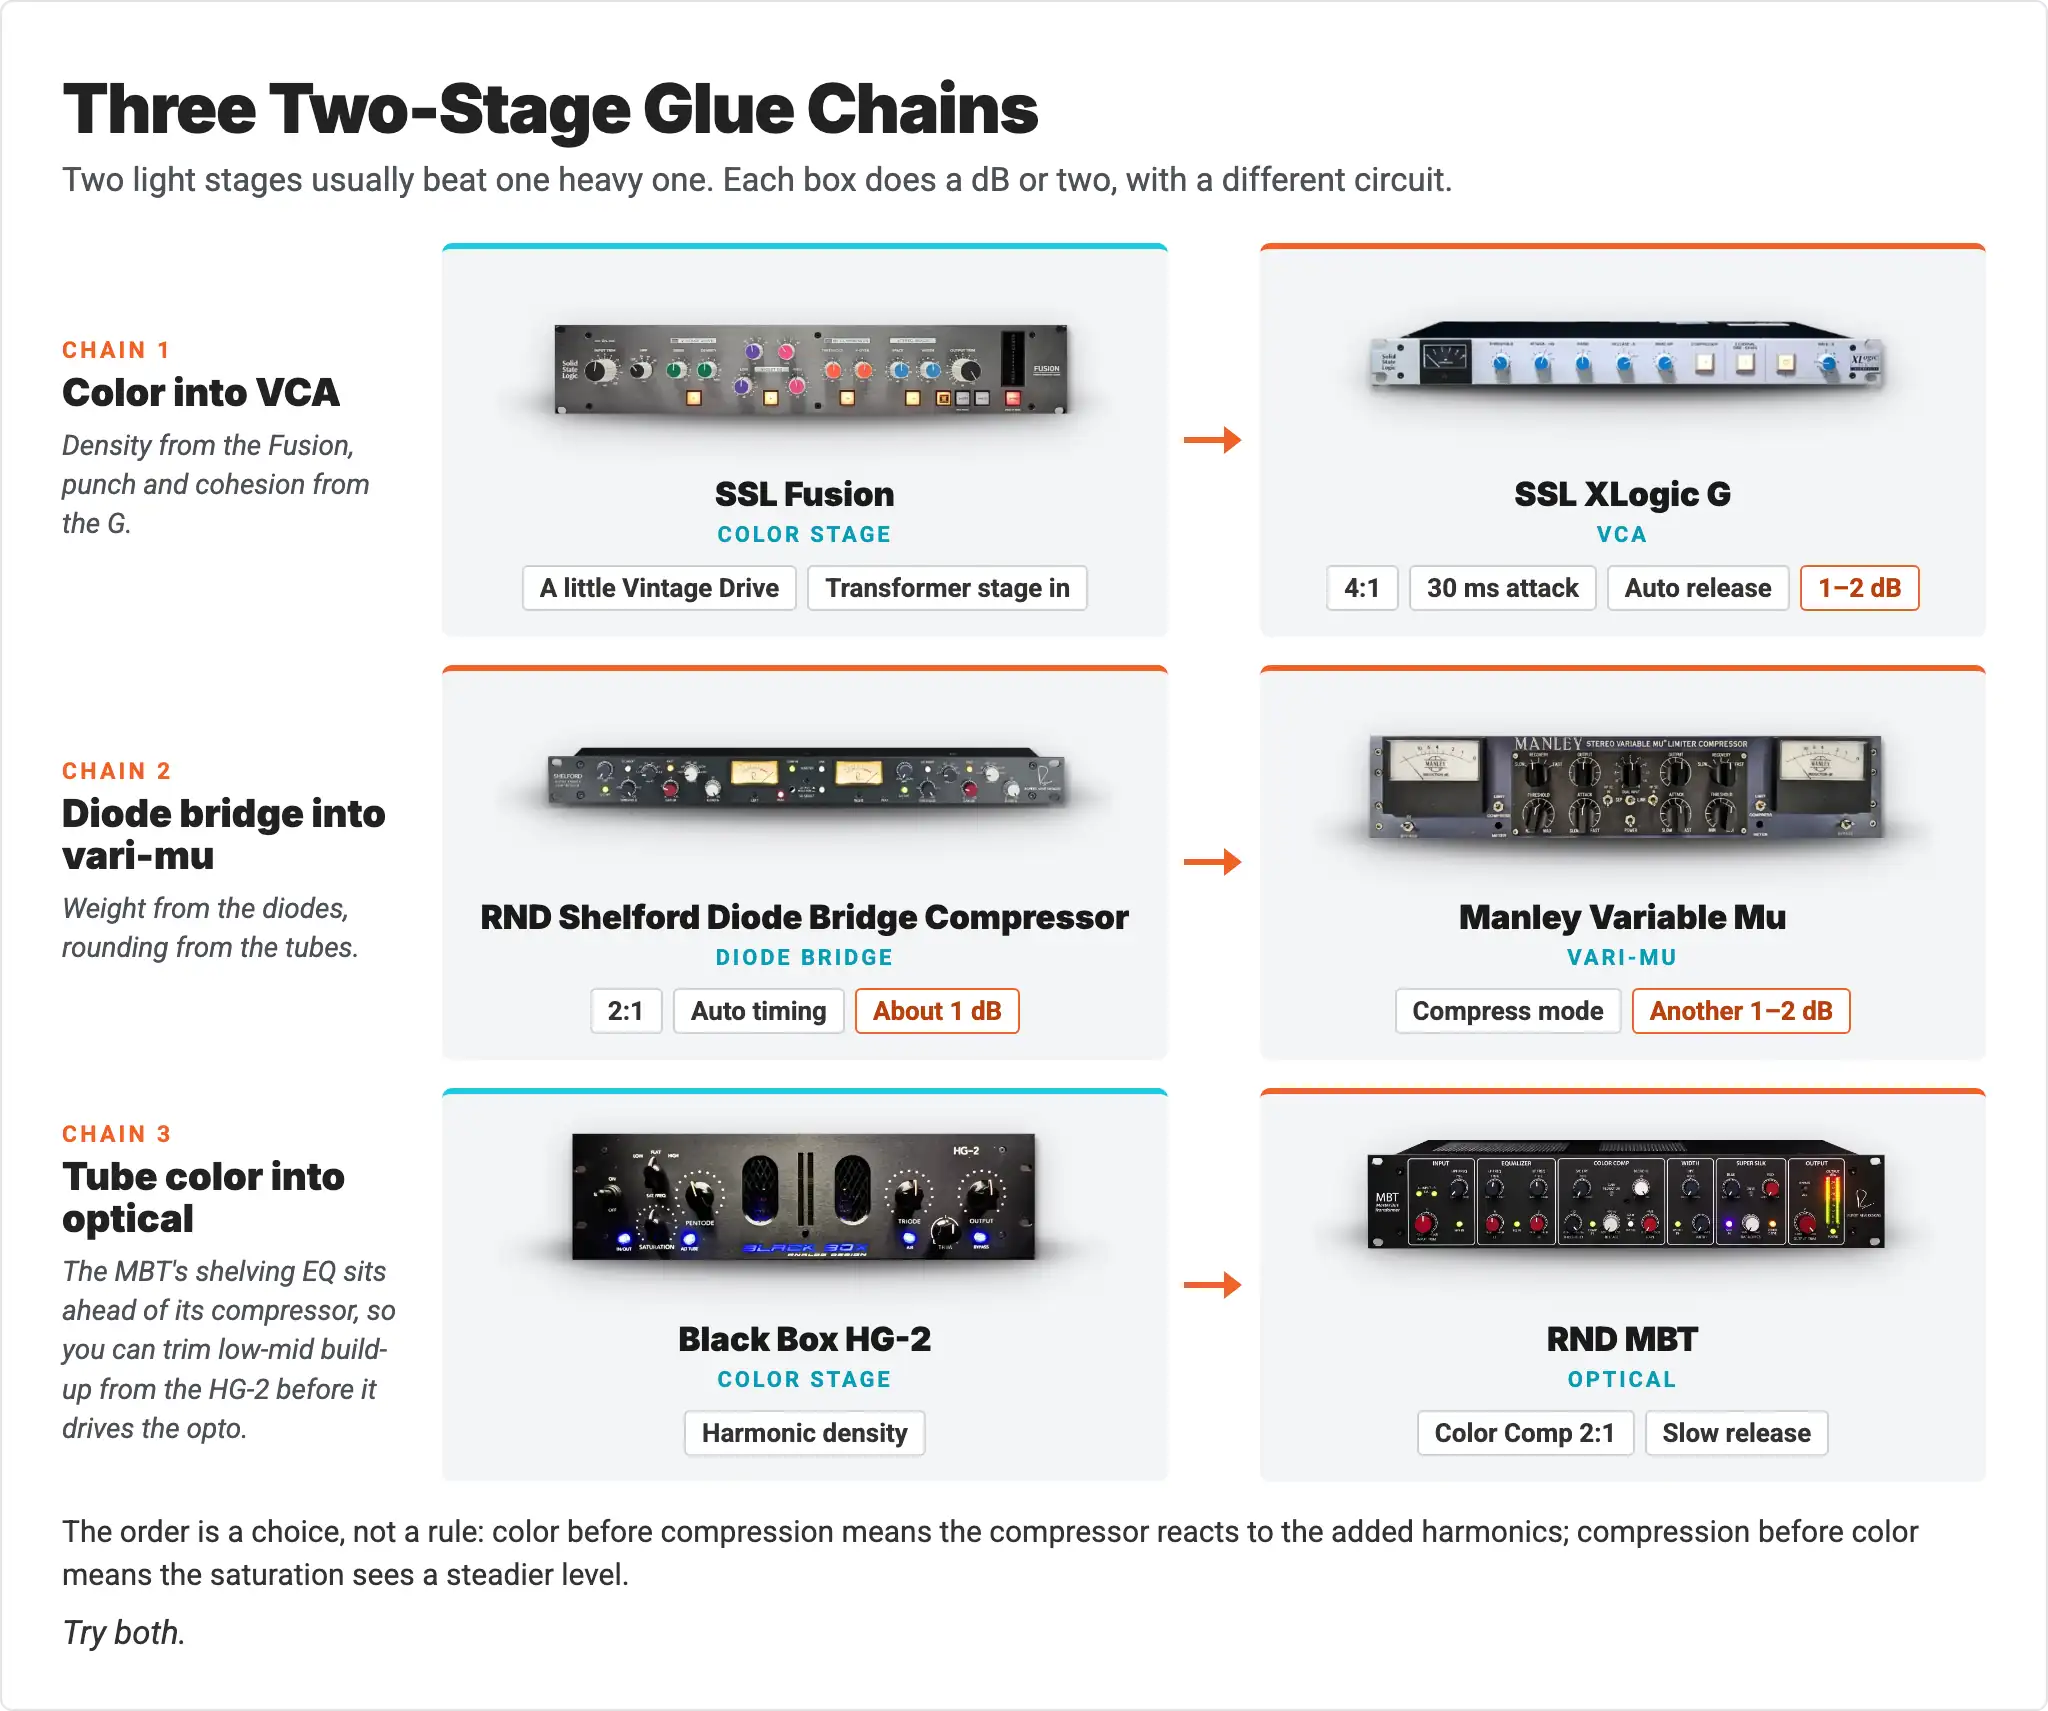
On Access Analog a two-stage chain is two devices in one Analog Matrix chain, so you need a subscription with a chain size of two or more, or reserve or use credits on both units.
Does a Plugin Give You the Same Glue?
The technique translates to plugins. The circuit doesn't.
Everything in the workflow above works on a good bus-compressor plugin, and many are excellent. Learn the moves on whatever you own. But a model of a VCA, a diode bridge, a remote cut-off tube, or a photocell is a model of how a circuit behaved, not the circuit. The interaction between the gain element, the transformers, and the amplifiers around it is where each route's fingerprint lives. We went through the honest trade-offs in Analog Hardware vs. Plugins.
How Can You Try Analog Glue Without Owning the Hardware?
Every route in this guide is real hardware on the Access Analog rack, controlled from your DAW through the Analog Matrix plugin, so you can audition all four on your own mix.
The Access Analog Subscription has three tiers, and there's a glue route at each one:
- Essential (from $14.98/month): VCA glue on the AudioScape Buss Compressor, Tegeler Creme, and Tegeler Magnetismus 2.
- Pro (from $20.98/month): adds vari-mu (Manley Variable Mu v4), diode bridge (RND Shelford), the Portico II Master Buss Processor, and the Elysia xmax.
- Elite (from $26.98/month): adds the SSL XLogic G, API 2500+, WesAudio ngBusComp, AMS Neve 33609/N, Variable Mu v9, the RND MBT, Gyraf G24, Manley ELOP+, SSL Fusion, and Black Box HG-2.
Compare the tiers on the Access Analog Subscription page. The Starter Credit Subscription ($9.98/month) is a cheaper way in. If you'd rather not subscribe, you can reserve any unit by the session or pay as you go with credits, and new accounts get 12 free credits to start. The AudioScape Buss Compressor is free to use, so VCA glue on real hardware costs you nothing to try.
Run the same mix through one box from each route, level-matched, and pick by ear rather than by reputation. Your settings save with your DAW session and the robotics restore them, so you can come back tomorrow and A/B again.
Four routes, one goal. Put your mix through the real circuits and let your ears pick the glue.
FAQs
What does "glue" mean in mixing?
Glue is the cohesion you get when gentle processing is applied to a whole mix at once, usually 1 to 3 dB of bus compression. Because one compressor turns every element down together, the parts rise and fall as a unit instead of independently, and the mix sounds like one record rather than a stack of tracks. Saturation and transformer stages can add to the effect by adding shared harmonic density.
How much gain reduction should a mix-bus compressor do?
For glue, 1 to 3 dB on the loudest sections is a common guideline, and many experienced mixers use only a dB or two. Mastering engineers working on a finished stereo file often stay at 1 to 2 dB. If you need much more than 3 dB to hear a difference, the mix balance usually needs work first.
What are the best attack and release settings for mix-bus glue?
A common starting point is a slow attack (10 to 30 ms on compressors that offer it, like the SSL G and API 2500+) so transients pass through, and an auto or program-dependent release so recovery follows the music. Some classic designs are faster: the AMS Neve 33609/N's slow attack is about 6 ms. Treat any setting as a starting point and judge it level-matched.
Which type of compressor is best for mix-bus glue?
There isn't one best type. VCA compressors such as the SSL G give precise, punchy glue. Vari-mu tube compressors such as the Manley Variable Mu round and smooth. Diode-bridge compressors such as the AMS Neve 33609/N add density and weight. Optical compressors such as the Rupert Neve Designs MBT bind a mix gently. Choose by what the mix is missing.
Should I compress the mix bus or leave it for mastering?
Most mix engineers put light compression on the mix bus and balance through it, because the compressor changes how the elements sit and only the mix engineer can still move faders. Keep it light (1 to 3 dB) so the mastering engineer has room to work. Heavy mix-bus compression limits what mastering can do.
Is mix-bus glue only compression?
No. Compression is the most common route, but transformer saturation, tube stages, and processors like the SSL Fusion or Black Box HG-2 add shared harmonic density that also helps a mix cohere. Many engineers pair a color stage with a compressor, each working lightly.
Can I use real analog bus compressors without buying them?
Yes. Access Analog racks real bus compressors and color processors, including the SSL XLogic G, Manley Variable Mu, AMS Neve 33609/N, and Rupert Neve Designs MBT, and you control them from your DAW with the Analog Matrix plugin. You can subscribe, reserve a unit, or use credits, and the AudioScape Buss Compressor is free to use.
Hear what real analog gear does to your own mix, before you buy a single piece of it.
Run real outboard hardware from your DAW. New accounts get 12 free credits.
Connect todayMore in Pro Tips
All posts →